Qnap Resource Monitor Not Working: Troubleshooting Tips
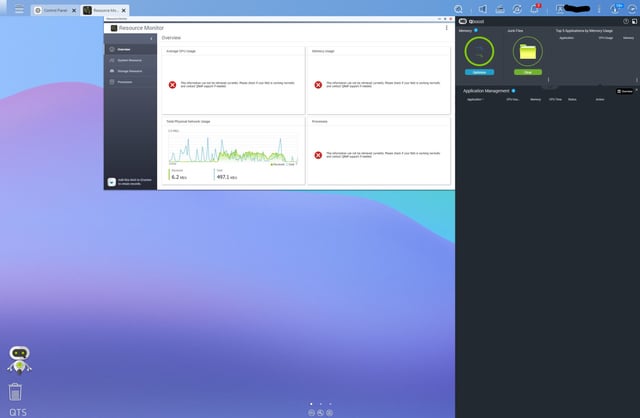
If your QNAP resource monitor is not working, you can monitor the status of your NAS by going to Control Panel > System > Resource Monitor. This feature provides information on hardware usage, including CPU usage, memory usage, network usage, and ongoing processes.
However, if you are experiencing issues after an update, you can try troubleshooting tips and solutions to resolve the problem. It’s important to ensure a stable internet connection and check if there are any power supply or LED issues with the NAS device.
If the problem persists, you can seek assistance on QNAP NAS community forums or contact QNAP support for further assistance.
Preliminary Checks For Nas Issues
If you are experiencing issues with the Qnap Resource Monitor not working, it is essential to perform some preliminary checks to identify and troubleshoot any potential problems. This will help you ensure the smooth functioning of your NAS and resolve any issues quickly. Below are some preliminary checks you can undertake to diagnose the problem:
Verify Network Connectivity And Power Supply Status
Before troubleshooting the Resource Monitor, it is crucial to verify the network connectivity and power supply status of your Qnap NAS. A stable and reliable network connection is essential for the proper functioning of the Resource Monitor. Make sure that your NAS is connected to a working network by checking the LED indicators on the device.
Check For Abnormal Led Indicators On The Nas
Abnormal LED indicators on your Qnap NAS can indicate potential issues with the device. Check the LED indicators and refer to the Qnap user manual to understand their meanings. If you notice any abnormal LED status, it may signify a problem that needs further investigation and troubleshooting.
Confirm If The Qnap Dashboard Is Accessible
To address the Resource Monitor not working issue, it is crucial to determine if you can access the Qnap dashboard successfully. The Qnap dashboard allows you to access various administrative settings, including the Resource Monitor. Ensure that you can log in to the Qnap dashboard without any issues and navigate to the Resource Monitor section.
By performing these preliminary checks, you can identify and address common NAS issues that may affect the functioning of the Resource Monitor. If you encounter any issues during these checks, refer to the Qnap user manual or seek assistance from the Qnap community forum for further troubleshooting steps.

Credit: www.qnap.com
Troubleshooting Tips For Resource Monitor
If you’re facing issues with your Qnap Resource Monitor not working, follow these troubleshooting tips to resolve the problem. Check for expired certificates, ensure you’re accessing the correct dashboard, and monitor hardware usage in the Control Panel. Seek help from Qnap’s advanced support or community forums if the problem persists after updates.
Having trouble with your Qnap Resource Monitor not working? Don’t worry, we have some troubleshooting tips that can help you get it up and running again. Follow these steps to diagnose and fix any issues:
Reboot The Nas Device For Resource Monitor Functionality
If your Qnap Resource Monitor is not working properly, a simple solution that often works is to reboot the NAS device. To do this, follow the steps below:
- Login to your Qnap’s web interface.
- Navigate to Control Panel and click on System Settings.
- Under System Settings, look for the “Restart” option and click on it.
- Wait for the NAS device to restart and then check if the Resource Monitor is working.
Update Qnap’s Firmware To The Latest Version
Another common reason why the Resource Monitor may not be working is because of outdated firmware. To update your Qnap’s firmware to the latest version, follow these steps:
- Login to your Qnap’s web interface.
- Navigate to Control Panel and click on System Settings.
- Under System Settings, look for the “Firmware Update” option and click on it.
- Check for any available firmware updates and follow the on-screen instructions to complete the update process.
- Once the update is finished, restart the NAS device and check if the Resource Monitor is now working.
Examine Qnap Logs For Error Messages Related To Resource Monitor
If the above troubleshooting tips didn’t solve the issue, it’s recommended to examine the Qnap logs for any error messages related to the Resource Monitor. Here’s how:
- Login to your Qnap’s web interface.
- Navigate to Control Panel and click on System Logs.
- Look for any error messages or warnings specifically related to the Resource Monitor.
- Note down the error codes or messages displayed.
- If you are unable to resolve the issue based on the error messages, consider contacting Qnap support for further assistance.
By following these troubleshooting tips, you should be able to fix the Resource Monitor on your Qnap NAS device and get it back to working normally. Remember to always keep your firmware updated to ensure smooth operation of all features and functionalities.
Pinpointing High Resource Consumption
In order to effectively manage the performance of your QNAP NAS, it is crucial to identify processes that consume a high amount of resources. By pinpointing resource-heavy processes, you can optimize the usage of CPU and memory, ensuring smooth operation and preventing any potential issues. Here are some methods to help you identify and address high resource consumption:
Use Alternative Tools To Identify Resource-heavy Processes
If QNAP Resource Monitor is not working properly, you can utilize alternative tools to gain insights into resource usage. Third-party applications like Sysstat, htop, or top provide detailed information about CPU and memory usage on your NAS. These tools allow you to monitor processes in real-time and identify any excessively consuming resources.
Check For Application-specific Cpu Or Memory Usage Issues
In some cases, high resource consumption might be specific to certain applications running on your QNAP NAS. To address this, you need to investigate and determine if any particular application is causing the issue. Here’s how:
- Access your NAS through SSH or the QNAP web interface
- Run the
topcommand to view the current processes and their resource usage - Identify any processes with abnormally high CPU or memory usage
- Investigate the identified processes further to determine if they belong to any specific application
- If you find an application that consistently consumes a significant amount of resources, you may need to optimize or update that application
By following these steps, you can effectively identify and address high resource consumption on your QNAP NAS. This will help optimize the performance of your system and ensure efficient utilization of CPU and memory resources.
Common Resource Monitor Error Messages
If you’re experiencing issues with your Qnap Resource Monitor not working, it could be related to common error messages such as “Resource Monitor Certificate Expired” or “Disk Usage not up to date. ” To troubleshoot this problem, you can monitor the status of your NAS in the Control Panel and check for any hardware usage or system resource issues.
However, it’s also important to consider network problems or power supply abnormalities as potential causes for connectivity problems with your QNAP NAS.
When it comes to monitoring the performance of your QNAP NAS, the Resource Monitor plays a crucial role. However, there are times when you might encounter some error messages that prevent the Resource Monitor from working as expected. Let’s take a look at some of the common error messages you might come across and how to address them.
Addressing ‘resource Monitor Certificate Expired’ Issue
If you see the error message “Resource Monitor Certificate Expired” on your QNAP NAS, it indicates that the security certificate used by the Resource Monitor has expired. This can prevent the Resource Monitor from functioning properly. To resolve this issue, you can follow these steps:
- Access your QNAP NAS control panel.
- Go to System and select Security.
- Under Security, click on Certificates.
- Locate the certificate related to the Resource Monitor and select it.
- Click on Renew to update the certificate.
By renewing the expired certificate, you should be able to fix the “Resource Monitor Certificate Expired” issue and restore the functionality of the Resource Monitor on your QNAP NAS.
Resolve Discrepancies In Disk Usage Reporting
Another common issue you may encounter with the Resource Monitor is discrepancies in disk usage reporting. It can be frustrating when the Resource Monitor does not accurately display the disk usage on your QNAP NAS. To address this issue, you can try the following troubleshooting steps:
- Restart your QNAP NAS to refresh the Resource Monitor.
- Ensure that you have the latest firmware installed on your QNAP NAS, as updates often include bug fixes for the Resource Monitor.
- Check for any incompatible or outdated apps that might interfere with the Resource Monitor’s disk usage reporting. Update or remove such apps accordingly.
- If the issue persists, you can try the “Disk Usage Refresh” option in the Resource Monitor settings to force a manual update of the disk usage data.
By following these steps, you should be able to resolve discrepancies in disk usage reporting and ensure the Resource Monitor accurately displays the disk usage on your QNAP NAS.
Fine-tuning Nas Configuration
The Qnap Resource Monitor is experiencing issues after an update, making it unavailable to monitor the status of your NAS. This can disrupt hardware usage and system resource information display. Troubleshooting tips and solutions are available to address the problem.
Adjust System Settings For Optimal Resource Monitoring
When it comes to monitoring the resources on your QNAP NAS, the Resource Monitor is an invaluable tool. However, sometimes you may encounter an issue where the Resource Monitor is not working as expected. In order to fine-tune your NAS configuration and ensure optimal resource monitoring, there are a few system settings that you can adjust.
Firstly, it is important to check your NAS’s firmware version and make sure that it is up to date. Outdated firmware can often cause compatibility issues and affect the performance of the Resource Monitor. If there is a newer version available, promptly update your NAS.
Another setting to consider is the network connection of your NAS. A slow or unstable internet connection can disrupt the communication between your NAS device and your device, resulting in the Resource Monitor not working properly. Make sure that your network connection is stable and perform a speed test to ensure that your internet connection meets the minimum requirements for efficient resource monitoring.
Furthermore, it is recommended to check the power supply and LED status of your NAS. Issues with the power supply or abnormal LED status can hinder the connection between your device and the NAS, resulting in the Resource Monitor not working as intended. Ensure that your NAS is receiving a consistent and stable power supply, and check for any abnormal LED indicators on the device. If you notice any issues, it is advisable to seek professional assistance to resolve the problem.
Explore Qnap Advanced Support Options For Resource Monitoring
If you have tried adjusting the system settings and the Resource Monitor is still not functioning correctly, Qnap offers advanced support options to help you troubleshoot and resolve the issue. The Qnap Advanced Support team is equipped with the knowledge and expertise to assist you in diagnosing and fixing any resource monitoring problems you may be experiencing.
To access advanced support for resource monitoring, navigate to the Qnap Advanced Support page. Here, you can find a wealth of resources, including support articles, troubleshooting guides, and frequently asked questions, to help you identify and resolve common issues related to the Resource Monitor.
If you are unable to find a solution on the Advanced Support page, you can also reach out to the Qnap support team directly. They can provide personalized assistance and guide you through the troubleshooting process. Whether it’s a technical glitch, a compatibility issue, or any other problem affecting the Resource Monitor, the Qnap support team is dedicated to helping you resolve it.
In conclusion, if you are facing issues with the Resource Monitor on your QNAP NAS, fine-tuning your NAS configuration and exploring Qnap’s advanced support options can help you resolve the problem and ensure optimal resource monitoring. By adjusting system settings and seeking assistance from Qnap’s support team, you can overcome any challenges and efficiently monitor the resources on your NAS.
Employing Advanced Solutions
When it comes to monitoring the performance of your Qnap NAS, dealing with issues like the resource monitor not working can be frustrating. Fortunately, there are advanced solutions that can help you overcome this problem and ensure that you have access to accurate and up-to-date information about your NAS’s hardware usage and system resources. In this article, we will explore two effective approaches to address the resource monitor not working issue on your Qnap NAS. These solutions include preserving performance monitor history on Qnap and utilizing third-party monitoring tools compatible with Qnap NAS.
Steps To Preserve Performance Monitor History On Qnap
If you’re experiencing issues with your Qnap NAS’s resource monitor, you can take steps to preserve the performance monitor history. This will ensure that you have access to historical data and trends that can provide valuable insights into your NAS’s performance over time. Here are the steps to follow:
- Login to your Qnap NAS’s admin interface.
- Go to Control Panel and then select System.
- Click on Resource Monitor to access the performance monitor settings.
- Under the Performance Monitor tab, locate the History section.
- Enable the “Preserve Performance Monitor History” option.
- Specify the duration for which you want to preserve the performance monitor history.
- Click Apply to save the changes.
Utilize Third-party Monitoring Tools Compatible With Qnap Nas
In addition to preserving the performance monitor history, you can also employ third-party monitoring tools that are compatible with Qnap NAS. These tools offer enhanced functionality and can provide comprehensive insights into your NAS’s performance and resource utilization. Here are some recommended third-party monitoring tools:
| Tool Name | Features |
|---|---|
| SolarWinds | CPU usage, disk usage, and bandwidth transfer statistics |
| NAS Compares | Application-specific CPU usage monitoring |
To utilize these third-party monitoring tools, follow these steps:
- Research and select a third-party monitoring tool that is compatible with your Qnap NAS.
- Download and install the monitoring tool on your NAS.
- Launch the monitoring tool and configure it to connect to your Qnap NAS.
- Access the monitoring tool’s interface to view and analyze the performance data of your NAS.
By employing these advanced solutions, you can overcome the resource monitor not working issue on your Qnap NAS and ensure that you have accurate and real-time information about your NAS’s performance and resource utilization.
Frequently Asked Questions On Qnap Resource Monitor Not Working
How Do I See Cpu Usage In Qnap?
To view CPU usage in QNAP, go to Control Panel > System > Resource Monitor. Here, you can see the CPU usage, memory usage, network usage, and ongoing processes on your NAS. It provides a general summary of your hardware usage and system resources.
How Do I Monitor Qnap?
To monitor your QNAP, go to Control Panel > System > Resource Monitor. Here you can check the status of your NAS, including CPU usage, memory usage, network usage, and ongoing processes. It provides valuable information and statistics about hardware usage and system resources.
Why Can’t I Connect To My Qnap Nas?
If you can’t connect to your QNAP NAS, it could be due to network problems or issues with the power supply. Slow or unstable internet connections can disrupt communication, and problems with the NAS’s power supply or abnormal LED status might hinder the connection.
Make sure to troubleshoot these issues for a solution.
How Do I Boot From Usb On Qnap?
To boot from USB on QNAP, follow these steps: 1. Connect the USB device to your QNAP NAS. 2. Access the QNAP NAS web interface. 3. Go to Control Panel > System > Boot Settings. 4. In Boot Settings, select the Boot Priority option.
5. Set the USB device as the first boot option. 6. Save the changes and restart your QNAP NAS. Note: Make sure your USB device is formatted correctly and contains the necessary bootable files.
Conclusion
The Qnap Resource Monitor is an essential tool for monitoring the status of your NAS. However, it can be frustrating when it stops working properly. Whether it’s due to an expired certificate, disk usage not being up to date, or other technical issues, it’s important to troubleshoot and find solutions.
Remember to check for network problems, power supply issues, or abnormal LED status as they may hinder the connection. By following troubleshooting tips and solutions, you can ensure that your Qnap Resource Monitor functions smoothly and provides accurate information about hardware usage and system resources.