Renogy Battery Monitor: Troubleshooting No Charge Display
If your Renogy battery monitor is not showing any charge, start by checking if the positive terminal is properly connected to the charger and inverter input. Additionally, ensure that the batteries are not in absorption or float mode, as this may cause the monitor to display a discharge rate even when the batteries are full.
Calibrate the monitor by setting a reference limit to accurately monitor the battery’s charge level. Restarting the monitor or checking the circuit board may also help resolve any issues. For more specific troubleshooting steps, consult the Renogy battery monitor manual or seek assistance from the manufacturer’s support team.
Understanding No Charge Display
To troubleshoot the issue of the Renogy battery monitor not showing charge, start by checking the battery’s positive terminal and its connections to the charger and inverter input. It’s important to ensure that the batteries are not in absorption or float mode, as this can cause the monitor to display a discharge rate instead of charge.
Additionally, set a reference limit on the battery monitor and calibrate it accordingly to accurately monitor the battery’s charge level.
Explanation Of The “no Charge Display” Issue
The “No Charge Display” is a common issue that users of the Renogy Battery Monitor may encounter. It refers to the situation where the monitor fails to show any charge occurring in the battery, even when it is receiving power from the charger or other power sources. Understanding this issue is crucial to ensure accurate battery health monitoring and effective troubleshooting.
Common Scenarios When ‘no Charge’ Might Appear
There are several scenarios in which the Renogy Battery Monitor may display the “No Charge” status. These scenarios include:
- The battery’s positive terminal is not properly connected to the charger or inverter input.
- The batteries are already fully charged or in absorption or float mode, causing the charger to reduce its current output.
- The charger is not recognizing the battery due to low voltage or other faults.
These situations can often be resolved by checking the connections, verifying the battery’s charge status, or troubleshooting the charger.
Importance Of Accurate Display For Battery Health Monitoring
Accurate display of the battery’s charge status is crucial for effective monitoring of its health. By accurately tracking the charge, users can identify any issues with the battery or charging system promptly and take necessary actions to prevent potential damage or performance degradation.
Monitoring the battery’s charge not only helps ensure its longevity but also maximizes the efficiency of the solar power system. With an accurate display, users can optimize their power usage and avoid overcharging or undercharging the battery.
It is essential to address the “No Charge Display” issue promptly to ensure the reliability and longevity of the battery, as well as the overall performance of the solar power system.
Diagnosing The Monitor’s Problem
If you’re experiencing the issue of your Renogy Battery Monitor not showing charge, start by checking the connection between the battery’s positive terminal and the charger or inverter input. Additionally, ensure that the batteries are not already fully charged or in a float state, as this may cause the monitor to not display any charge.
Initial Checks For Renogy Battery Monitor Setup
When your Renogy Battery Monitor is not showing the charge, there could be several factors at play. To start diagnosing the problem, it’s important to first perform some initial checks for the monitor’s setup. Ensure that the monitor is properly connected and powered on. Check if there are any loose connections or cables. Verify that the battery and charger are correctly connected to the monitor. These initial checks can help identify any setup issues that may be causing the monitor’s failure to show the charge.Inspecting Cable Connections And Battery Terminals
Next, it’s crucial to inspect the cable connections and battery terminals. Look for any loose or damaged cables that may be affecting the monitor’s functionality. Make sure that the cables are securely connected to the battery terminals and the charger or inverter input. Loose connections can disrupt the flow of electricity and cause the monitor to not display the charge accurately. By inspecting and ensuring proper cable connections, you can eliminate any potential issues arising from faulty wiring.Evaluating The Battery’s State Of Charge And Health
Another important step in diagnosing the monitor’s problem is to evaluate the battery’s state of charge and health. Check the battery to see if it is fully charged or if it is experiencing any issues. Use a voltmeter to measure the battery’s voltage and compare it to the manufacturer’s specifications. A low voltage reading may indicate a discharged or faulty battery. Additionally, assess the battery’s health by examining its physical condition and checking for any signs of damage or corrosion. A damaged battery can impact the monitor’s ability to accurately display the charge. Taking these steps to evaluate the battery’s state of charge and health can provide valuable insights into the root cause of the monitor’s problem. By systematically performing these diagnostic steps, you can identify the underlying issues that may be preventing your Renogy Battery Monitor from showing the charge. Thoroughly examine the monitor’s setup, inspect cable connections and battery terminals, and assess the battery’s charge and health. By doing so, you’ll be well on your way to resolving the issue and ensuring that your battery monitor functions properly.Troubleshooting No Charge Display
Troubleshooting the Renogy battery monitor not showing charge? Start by inspecting the battery’s positive terminal and ensure it’s properly connected. If the monitor doesn’t turn on, check the charger and inverter input.
Step-by-step Guide To Address The ‘no Charge’ Issue
When your Renogy Battery Monitor fails to display any charge, it can be frustrating and concerning. However, there are several troubleshooting steps you can take to resolve this issue and ensure that your battery monitor accurately reflects the charging status of your batteries.
- Start by checking the battery’s positive terminal connection. Confirm that it is securely connected to the charger and the inverter input. Loose or incorrect connections can prevent the battery monitor from displaying the charge correctly.
- Inspect the battery cables for any signs of damage or corrosion. Faulty or damaged cables can disrupt the charging process and lead to inaccurate readings on the battery monitor.
- If the battery monitor is not turning on at all, check the battery voltage to ensure it is above the charger’s minimum level. If the voltage is too low, the charger may not recognize the battery hookup and fail to pass current.
- Check the charger for any fault modes indicated by continuous flashing lights. Faulty chargers may not properly recognize the battery and, consequently, fail to charge it.
- Verify that the fuse in your charger is intact. A blown fuse can disrupt the charging process and prevent the battery monitor from accurately displaying the charge status.
- If you’ve confirmed all the above steps and the ‘No Charge’ issue persists, it may be worth considering the condition of your batteries. Bad or worn-out batteries can prevent the charger from effectively delivering charge and consequently impact the display on the battery monitor.
How To Reset The Renogy Battery Monitor Correctly
Resetting the Renogy Battery Monitor can often resolve issues with incorrect charge display. Follow these steps to reset the monitor:
- Start by turning off the battery monitor and disconnecting it from any power source.
- Locate the reset button or pinhole on the monitor. It is usually labeled ‘RESET’ or indicated with an arrow.
- Using a slender object such as a paperclip or a pen, press and hold the reset button for at least 10 seconds.
- Release the button and wait for the monitor to power back on.
- Once the monitor has fully restarted, observe if the charge display returns to normal. If not, you may need to perform additional troubleshooting steps or consider contacting Renogy support for further assistance.
Adjusting Settings For Accurate Charge Display
In some cases, the Renogy Battery Monitor may require adjustments to its settings to ensure an accurate charge display. Here are some steps you can take:
- Set a reference limit for the battery monitor. Fully charge your battery bank and inform the Renogy unit about this charge level.
- Ensure that the positive and negative bus bars are not too close to each other, as this proximity can cause interference and affect the accuracy of the charge display.
- Calibrate the battery monitor with the specific type of battery you are using, especially if you have a lithium battery. Refer to the Renogy user manual or consult online resources for the correct calibration process.
- If the battery monitor continues to show negative draw while connected to shore power, consider adjusting the settings or reaching out to Renogy support for assistance.
Charging System Checks
When your Renogy battery monitor is not displaying the charge, it can be frustrating and leave you questioning the effectiveness of your charging system. To ensure optimal charging performance, it is important to conduct a series of checks on various components of your system. By assessing solar panel connections and sunlight exposure, inspecting charge controllers and DC to DC chargers, and following some helpful tips, you can troubleshoot the issue and ensure effective charging in different conditions.
Assessing Solar Panel Connections And Sunlight Exposure
One of the first checks you should perform is to assess your solar panel connections and the exposure they receive to sunlight. Here are some steps you can take to troubleshoot the issue:
- Inspect the connections between the solar panels and the battery monitor. Ensure they are securely attached and free from any damage.
- Check for any loose or corroded connectors. Clean them if necessary and make sure they are tightly connected.
- Verify that your solar panels are receiving adequate sunlight exposure. Remove any obstructions that may be blocking the panels from direct sunlight.
- Consider the positioning of your solar panels. Adjust their angle or direction if needed to optimize sunlight absorption.
Inspecting Charge Controllers And Dc To Dc Chargers
The next step in your charging system checks is to inspect your charge controllers and DC to DC chargers. Follow these guidelines to identify any potential issues:
- Check the connections between the charge controller and the battery monitor. Ensure they are securely connected and free from damage.
- Inspect the settings of your charge controller. Make sure they are configured correctly for the batteries you are using.
- Ensure that your charge controller and DC to DC chargers are compatible with each other and properly integrated into your system.
- Consider updating the firmware or software of your charge controller if available, as this can often resolve compatibility issues.
Tips For Ensuring Effective Charging In Different Conditions
To optimize the charging performance of your Renogy battery monitor in various conditions, consider the following tips:
- During periods of low sunlight, use an alternative charging source such as a generator or AC charger to supplement your solar power.
- Monitor the temperature of your batteries. Extreme heat or cold can affect their charging efficiency. Ensure they are protected and insulated as necessary.
- Regularly clean your solar panels to remove any dirt, dust, or debris that may hinder their performance.
- Consider using a solar panel tilt mount to adjust the angle of your panels throughout the day for maximum sunlight absorption.
- Investigate the capacity and compatibility of your batteries. Make sure they are suitable for your power requirements and properly connected.
By following these charging system checks and tips, you can troubleshoot the issue of your Renogy battery monitor not displaying the charge. Ensure that all components of your charging system are properly connected, optimized, and functioning to achieve efficient charging performance.
Advanced Solutions And Maintenance
If your Renogy battery monitor is not showing the charge, start by inspecting the battery connections and ensure they are properly connected to the charger and inverter input. It’s also recommended to check for any faulty batteries or issues with the charger wire.
Troubleshooting and calibration may be required to resolve the issue.
Firmware Updates And Troubleshooting With Renogy Support
If your Renogy battery monitor is not showing the charge, one possible solution is to check for firmware updates. Renogy regularly releases firmware updates that can address bugs and improve the performance of their battery monitors. To do this, you can visit the Renogy website and navigate to the support page. From there, you can search for the firmware updates section and follow the instructions to download and install the latest firmware for your battery monitor.
If firmware updates don’t resolve the issue, it’s recommended to contact Renogy support for further troubleshooting assistance. Renogy’s support team consists of knowledgeable experts who can guide you through the process of diagnosing and resolving any technical issues with your battery monitor. They may ask you to provide detailed information about your setup and perform certain tests to identify the underlying problem.
Calibrating The Monitor With A Fully Charged Battery
Another potential solution to consider is calibrating your Renogy battery monitor with a fully charged battery. Calibrating the monitor helps ensure accurate readings and can resolve discrepancies that may arise due to various factors, such as voltage fluctuations or battery wear.
To calibrate your battery monitor, follow these steps:
- Ensure that your battery is fully charged. You can use a compatible charger to reach this state.
- Access the calibration settings on your Renogy battery monitor. Refer to the user manual or Renogy’s online resources for detailed instructions specific to your monitor model.
- Enter the calibration mode and input the current voltage reading displayed on your battery monitor.
- Confirm the calibration and allow the monitor to adjust its readings based on the fully charged battery.
- Once calibrated, your Renogy battery monitor should provide accurate information about the charge levels of your battery.
Maintaining Your Renogy Battery Monitor For Longevity
To ensure the longevity of your Renogy battery monitor and maximize its performance, it’s important to establish a regular maintenance routine. Here are a few tips:
- Keep the battery monitor clean and free from dust or debris. Regularly wipe the display with a soft, lint-free cloth to maintain visibility.
- Inspect the connections between the battery monitor and your battery system. Ensure that all connections are tight and secure.
- Periodically check for any firmware updates released by Renogy. Updating the firmware can provide improvements in functionality and address any potential bugs.
- Monitor the battery’s health and performance regularly. Pay attention to any unusual patterns or discrepancies in the readings and take appropriate action if necessary.
- Consider using a surge protector or voltage stabilizer to protect the battery monitor from power surges or fluctuations.
By following these maintenance practices, you can enhance the lifespan and accuracy of your Renogy battery monitor, allowing you to effectively monitor your battery’s charge levels and optimize your solar power system.
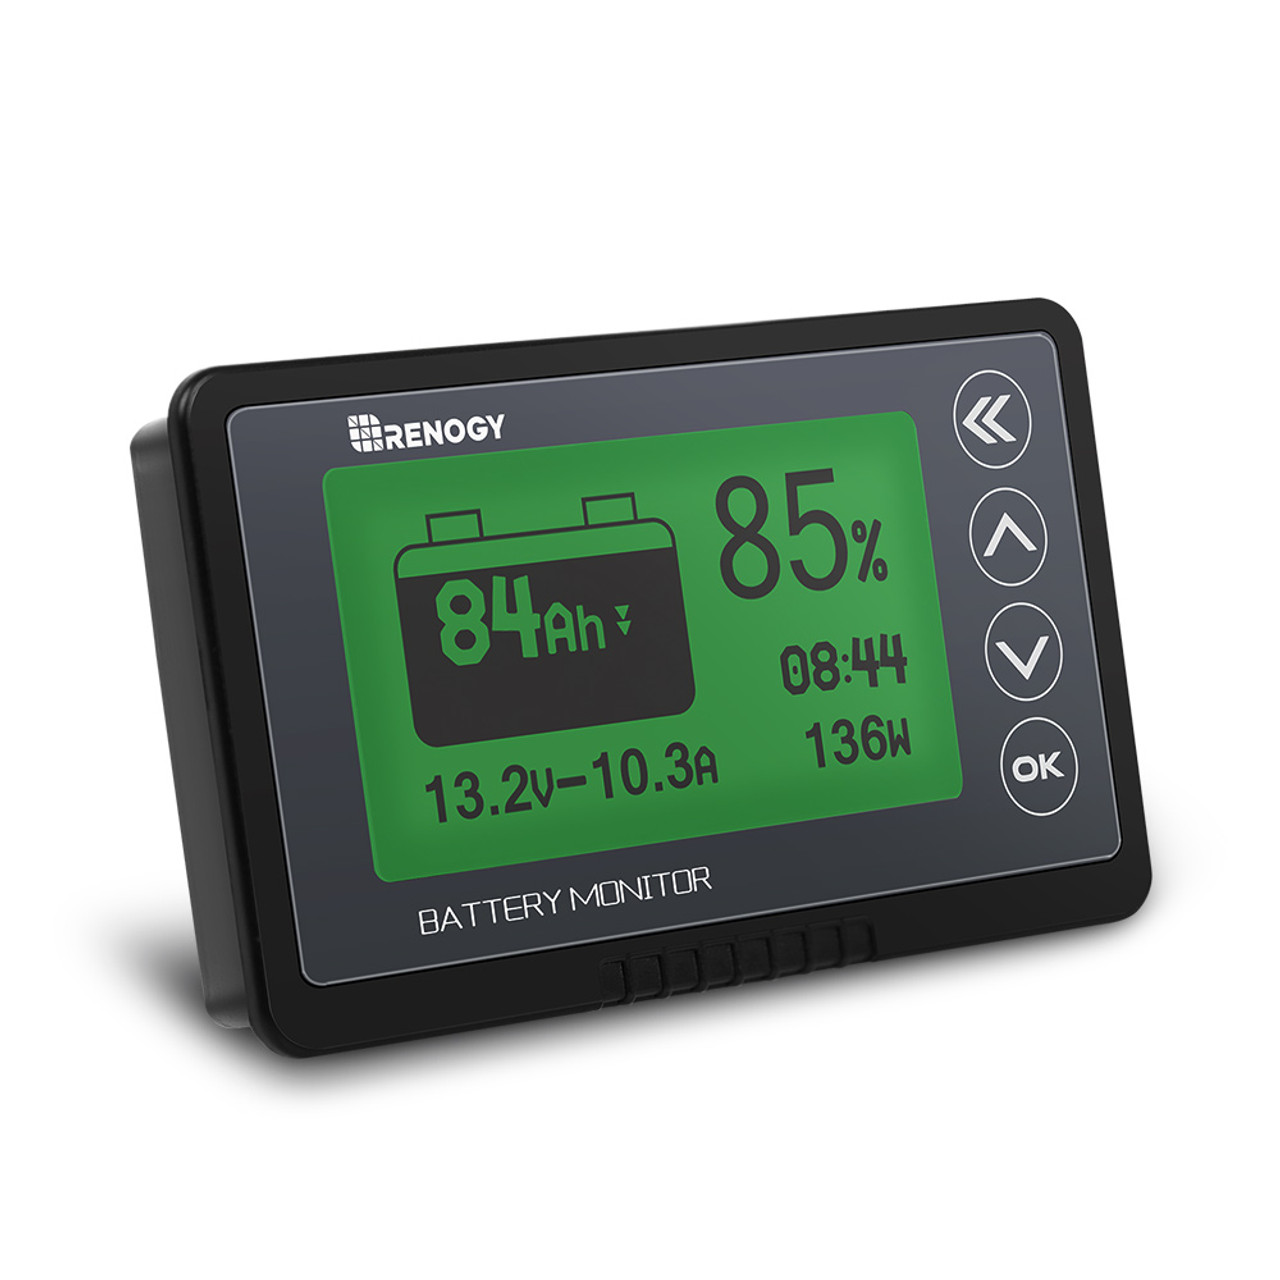
Credit: www.renogy.com
Frequently Asked Questions On Renogy Battery Monitor Not Showing Charge
How Do You Reset The Renogy Battery Monitor?
To reset the Renogy Battery Monitor, locate the “Reset” button on the device and press and hold it for a few seconds. This will reset the monitor and restore it to its default settings. Check the user manual for detailed instructions on how to reset the specific model of the Renogy Battery Monitor.
Why Is My Battery Charger Not Recognizing The Battery?
If your battery charger isn’t recognizing the battery, check if the battery voltage is below the charger’s required level. The charger won’t acknowledge the battery if the voltage is too low. Some chargers have a flashing fault mode, while others show no response.
Why Is My Renogy Battery Monitor Flashing?
If your Renogy Battery Monitor is flashing, check the connection of the battery’s positive terminal to the charger and inverter input. Low battery voltage or a faulty charger could also be the cause.
Why Won T My Battery Charger Light Up?
If your battery charger light won’t come on, check the battery in your charger. Replace dead batteries as a quick fix. Also, check the circuit board if the indicator light still doesn’t work after checking the fuse.
Conclusion
To troubleshoot a Renogy Battery Monitor that is not showing charge, start by inspecting the battery’s positive terminal and ensuring it’s connected properly. If the monitor still doesn’t turn on, check the charger, inverter input, and battery meter settings. It’s also important to calibrate the monitor and set a reference limit.
In some cases, the batteries may be the issue and may need to be replaced. Remember that monitoring the battery voltage is crucial, and the SOC % on the charge controller may not accurately represent the battery’s charge level. By following these steps, you can effectively diagnose and resolve issues with your Renogy Battery Monitor.