Peloton Heart Rate Monitor Not Working: Troubleshooting Tips
If your Peloton Heart Rate Monitor is not working, ensure that the sensors on the back are moist with water and tighten the band around your chest. Also, make sure the sensors are in full contact with your skin.
If the monitor is low on battery, place the Heart Rate Pod on the Pod Charger or check the battery percentage in the App Settings. You can try clearing the cache if the HRM isn’t connecting to the bike. Additionally, ensure that the HRM electrodes are wet by putting your fingers under running water.
If the problem persists, troubleshoot the bluetooth connection and check for any firmware updates.

Credit: www.pcmag.com
Signs Of Malfunctioning Monitors
When using a Peloton heart rate monitor, it is important to ensure that it is functioning properly to track your heart rate accurately during workouts. However, there are times when these monitors may experience malfunctions, leading to inconsistent readings, connection issues, or no heart rate display during workouts. It’s crucial to be aware of these signs so that you can troubleshoot and address the problem promptly. Let’s take a closer look at each of these signs.
Inconsistent Heart Rate Readings
One of the signs that your Peloton heart rate monitor may not be working properly is inconsistent heart rate readings. If you notice that your heart rate readings are fluctuating significantly during a workout, it could indicate a malfunction in the monitor. This can be frustrating, as accurate heart rate monitoring is crucial for tracking your effort and ensuring an effective workout.
To troubleshoot this issue, first, make sure that the sensors on the back of your heart rate monitor band are moist with water. Moisture helps improve the conductivity between your skin and the sensors. Additionally, ensure that the band is tightened securely around your chest, with the sensors in full contact with your skin. Placing the band below your pectoral muscles or immediately below a sports bra strap, on the sternum, is the recommended position for accurate readings.
Failure To Connect Or Pair With Equipment
Another sign of a malfunctioning heart rate monitor is the failure to connect or pair with your Peloton equipment. If you are unable to establish a connection between your heart rate monitor and your bike or other devices, it can hinder your ability to track your heart rate during workouts.
To troubleshoot this issue, you can try clearing the cache on your Peloton device. Clearing the cache can help resolve any connectivity issues that may be causing the problem. Additionally, make sure that your heart rate monitor is within range of your Peloton equipment and that both devices are properly charged.
No Heart Rate Display During Workouts
The absence of a heart rate display during workouts is another sign that your Peloton heart rate monitor may not be working as intended. If you don’t see your heart rate displayed on the screen during a workout, it can make it challenging to gauge your effort and adjust your intensity accordingly.
To troubleshoot this issue, you can try the following steps:
- Ensure that the sensors on the back of your heart rate monitor band are moist with water.
- Retighten the band around your chest, ensuring that the sensors are in full contact with your skin.
- Check the battery percentage of your heart rate monitor in the app settings. If the battery is low, place the heart rate pod on the pod charger to recharge it.
Following these troubleshooting steps should help resolve the issue and restore the heart rate display during your workouts.
Keep in mind that these troubleshooting tips are general recommendations, and if the issue persists, it is advisable to reach out to Peloton support for further assistance. Identifying and addressing any malfunctioning issues with your heart rate monitor is crucial to ensure accurate heart rate tracking and maximize the benefits of your Peloton workouts.
Basics Of Battery Care
A properly functioning heart rate monitor is essential for a seamless workout experience on your Peloton bike. One common issue users face is a heart rate monitor not working due to battery-related issues. To ensure that your Peloton heart rate monitor stays in optimal condition, it is important to understand the basics of battery care. This includes checking the charge level, using correct charging techniques, and knowing when to replace the battery.
Checking The Charge Level
Regularly checking the charge level of your Peloton heart rate monitor is crucial to avoid any unexpected battery depletion during your workouts. To do this:
- Access the App Settings on your Peloton device.
- Select the Heart Rate section.
- Here, you will find the battery percentage of your heart rate monitor.
By keeping an eye on the charge level, you can proactively charge your heart rate monitor when needed, ensuring it’s always ready for your workouts.
Correct Charging Techniques
Proper charging techniques can greatly extend the lifespan of your Peloton heart rate monitor’s battery. Follow these steps for correct charging:
- Connect one end of the charging cable to your heart rate monitor.
- Ensure the other end of the cable is securely plugged into a power source.
- Let the heart rate monitor charge fully until the battery indicator shows it is complete.
- Disconnect the charging cable from both the heart rate monitor and the power source.
It is important to avoid overcharging your heart rate monitor, as it can lead to battery degradation and shorten its overall lifespan.
When To Replace The Battery
Even with proper care, the battery of your Peloton heart rate monitor will eventually need to be replaced. Signs that indicate a battery replacement may be necessary include:
- Significantly reduced battery life, requiring more frequent charging.
- Inconsistent or inaccurate heart rate readings.
- Difficulty in connecting the heart rate monitor to your Peloton bike.
If you experience any of these issues, it is recommended to replace the battery of your Peloton heart rate monitor to restore optimal performance during your workouts.
Ensuring Optimal Connection
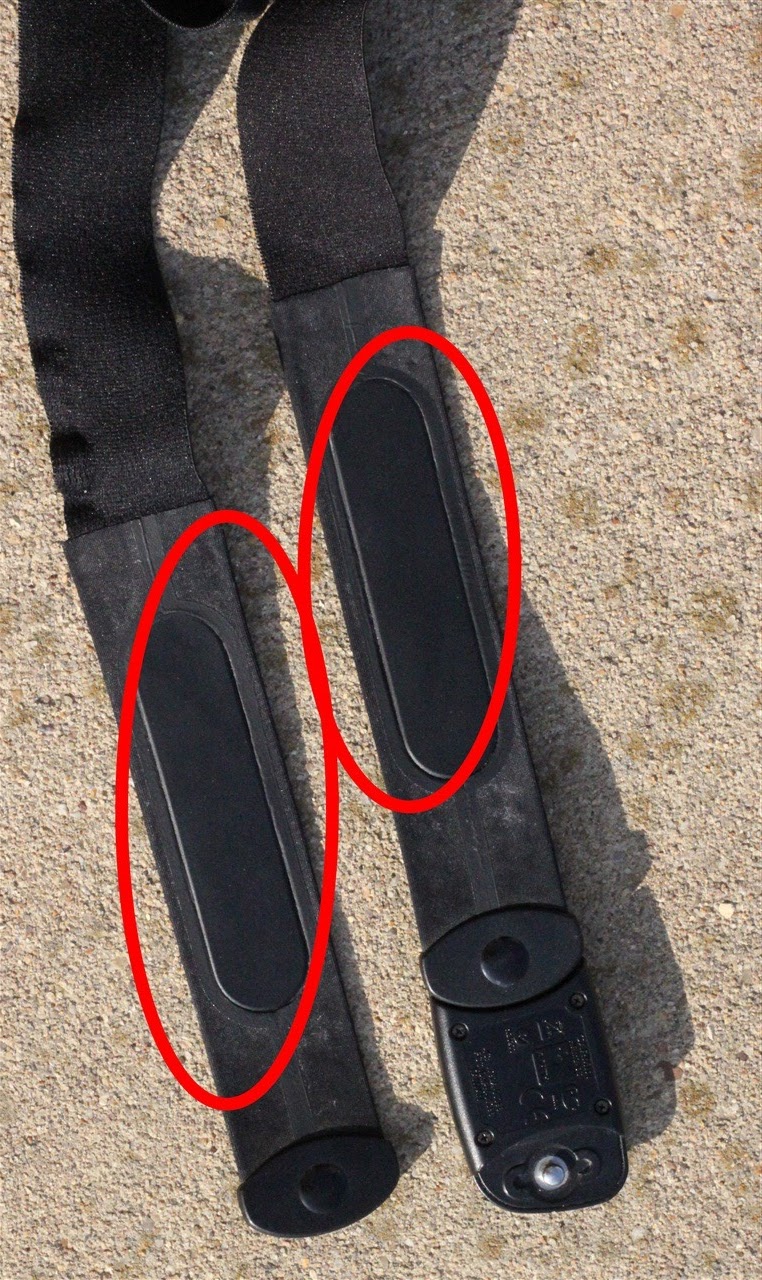
To ensure optimal connection, make sure the grey sensors on the back of your Peloton Heart Rate Monitor band are moist with water and securely fasten the band around your chest. The sensors should have full contact with your skin, positioned below the pectoral muscles or below a sports bra strap.
Troubleshoot by checking the battery level and clearing cache, if necessary.
In the next section, we will discuss how to ensure an optimal connection for your Peloton Heart Rate Monitor. We will cover the Bluetooth pairing process, common connectivity issues, and resolutions, as well as how to reset the heart rate monitor.Bluetooth Pairing Process
Properly pairing your Peloton Heart Rate Monitor with your device is essential for optimal performance. Follow these steps to ensure a seamless connection:
- First, make sure that your device’s Bluetooth is turned on.
- Put on your Peloton Heart Rate Monitor band and ensure that the grey sections (sensors) on the back are moist with water.
- Tighten the band around your chest, making sure the sensors are in full contact with your skin. The band should be placed below your pectoral muscles or immediately below a sports bra strap on the sternum.
- On your device, navigate to the Bluetooth settings and search for available devices.
- Select your Peloton Heart Rate Monitor from the list of available devices.
- Wait for the pairing process to complete, and you should see a notification confirming the successful connection.
By following these steps, your Peloton Heart Rate Monitor should be properly paired with your device, ensuring accurate heart rate tracking during your workouts.
Common Connectivity Issues And Resolutions
Occasionally, you may encounter connectivity issues with your Peloton Heart Rate Monitor. Here are some common problems and their possible solutions:
| Issue | Resolution |
|---|---|
| The heart rate monitor is not connecting to the bike. | Try clearing the cache on your device. This can often resolve connectivity issues. Follow the instructions provided by Peloton support to clear the cache successfully. |
| The heart rate monitor stops working during a workout. | Ensure that the grey sections (sensors) on the back of the band are moist with water. Re-tighten the band around your chest to ensure full contact with your skin. |
| The heart rate monitor is not displaying accurate readings. | Make sure the band is properly positioned below your pectoral muscles or immediately below a sports bra strap on the sternum. Adjust it if necessary to ensure optimal contact with your skin. |
By troubleshooting these common connectivity issues, you can ensure a smooth and accurate tracking experience while using your Peloton Heart Rate Monitor.
How To Reset The Heart Rate Monitor
If you are still experiencing issues with your Peloton Heart Rate Monitor, you may need to reset it. Follow these steps to reset the heart rate monitor:
- Remove the Heart Rate Pod from the band.
- Place the Heart Rate Pod on the Pod Charger to ensure it is fully charged.
- Once the Heart Rate Pod is fully charged, reattach it to the band.
- Repeat the Bluetooth pairing process outlined earlier to reconnect the heart rate monitor with your device.
Resetting your heart rate monitor can help resolve any underlying issues and ensure optimal performance during your Peloton workouts.
Perfecting Band Fit And Position
One common issue that Peloton users may encounter is their heart rate monitor not working properly. When it comes to troubleshooting this problem, perfecting the band fit and position can make a significant difference in ensuring accurate readings. Pay attention to the following aspects to maximize the effectiveness of your heart rate monitor:
Proper Tightening Of The Band
Ensuring a proper fit is crucial for accurate heart rate monitoring. Start by tightening the band around your chest, making sure it is snug but not too tight. This will help maintain a secure connection between the sensors and your skin. Placing the band below your pectoral muscles or immediately below a sports bra strap is recommended.
Moistening The Sensors
Moistening the sensors on the back of your heart rate monitor band is essential for optimal performance. Before wearing your heart rate monitor, make sure the grey sections (sensors) are moist with water. This can be done by running a few fingers under water and swiping it across the sensors. The moisture enhances conductivity, allowing for more accurate readings.
Positioning For Accurate Readings
The position of the band and sensors on your chest is crucial for accurate heart rate monitoring. Ensure that the sensors are in full contact with your skin, as any gaps might result in inconsistent readings. Placing the band on the sternum, below the pectoral muscles, helps maintain proper positioning and enhances the accuracy of the measurements.
By following these guidelines for perfecting band fit and position, you can optimize the performance of your Peloton heart rate monitor. Remember to always tighten the band properly, moisten the sensors, and position the band correctly for accurate and reliable heart rate readings during your workouts. Keeping these factors in mind will enhance your overall Peloton experience and help you make the most out of your fitness tracking.
Cleaning And Storage Tips
Proper maintenance and care are essential to ensure optimal performance and longevity of your Peloton Heart Rate Monitor. In this section, we will explore the best practices for cleaning the band and sensors as well as recommended storage practices.
Cleaning The Band And Sensors
Regular cleaning of the band and sensors is important to maintain accurate readings and prevent any issues with your Peloton Heart Rate Monitor. Follow these steps to properly clean your device:
- Detach the band from the heart rate monitor pod.
- Prepare a mild soap and water solution.
- Gently submerge the band in the solution and use a soft cloth or sponge to clean it thoroughly.
- Rinse the band with clean water to remove any soap residue.
- Dry the band completely before reattaching it to the heart rate monitor pod.
It is important to note that harsh chemicals or abrasive cleaning agents should not be used as they may damage the band or sensors.
Recommended Storage Practices
Proper storage of your Peloton Heart Rate Monitor when not in use can help prolong its lifespan and prevent any issues. Follow these recommended storage practices:
- Ensure the heart rate monitor pod is detached from the band.
- Clean the band as per the instructions mentioned earlier.
- Store the band and heart rate monitor pod in a cool, dry place away from direct sunlight.
- Avoid storing the heart rate monitor in extremely hot or cold temperatures as it may affect its performance.
- Protect the band and heart rate monitor pod from any sharp objects or excessive pressure.
- If possible, store the heart rate monitor in its original packaging or a dedicated protective case to prevent any damage.
By following these cleaning and storage tips, you can ensure that your Peloton Heart Rate Monitor remains in optimal condition, providing you with accurate heart rate readings during your workouts. Remember to regularly clean the band and sensors and store the device correctly to maintain its performance and longevity.
Fine-tuning Device Settings
If your Peloton heart rate monitor is not working, make sure the sensors on the back of the band are moist with water and tighten the band around your chest. Ensure the sensors have full contact with your skin for proper functionality.
Adjusting Peloton Display Settings
If you’re experiencing issues with your Peloton Heart Rate Monitor not working properly, one of the first steps you can take is to adjust the display settings on your Peloton device. By fine-tuning these settings, you may be able to resolve any connectivity or tracking issues you’re facing. To adjust the Peloton display settings, follow these steps:- On the Peloton display, navigate to the Settings menu.
- Scroll down and select the Heart Rate option.
- Check if the Heart Rate Monitor is enabled. If not, toggle the switch to turn it on.
- Ensure that the display is set to show real-time heart rate data.
- Save the changes and exit the Settings menu.
Updating Firmware If Applicable
Sometimes, the issue with your Peloton Heart Rate Monitor not working may stem from outdated firmware. To ensure your device is running the latest firmware, follow these steps:- On the Peloton display, navigate to the Settings menu.
- Scroll down and select the About option.
- Check if there are any available firmware updates.
- If an update is available, proceed with the installation process.
- Allow the Peloton device to complete the firmware update.
When To Seek Professional Help
If you’ve tried all the troubleshooting tips and your Peloton heart rate monitor still isn’t working, it may be time to seek professional help. While it’s always recommended to try basic troubleshooting steps first, there are instances where a more complex issue may require expert attention. Here are some situations where you should consider reaching out to Peloton support or exploring warranty and repair options:
Peloton Support Resources
If you’ve exhausted all the resources available on your own and still haven’t resolved the issue with your heart rate monitor, Peloton support is your next best option. They have a dedicated team of experts who can guide you through the troubleshooting process and provide personalized solutions. Whether it’s a connectivity problem or a malfunctioning device, Peloton support can help diagnose the issue and offer appropriate recommendations.
Warranty And Repair Information
If your heart rate monitor is still under warranty, it’s important to explore the repair options provided by Peloton. Warranty information can vary based on your specific product and purchase date, so be sure to review the terms and conditions outlined by Peloton. They may offer repair or replacement services for eligible devices, helping you get your heart rate monitor back up and running without any additional cost.
Should you require professional help for your Peloton heart rate monitor, don’t hesitate to reach out to Peloton support or explore warranty and repair options. Remember, a non-working heart rate monitor can impact your workouts and overall experience, so it’s essential to resolve the issue promptly. By seeking professional assistance, you can ensure that your heart rate monitor is functioning optimally and continue enjoying a seamless Peloton workout.
Step-by-step Troubleshooting Tips
If your Peloton heart rate monitor is not working, ensure that the sensors on the back of the band are moist with water and tighten the band around your chest. Check for proper contact with your skin and position the band below your pectoral muscles or bra strap.
Additionally, you can troubleshoot by checking the battery level and clearing the cache.
If you’re encountering issues with your Peloton Heart Rate Monitor not working, don’t worry. We’ve got you covered with some step-by-step troubleshooting tips to help you get back on track. Follow these simple instructions to identify and resolve the problem efficiently.
Verifying Monitor Functionality
The first step in troubleshooting your Peloton Heart Rate Monitor is to verify its functionality. Here’s what you need to do:
- Ensure that the grey sections (sensors) on the back of your Peloton Heart Rate Monitor band are moist with water.
- Re-tighten the band around your chest, making sure the sensors are in full contact with your skin.
- Proper band placement is crucial. Position it below your pectoral muscles or immediately below a sports bra strap, on the sternum.
If your Heart Rate Band’s battery is low, place the Heart Rate Pod on the Pod Charger. You can also check the battery percentage in App Settings > Heart Rate.
Sequential Troubleshooting Steps
If you’re still facing issues with your Peloton Heart Rate Monitor, it’s time to move on to the sequential troubleshooting steps. Follow these steps one after the other to identify and resolve the problem:
- Check the Bluetooth connection to your bike. Sometimes, a weak or interrupted connection can cause the heart rate monitor to stop working.
- If the HRM isn’t connecting to the bike, try clearing the cache. This step might be recommended by support as well.
- Ensure that the charging cable is properly connected to both your heart rate monitor and a power source. Sometimes, a loose cable connection can prevent the monitor from working.
- If none of the above steps resolve the issue, make sure to check whether the battery needs replacing. A drained or faulty battery can be the culprit behind a non-functional heart rate monitor.
Tips For Persistent Issues
If you’ve tried all the troubleshooting steps mentioned above and are still experiencing persistent issues with your Peloton Heart Rate Monitor, here are a few additional tips:
- Reach out to Peloton Support for further assistance. They have the expertise to guide you through more advanced troubleshooting steps or provide a solution if the monitor needs repair or replacement.
- Consider checking online communities such as r/pelotoncycle on Reddit, where fellow Peloton users might have encountered similar issues and shared their own solutions or workarounds.
- Watch tutorial videos available on platforms like YouTube to see if there’s a specific fix or troubleshooting method relevant to your heart rate monitor issue.
Remember, troubleshooting can be a trial-and-error process, but with patience and persistence, you’ll likely find a solution to get your Peloton Heart Rate Monitor back up and running properly.
Frequently Asked Questions Of Peloton Heart Rate Monitor Not Working
How Long Do Peloton Heart Rate Monitors Last?
Peloton heart rate monitors typically last for a long time, but their durability depends on regular maintenance and proper usage. It is important to keep the sensors on the back of the monitor moist with water and ensure they are in full contact with your skin.
If you experience any issues, troubleshooting steps like checking the battery, clearing the cache, and ensuring proper Bluetooth connection can help resolve them.
Why Is My Heart Rate Monitor Not Working?
To troubleshoot a Peloton Heart Rate Monitor not working, moisten the grey sensor sections on the back of the band and tighten it around your chest. Ensure the sensors have full contact with your skin. Also, check the battery level and consider clearing the cache or checking the bluetooth connection.
Clean the sensor with a damp cloth and wash the belt to remove any dirt that may cause connection errors.
Why Is My Peloton Heart Rate Monitor Not Connecting To Bluetooth?
Ensure the grey sensors on the back of your Peloton Heart Rate Monitor are moist and tighten the band around your chest. Check that the sensors make full contact with your skin. Also, make sure the monitor’s battery is charged and try clearing the cache if it still won’t connect.
Why Is My Apple Watch Not Showing Heart Rate On Peloton?
The Apple Watch doesn’t connect to Peloton for heart rate. Instead, install apps and adjust settings, then start a workout. The heart rate should show up on the Peloton screen. Make sure your watch is properly connected and synced.
Conclusion
Ensure proper functioning of your Peloton Heart Rate Monitor by following these troubleshooting tips. Make sure the grey sections on the back are moist with water and securely fasten the band around your chest. Check the battery level and charge if necessary.
In case of connection issues, try clearing the cache or ensuring a proper Bluetooth connection. Remember to keep the sensors in full contact with your skin for accurate readings. By following these steps, you can resolve the common issues with your Peloton Heart Rate Monitor and enjoy your workouts without any interruptions.