Pc is Not Displaying on Monitor : Troubleshooting Tips
If your PC is not displaying on the monitor, try testing your monitor and verifying that your PC has completely restarted from a powered-off state. Additionally, check for damaged or loose cables and consider using a different monitor or display cord to troubleshoot the issue.
If these steps don’t resolve the problem, you may need to seek further assistance. Having a PC that doesn’t display on the monitor can be frustrating, especially if you rely on it for work or entertainment. Fortunately, there are several steps you can take to diagnose and fix the issue.
This article will guide you through troubleshooting techniques to help you get your PC up and running with a functioning monitor display. Whether it’s a loose cable connection or a faulty GPU, we’ll explore the common causes and potential solutions to help you resolve the problem. By following these steps, you can troubleshoot the issue and get your PC back to displaying on the monitor in no time.
Ensure Proper Connection And Power
If your PC is not displaying on the monitor, there could be several reasons for this issue. First, check if the monitor is properly connected and powered on. Make sure all cables are securely connected and try restarting your PC.
If the problem persists, you may need to troubleshoot further or seek professional assistance.
Check Power Cables And Connections
If your PC is not displaying on the monitor, the first thing you should check is the power cables and connections. Ensure that all power cables are properly plugged in and securely connected.
Inspect For Physical Damage On Cables
Physical damage on cables can also cause display issues. Inspect all the cables connected to your PC, including the power cable, VGA/HDMI/DisplayPort cable, and any other cables used for connectivity. Look for any signs of wear and tear such as frayed wires or bent connectors.
Confirm Power Outlet And Surge Protector Functionality
Another important step is to confirm the functionality of the power outlet and surge protector. Make sure that the power outlet is working properly by plugging in a different device. If the outlet is not providing power, try connecting your PC to a different outlet. Additionally, test the surge protector by plugging in another device and checking if it powers on.
If you have confirmed that the power cables and connections are secure and there are no physical damages on the cables, it’s time to move on to other troubleshooting steps to identify the cause of the display issue.
It’s important to ensure proper connection and power as these are common causes for a PC not displaying on a monitor. By checking power cables and connections, inspecting for physical damage on cables, and confirming power outlet and surge protector functionality, you can rule out any potential issues with power supply and connectivity.

Credit: www.pcmag.com
Review Pc And Monitor Compatibility
Are you facing the frustrating issue of your PC not displaying anything on your monitor? This can be a common problem that can occur due to various reasons. In this blog post, we will discuss how to troubleshoot this issue and fix it. In particular, we will review the compatibility between your PC and monitor to identify any potential issues. Let’s dive in and find the solution!
Verify Monitor Supports Pc’s Output
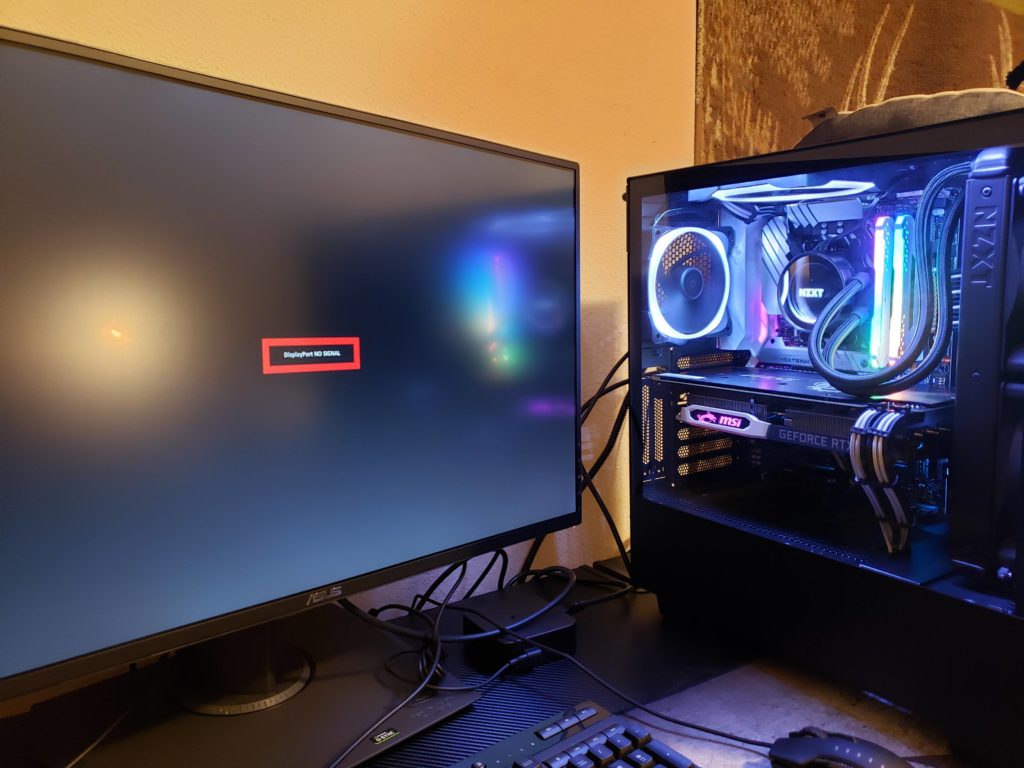
Firstly, it is important to confirm that your monitor supports the output of your PC. Different PCs have different output ports, such as HDMI, DVI, VGA, or DisplayPort. Check the specifications of your monitor to ensure it has a compatible input port for your PC’s output. Refer to the product manual or manufacturer’s website for this information. It’s crucial to establish this compatibility to ensure a proper connection between your PC and monitor.
Cross-test Monitor With Another Pc
To further assess the compatibility between your PC and monitor, try connecting your monitor to another PC with known working display output. This cross-testing technique can help identify whether the issue lies with your PC or the monitor itself. If the monitor works fine with another PC, it indicates that the problem is most likely with your PC’s display settings or hardware. In such cases, proceed with the next troubleshooting steps. However, if the monitor fails to display anything with another PC, it suggests a potential issue with the monitor itself, and you may need to consider repair or replacement options.
Assess Display Settings For Correct Configuration
Now, let’s focus on your PC’s display settings. Sometimes, incorrect display settings can prevent the monitor from displaying anything. Start by checking the resolution and refresh rate settings. These settings should be set to values supported by both your PC and monitor. Adjust them as necessary to match the recommended settings mentioned in the monitor’s user manual. Additionally, ensure that the display output is set to the appropriate monitor in your PC’s settings.
If you are using multiple displays, make sure they are configured correctly in your PC’s settings. Sometimes, a misconfiguration can cause the monitor to not display anything. Enable the display or extend the desktop to the monitor that is not showing any output.
If you have recently updated your display driver, it’s worth considering rolling back to the previous version or re-installing the driver to eliminate any compatibility issues. Faulty or incompatible display drivers can also cause the monitor to not display anything.
In conclusion, by reviewing the compatibility between your PC and monitor, you can troubleshoot the issue of your PC not displaying anything on your monitor effectively. Verify that your monitor supports the output of your PC, cross-test your monitor with another PC to identify any potential hardware issues, and assess your PC’s display settings for correct configuration. Follow these steps, and you’ll be one step closer to resolving the problem. If the issue persists, it’s recommended to seek professional technical assistance to diagnose and fix the problem.
Investigate Graphics Card Issues
If your PC is not displaying on the monitor, there are several troubleshooting steps you can take. Make sure all cables are securely connected, try a different monitor or display cord, and check for any hardware issues such as a faulty graphics card.
Additionally, adjusting power-saving settings on your PC may prevent the monitor from turning off. For more detailed instructions, you can search on Google for “How to Fix a Computer That Turns on but Displays Nothing. “
Test With Onboard Graphics Vs. Dedicated Gpu
One of the first steps to investigate graphics card issues when your PC is not displaying on the monitor is to test with onboard graphics versus a dedicated GPU. This will help identify whether the issue lies with the graphics card or with other components of your system.
- Power off your computer completely and disconnect any external graphics cards.
- Locate the onboard graphics port on your motherboard, usually located near the USB and Ethernet ports.
- Connect your monitor’s cable to the onboard graphics port.
- Power on your computer and check if the display appears on your monitor.
If the display appears with onboard graphics, it indicates that there may be an issue with your dedicated GPU. On the other hand, if there is still no display, the problem might be with your monitor or other components.
Look For Signs Of Gpu Failure
If you suspect that the issue lies with your dedicated GPU, it’s essential to look for signs of GPU failure. Some common signs include:
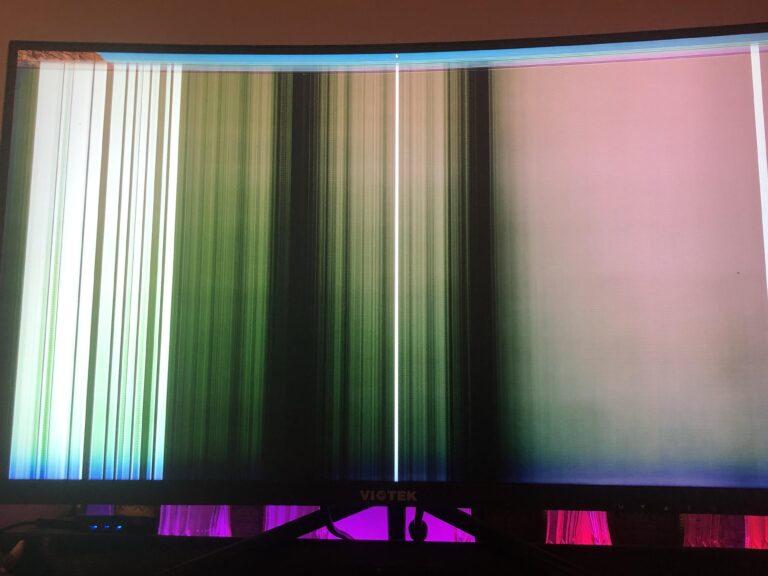
- Visual artifacts on the screen, such as random lines, flickering, or distorted images.
- Overheating of the GPU, leading to system instability and frequent crashes.
- System freezing or becoming unresponsive while performing graphics-intensive tasks.
- Fan noise or malfunctioning fans on the graphics card.
If you notice any of these signs, it’s advisable to consult a professional or contact the manufacturer for assistance. They can help diagnose the issue and provide recommendations for repair or replacement.
Consider Driver Updates Or Rollbacks
In some cases, driver issues can cause the PC to not display on the monitor. Therefore, it’s worth considering driver updates or rollbacks as part of your investigation.
- Visit the manufacturer’s website for your graphics card.
- Search for the latest driver software available for your specific model.
- Download and install the driver following the provided instructions.
Alternatively, if you recently updated your graphics card driver and started experiencing the display issue, you can try rolling back to the previous version. To do this:
- Open the Device Manager on your computer.
- Expand the “Display Adapters” category.
- Right-click on your graphics card and select “Properties.”
- In the “Driver” tab, click on “Roll Back Driver” if available.
- Follow the on-screen instructions to complete the rollback.
By updating or rolling back the graphics card driver, you can potentially resolve compatibility issues or conflicts that may be causing the display problem.
Examine Bios And Post Beeps
When your PC is not displaying anything on the monitor, it can be frustrating and concerning. However, there are steps you can take to diagnose and resolve the issue. One of the first areas to examine is the BIOS (Basic Input/Output System) and POST (Power-On Self-Test) beeps.
Access Bios Settings For Clues
Accessing the BIOS settings can provide valuable clues about the source of the problem. Follow these steps to access the BIOS:
- Restart your computer
- During startup, look for an on-screen prompt that instructs you to press a specific key (e.g., F2 or Delete) to enter setup
- Press the designated key to access the BIOS
Once you’re in the BIOS, take note of any unusual settings or error messages. Make sure the display settings are configured correctly and that the display is set as the primary output device.
Interpret Post Beep Codes
In addition to checking the BIOS settings, listen for POST beep codes. These beeps are a series of sounds that indicate the status of the hardware during startup. Each beep code represents a specific issue, helping you identify the underlying problem. Refer to the table below for common POST beep codes:
| Beep Code | Possible Issue |
|---|---|
| 1 short beep | Normal startup |
| 2 short beeps | CMOS setting error |
| Continuous beeping | Memory or motherboard issue |
| 1 long, 3 short beeps | Graphics card problem |
If you hear any beeps during startup, take note of the pattern and refer to your computer’s motherboard manual or manufacturer’s website for specific beep code interpretations.
Clear Cmos To Reset Bios Settings
If examining the BIOS settings and interpreting beep codes doesn’t resolve the display issue, you can try clearing the CMOS to reset the BIOS settings. Follow these steps:
- Power off your computer
- Locate the CMOS jumper on your motherboard (refer to the motherboard manual for its exact location)
- Move the CMOS jumper to the clear position (usually pins 2-3)
- Wait for a few seconds and then move the CMOS jumper back to its original position (usually pins 1-2)
- Power on your computer and check if the display is now functioning properly
Clearing the CMOS can help resolve any corrupted settings that may be causing the display issue. However, note that this process will reset all BIOS settings to their default values, so you may need to reconfigure certain settings after clearing the CMOS.
By examining the BIOS settings and paying attention to POST beeps, you can gather valuable information about the cause of your PC not displaying on the monitor. Clearing the CMOS can also help reset any problematic settings. If these steps don’t resolve the issue, further troubleshooting may be required.
Systematic Component Testing
When your PC is not displaying on the monitor, it’s essential to perform systematic component testing to identify and resolve the issue. By following a structured approach, you can isolate the problem and take the necessary steps to fix it. Here are some methods you can use:
Swap Out With Known Working Components
One way to narrow down the cause of the issue is to swap out the components with known working ones. Start by replacing the monitor cable with a different cable that you know is functioning correctly. If the problem persists, try connecting your PC to a different monitor to see if the issue lies with the display device. This method helps to determine if the problem lies in the cables or the monitor itself.
Use Minimal Setup To Isolate The Issue
Another effective method is to disconnect unnecessary components and use a minimal setup to isolate the problem. Start by removing any peripheral devices such as printers, scanners, or external hard drives. Disconnect all unnecessary cables and leave only the essential ones, such as the power cable and the monitor cable, connected. This approach helps to rule out any potential conflicts or issues caused by external devices.
To further narrow down the problem, try booting your PC with only one RAM stick installed. If you have multiple RAM sticks, test each one individually to determine if any of them are faulty. In some cases, a defective RAM stick can cause the display issue.
Check For Overheating And Clean Internals
Overheating can also lead to display issues. Make sure to check the temperature of your PC and clean the internals if necessary. Dust accumulation can cause the components to overheat and malfunction. Use compressed air to blow out any dust from the fans, heat sinks, and other areas where dust might have accumulated.
Additionally, ensure that all the cables inside your PC are properly connected. A loose cable can disrupt the display signal, so double-check all the connections.
By following these systematic component testing methods, you can troubleshoot and resolve the issue when your PC is not displaying on the monitor. Remember to be patient and systematic in your approach, as identifying the underlying cause is crucial for an effective solution.
Frequently Asked Questions On Pc Is Not Displaying On Monitor
Why Is My Pc Not Displaying On My Monitor?
If your PC is not displaying on your monitor, try these troubleshooting steps: 1. Check that all cables are securely connected. 2. Restart your PC from a completely powered off state. 3. Test your monitor on another system or try a different monitor.
4. Verify that your graphics card is working properly. If these steps don’t work, seek professional help.
Why Won’t My Pc Go Onto My Monitor?
Ensure the cable connecting your PC to the monitor is secure. Try a different cable to rule out any faults. Test the monitor with another system to see if it works. Adjust your power-saving settings to prevent the monitor from turning off.
If the issue persists, consult a professional for further assistance.
How Do You Fix A Computer That Is On But The Screen Is Black?
If your computer is on but the screen is black, try these steps to fix it: 1. Check if the monitor is connected properly and turned on. 2. Restart your computer and see if the screen comes back. 3. If not, try connecting the monitor to a different port or using a different cable.
4. If none of these solutions work, there may be an issue with the graphics card or motherboard, and you should consult a professional.
Why Does My Monitor Turn Off But My Pc Is Still On?
If your monitor turns off but your PC is still on, it could be due to power-saving settings on your computer. Check your power-saving settings to ensure that the monitor is not set to turn off after a period of inactivity.
Adjusting these settings can resolve the issue.
Conclusion
If your PC is not displaying on the monitor, there are several troubleshooting steps you can take. First, verify that your PC has completely restarted from a powered-off state. Test your monitor and make sure all cables are securely connected.
If the issue persists, try using a different monitor or display cord. If none of these steps work, it may be a hardware issue, such as a faulty GPU. Remember to always consult a professional if you’re unsure.