One Monitor Not Working on Docking Station: Troubleshooting Tips
If one monitor is not working on a docking station, try disconnecting and reconnecting the docking station to the laptop. Also, disconnect and check the video cable for any damage or bent pins.
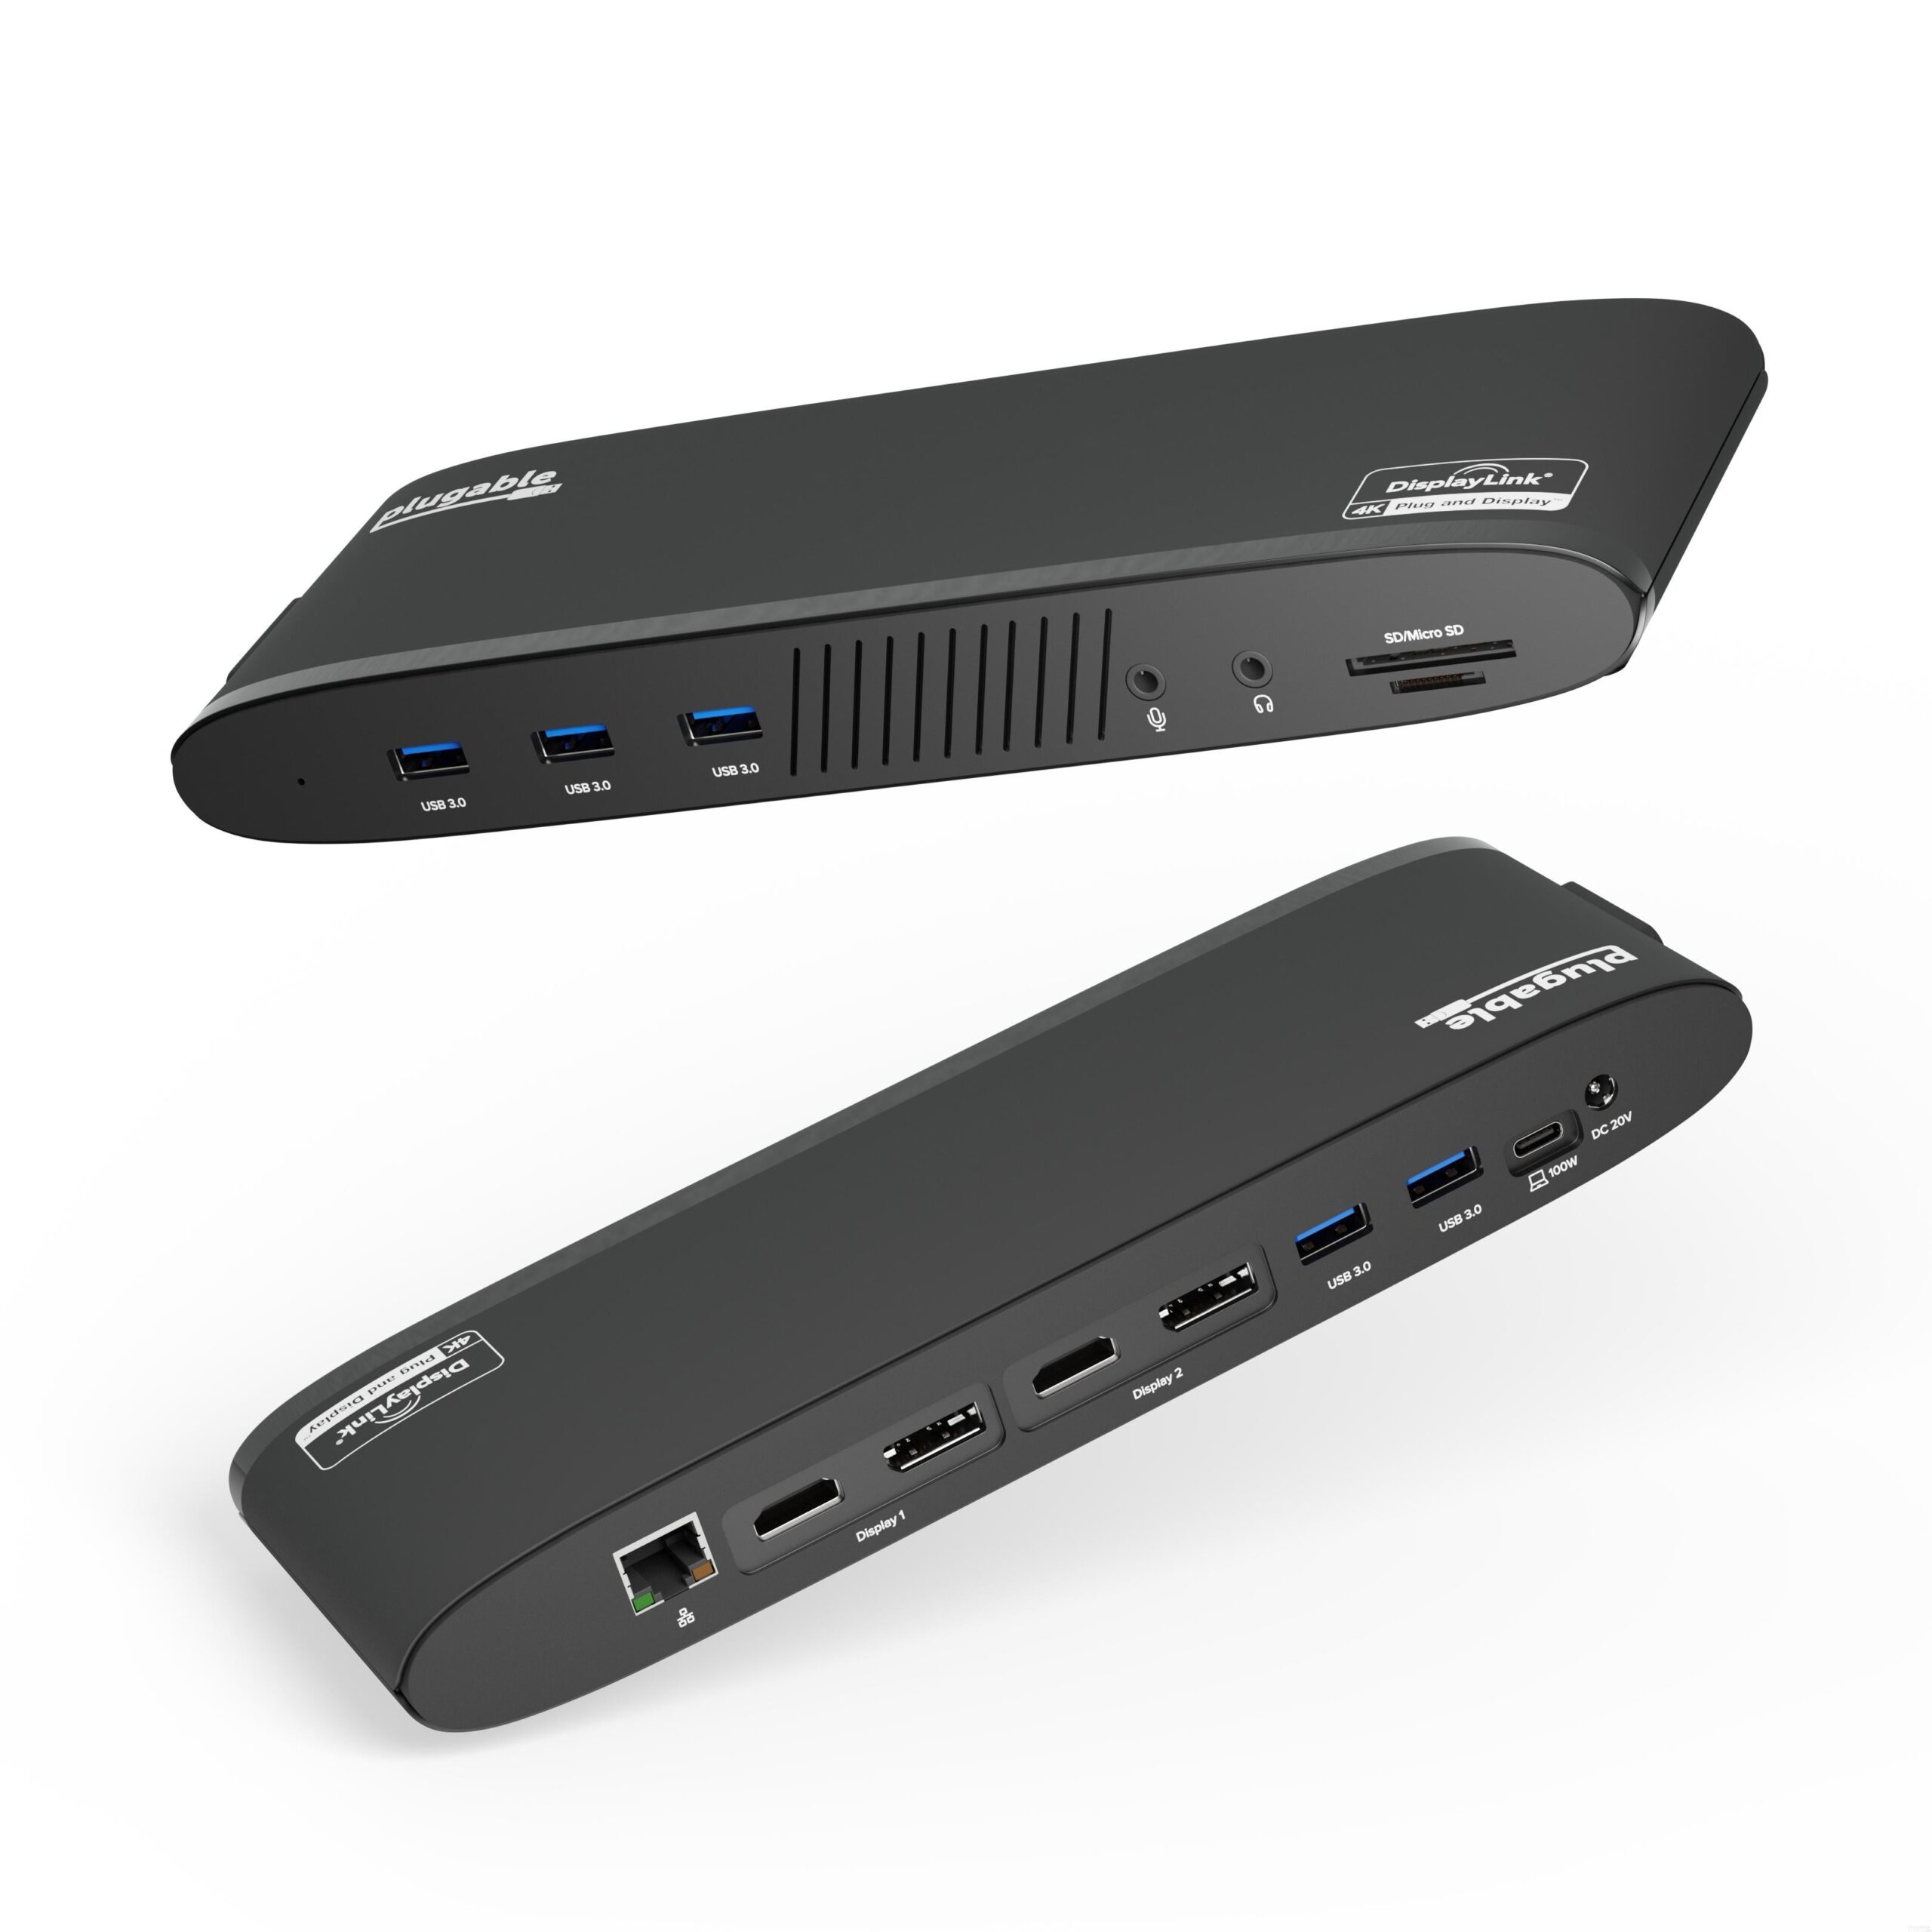
Ensure that the cable is securely connected to both the monitor and the docking station. Additionally, make sure that the video cable (HDMI or DisplayPort) is properly connected to the monitor and the docking station. A faulty or incompatible docking station may also be the issue.
Consider troubleshooting the display settings and restarting the computer with both monitors plugged in and turned on to resolve the problem.
Check Cable Connections And Ports
One common issue when a monitor is not working on a docking station is loose or faulty cable connections. To troubleshoot this problem, follow the steps below:
Ensure All Cables Are Securely Connected
Start by disconnecting and reconnecting the docking station to the laptop. This will help ensure a proper connection between the two devices. Then, check both ends of the video cable for any visible damage or bent pins. If you notice any, replace the cable as necessary.
Examine For Any Visible Damage On Cables
Inspect the video cable (HDMI, or DisplayPort) for any signs of wear or damage. This can include frayed wires, bent connectors, or kinks in the cable. If you identify any damage, it’s essential to replace the cable to restore the connection between the monitor and docking station.
Clean Ports And Reseat Cables If Necessary
Dust and debris can accumulate in the ports, affecting the connection. Clean the ports on both the docking station and the monitor using a soft, dry cloth. Additionally, ensure that the cables are properly seated in the ports, providing a secure and stable connection.
By checking the cable connections and ports, you can troubleshoot and resolve the issue of one monitor not working on a docking station. These simple steps can help ensure a proper and reliable connection between your devices.
Power Cycle Your Setup
In case you are facing the issue of one monitor not working on your docking station, power cycling your setup can be a simple yet effective solution to troubleshoot the problem. Power cycling involves turning off the monitor and docking station, unplugging the power source for both devices, and then reconnecting and powering them up after a brief wait.
To begin the power cycling process, first, turn off both the monitor and the docking station. This can be done by pressing the power button of each device until they shut down completely.
After turning off the monitor and docking station, the next step is to unplug the power source for both devices. Locate the power cords of the monitor and the docking station and disconnect them from the electrical outlets.
Once the power source has been unplugged, it’s important to wait for a brief moment before proceeding. This allows any residual power to dissipate, ensuring a complete reset of the devices. After the wait period, securely reconnect the power cords of both the monitor and the docking station to their respective electrical outlets.
Once the power cords have been reconnected, proceed to power up the devices. Press the power buttons for the monitor and the docking station to turn them back on. Allow them a few moments to fully power up and establish the necessary connections.
By power cycling your setup, you are essentially giving your monitor and docking station a fresh start, allowing them to reset and re-establish any connections that might have caused the issue of one monitor not working. This simple troubleshooting step can often resolve the problem without any further intervention.
Set Correct Display Settings
One common issue that arises with docking stations is when one monitor is not working. This can be frustrating, but fortunately, it is often a simple fix. By setting the correct display settings, you can ensure that both monitors are functioning properly. Here are a few steps to follow:
Verify Primary And Secondary Monitor Configuration
The first thing to check is the configuration of your primary and secondary monitors. Sometimes, a wrong configuration can cause one monitor to not work as expected. To check and adjust the monitor configuration:
- Go to the Control Panel on your computer.
- Click on Display or Appearance and Personalization.
- Select Screen Resolution or Display Settings.
- Under the Multiple Displays section, ensure that the correct monitor is set as the primary display.
- If needed, click on Identify to identify which monitor is which.
Check For Proper Resolution And Display Mode
Another important aspect to consider is the resolution and display mode of your monitors. Improper settings in these areas can cause one monitor to not function properly. To verify and adjust the resolution and display mode:
- Go to the Control Panel on your computer.
- Click on Display or Appearance and Personalization.
- Select Screen Resolution or Display Settings.
- Ensure that the resolution for both monitors is set correctly.
- Choose the appropriate display mode (e.g., Duplicate, Extend) depending on your preference.
Rearrange Display Order If Needed
In some cases, the display order of your monitors can affect their functionality. If one monitor is not working, you can try rearranging the display order. Here’s how:
- Go to the Control Panel on your computer.
- Click on Display or Appearance and Personalization.
- Select Screen Resolution or Display Settings.
- Click and drag the monitors to rearrange their order.
- Click Apply to save the changes.
By following these steps, you can set the correct display settings and resolve the issue of one monitor not working on your docking station. Remember to double-check the connections and ensure that all cables are securely plugged in. If the problem persists, you may need to consider other factors such as compatibility between your docking station and monitor connection.
Update Drivers And Firmware
When it comes to troubleshooting one monitor not working on a docking station, updating drivers and firmware can often resolve the issue. Outdated or incompatible drivers and firmware can prevent your docking station and monitor from functioning properly. Follow these steps to update drivers and firmware:
Check For Latest Updates Of Docking Station Firmware
The first step is to check for the latest firmware updates for your docking station. The firmware is the software embedded in the docking station that controls its functionality. To ensure compatibility and optimal performance, manufacturers regularly release firmware updates. Here’s how to check for firmware updates:
- Visit the manufacturer’s website and navigate to the support or downloads section.
- Enter the model number or product name of your docking station.
- Look for the firmware section and check if any updates are available.
- If updates are available, download the latest firmware version onto your computer.
Update Graphics And Monitor Drivers On Your Pc
In addition to the firmware, it’s crucial to update the graphics and monitor drivers on your PC. Drivers act as the communication bridge between your operating system and hardware devices, including your docking station and monitor. Here’s how to update your graphics and monitor drivers:
- Open the Device Manager on your PC. You can do this by right-clicking on the Start menu and selecting “Device Manager”.
- Expand the “Display adapters” and “Monitors” categories.
- Right-click on your graphics card and select “Update driver”. Choose the option to search automatically for updated driver software.
- Repeat the process for your monitors to update their drivers.
Restart After Updates To Apply Changes
Once you have updated the firmware, graphics, and monitor drivers, it’s essential to restart your computer. Restarting helps apply the changes and ensures that the new drivers and firmware take effect. After your PC has restarted, reconnect the docking station and monitor and check if the issue has been resolved.
In conclusion, updating drivers and firmware can often fix the problem of one monitor not working on a docking station. By following the steps above to check for firmware updates, update graphics and monitor drivers, and restart your computer, you can troubleshoot the issue effectively. Remember to always keep your drivers and firmware up to date for optimal performance.
Identify And Isolate The Issue
When you encounter the problem of one monitor not working on your docking station, it’s crucial to identify and isolate the root cause. This will help you troubleshoot and resolve the issue effectively. Here are a few steps you can follow to do just that:
Try Connecting Another Monitor To The Same Port
If you suspect that the issue might be with the docking station’s port, try connecting another monitor to the same port. This will help determine if the problem lies with the specific monitor or the port itself. Use the following steps:
- Disconnect the current monitor from the docking station.
- Connect a different monitor to the same port on the docking station.
- Check if the newly connected monitor works properly.
- If the second monitor functions normally, it indicates that the initial monitor may be faulty.
Use The Problematic Monitor Directly With Pc
In some cases, the issue might not be with the docking station but with the monitor itself. To determine if the monitor is the problem, follow these steps:
- Disconnect the monitor from the docking station.
- Connect the problematic monitor directly to your computer using the appropriate cables.
- If the monitor works fine when connected directly to the PC, it suggests that the issue may lie within the docking station.
- However, if the monitor still doesn’t work, there might be a problem with the monitor itself.
Replace Cables Or Adapters To Rule Out Faulty Accessories
Faulty cables or adapters can also be the cause of the problem. To rule out this possibility:
- Disconnect the video cable connecting the monitor to the docking station.
- Inspect the cable for any visible damage, bent pins, or loose connections.
- If you notice any issues, replace the cable or adapter with a known working one.
- Ensure that the video cable is securely connected to both the monitor and the docking station.
By following these steps and testing different components, you can identify and isolate the source of the problem when one monitor is not working on your docking station.
Explore Software Solutions
If your docking station is not detecting one of your monitors, try disconnecting and reconnecting the docking station to your laptop. Also, check for any damaged or bent pins on the video cable and make sure it is securely connected to both the monitor and docking station.
These troubleshooting steps may help resolve the issue.
Look Into Multi-monitor Management Software
One possible solution to explore when you encounter the issue of one monitor not working on a docking station is to look into multi-monitor management software. This software is designed to help you manage and troubleshoot issues with multiple monitors connected to your docking station.
Multi-monitor management software can provide various features such as screen configuration, monitor detection, and resolution settings. By using this software, you can easily identify and troubleshoot any issues related to your monitors and docking station connectivity.
- DisplayFusion
- Ultramon
- Actual Multiple Monitors
Adjust Power Settings Related To Usb Devices And Monitors
Another potential solution to consider is adjusting the power settings related to USB devices and monitors. Sometimes, power settings can interfere with the proper functioning of your docking station and connected monitors.
To adjust the power settings, follow these steps:
- Open the Control Panel on your computer.
- Click on “Power Options.”
- Select the power plan that is currently in use and click on “Change plan settings.”
- Click on “Change advanced power settings.”
- Look for settings related to USB devices and monitors.
- Make sure these settings are set to appropriate values, such as “Maximum Performance” or “Always On.”
- Save the changes and restart your computer.
By adjusting the power settings, you can ensure that your docking station and connected monitors receive the necessary power and maintain a stable connection.
Consider Any Recent Software Changes That Could Affect Connectivity
If you are facing issues with one monitor not working on your docking station, it is crucial to consider any recent software changes that could be affecting the connectivity. Software updates, driver installations, or changes in display settings can potentially disrupt the connection between your docking station and monitor.
To investigate recent software changes, follow these steps:
- Check for any recent updates installed on your computer.
- Review the release notes or changelogs of these updates to see if there are any known issues related to docking station connectivity.
- Roll back recent driver installations or updates that might be causing the problem.
- Verify and adjust the display settings to ensure they are compatible with your docking station and monitor.
By considering recent software changes, you can pinpoint any specific software-related issues that might be causing the problem and take appropriate action to resolve them.
Seek Professional Support
If you’re facing the issue of one monitor not working on your docking station, try disconnecting and reconnecting the docking station to your laptop. Make sure to also check the video cable for any damage or bent pins. By ensuring proper connection and checking for any faults, you can troubleshoot and resolve this problem effectively.
Contact Manufacturer’s Customer Service For Guidance
If you’ve tried troubleshooting on your own and your monitor still isn’t working on your docking station, it may be time to seek professional support. The manufacturer’s customer service team can provide you with expert guidance and assist you in resolving the issue. To get in touch with them, follow these steps:- Locate the manufacturer’s website.
- Navigate to the “Support” or “Contact Us” section.
- Look for the customer service phone number or email address.
- Contact them directly and explain the problem you’re facing with your monitor.
Utilize Online Forums For Community-based Help
Another option for seeking professional support is to turn to online forums where you can find community-based help. These forums often have experienced users, tech enthusiasts, and even representatives from the manufacturer who can assist you in resolving the issue with your monitor on the docking station. To find relevant forums, follow these steps:- Search for the manufacturer’s name along with keywords such as “monitor not working on docking station” or “docking station troubleshooting.”
- Explore the forums that appear in the search results.
- Join the forum that seems most active and helpful.
- Post a detailed description of your problem, including the make and model of your docking station and monitor.
- Explain the troubleshooting steps you’ve taken so far.
Consider Third-party Repair Services If Under Warranty
If your docking station or monitor is still under warranty, you may have the option to consider third-party repair services. These services specialize in fixing issues with electronic devices and can provide professional assistance with your monitor not working on the docking station. Follow these steps to find reputable third-party repair services:- Research local repair shops or authorized service centers in your area.
- Check their reviews and ratings to ensure their reliability.
- Contact them directly and inquire about their expertise in repairing docking stations and monitors.
- Ask if they honor warranties and if they have experience with your specific make and model.

Credit: www.amazon.com
Frequently Asked Questions Of One Monitor Not Working On Docking Station
Why Won’t My Docking Station Detect My Monitor?
Ensure that the docking station is properly connected to the laptop and check for any damaged pins on the video cable. Also, make sure the cable is securely connected to both the monitor and docking station. If the issue persists, it may be due to an incomplete configuration or compatibility problem.
You can try adjusting the display settings or using a different cable or connector.
Why Is Only One Of My Dual Monitors Working?
If only one of your dual monitors is working, try the following steps: 1. Disconnect and reconnect the docking station to the laptop. 2. Check for damaged or bent pins on both ends of the video cable. 3. Securely reconnect the cable to the monitor and docking station.
4. Ensure that the video cable is properly connected to both the monitor and docking station. 5. If using a docking station, try connecting the other monitor directly to the laptop’s HDMI port.
How Do I Get My Second Monitor To Work With My Docking Station?
To get your second monitor to work with your docking station, try these steps: 1. Disconnect and reconnect the docking station to your laptop. 2. Check the video cable for any damage or bent pins. 3. Securely reconnect the cable to the monitor and docking station.
4. Ensure the video cable is connected properly to both the monitor and docking station. 5. Restart your computer and check if the second monitor is detected.
Why Does My Docking Station Only Recognize One Monitor?
Your docking station may only recognize one monitor due to a faulty video cable, damaged or bent pins, or an incomplete configuration in the display settings. Try disconnecting and reconnecting the docking station and video cable, ensuring they are securely connected.
If the issue persists, try using a different cable or connecting the second monitor directly to the laptop’s HDMI port.
Conclusion
If you are experiencing the issue of one monitor not working on a docking station, there are several steps you can take to troubleshoot the problem. First, try disconnecting and reconnecting the docking station to the laptop, as well as checking for damaged or bent pins on the video cable.
Ensure that the video cable is securely connected to both the monitor and the docking station. If these steps don’t solve the issue, it’s possible that there is an incomplete configuration in the display settings or that the docking station is incompatible with your computer.
By following these troubleshooting steps, you should be able to resolve the problem and get both monitors working properly.