Nvidia Second Monitor Not Detected Ubuntu: Troubleshooting Guide
The most common reason for Nvidia not detecting a second monitor on Ubuntu is a hardware failure, such as a faulty cable or monitor. To fix this, check your display settings and click “Detect Displays” to force Ubuntu to search for the monitor.
Another option is to use the “xserver-xorg-video-nouveau” driver, although it may not work after the computer sleeps. Additionally, you can try connecting the monitor to a different port or using a different cable. If none of these solutions work, it is recommended to seek further assistance from Ubuntu support forums or NVIDIA Developer Forums.

Credit: www.drivereasy.com
Initial Checks For Troubleshooting
When you encounter the issue of your Nvidia second monitor not being detected on Ubuntu, there are several initial checks you can perform to troubleshoot the problem. These checks will help you identify and resolve any potential issues with physical connections, hardware compatibility, and driver updates. By following these steps, you can increase the chances of successfully resolving the problem and getting your second monitor up and running.
Verify Physical Connections And Hardware Integrity
The first step is to ensure that all physical connections between your Nvidia graphics card, second monitor, and your computer are properly established. Check that the cables, such as HDMI or DisplayPort, are securely connected to both the monitor and the graphics card. Additionally, make sure that there are no loose connections or damaged cables that could be causing the issue. It’s also a good idea to try using a different cable or port to rule out any potential problems.
Check Compatibility Of The Nvidia Graphics Card With Ubuntu
Another possible reason for your second monitor not being detected is compatibility issues between your Nvidia graphics card and Ubuntu. Some older or less common graphics cards may require additional configuration or driver updates to ensure full compatibility with the Ubuntu operating system. Consult the Nvidia website or relevant forums to determine if your graphics card model is fully supported by Ubuntu. If there are known compatibility issues, you may need to explore alternative solutions or consider upgrading your graphics card.
Ensure Nvidia Drivers Are Up-to-date
Updating your Nvidia drivers is crucial for optimal performance and compatibility with Ubuntu. Outdated drivers can lead to various issues, including the failure to detect your second monitor. To ensure your Nvidia drivers are up-to-date, you can follow these steps:
- Open the Terminal by pressing
Ctrl+Alt+Ton your keyboard. - Type the following command and press
Enterto open the Software & Updates application:software-properties-gtk --open-tab=4 - In the “Additional Drivers” tab, wait for the list to populate.
- Select the recommended Nvidia driver from the list and click “Apply Changes”.
- Enter your password when prompted and wait for the driver installation to complete.
- Once the installation is finished, restart your computer.
After restarting, check if your second monitor is now detected by Ubuntu. If not, you may need to explore further troubleshooting steps or seek assistance from the Ubuntu community or Nvidia support.
Nvidia Second Monitor Configuration Steps
If you are using Ubuntu and facing the issue of Nvidia second monitor not being detected, there are a few steps you can follow to configure it correctly. In this article, we will discuss the necessary steps to access display settings in Ubuntu, use Nvidia X Server Settings for monitor detection, and manually configure through terminal commands.
Accessing Display Settings In Ubuntu
To begin the configuration process, you need to access the display settings on your Ubuntu system. Follow the steps below:
- Open the Activities overview.
- Start typing Displays and click on Displays to open the panel.
This will open the display settings panel where you can configure your monitors.
Using Nvidia X Server Settings For Monitor Detection
If your second monitor is not being detected automatically, you can use Nvidia X Server Settings to manually configure it. Here’s how:
- Open the Activities overview.
- Start typing Nvidia X Server Settings and click on the application to open it.
- In the application, navigate to the X Server Display Configuration tab.
- Click on the Detect Displays button to search for the second monitor.
- If the monitor is detected, you can adjust the settings as per your requirements.
- If the monitor is still not detected, you can try some manual configuration steps.
Manual Configuration Through Terminal Commands
If the above methods did not detect your second monitor, you can try manually configuring it through terminal commands. Here’s how:
- Open the Terminal application.
- Type the following command to list the available displays:
xrandr -q - Identify your second monitor in the list of displays.
- Use the following command to enable the second monitor:
xrandr --output [SECOND_MONITOR_NAME] --auto - If the monitor does not have the correct resolution, you can set it using the following command:
xrandr --output [SECOND_MONITOR_NAME] --mode [RESOLUTION]
By following these steps, you should be able to configure your Nvidia second monitor successfully on Ubuntu.
Common Ubuntu Detection Problems With Solutions
Are you experiencing issues with your Nvidia second monitor not being detected on Ubuntu? This problem could be caused by hardware failures such as a faulty cable or monitor. To troubleshoot, try checking your display settings and clicking the “Detect Displays” button to force Ubuntu to search for the monitor.
Another solution could be to use the “xserver-xorg-video-nouveau” driver, although it may not work after your computer sleeps.
Ubuntu is a popular operating system known for its stability and user-friendly interface. However, like any other operating system, Ubuntu may encounter some issues when it comes to detecting and using a second monitor efficiently. In this article, we will discuss some common Ubuntu detection problems and provide solutions to address them.
Handling The Black Screen Issue On The Second Monitor
One of the common issues faced by Ubuntu users is the black screen problem on the second monitor. This can be frustrating as it hinders your productivity. Here are some steps you can follow to resolve this issue:
- Check the connection: Ensure that the HDMI or DisplayPort cable connecting the second monitor to your Ubuntu system is securely plugged in.
- Restart your system: Sometimes, a simple restart can help resolve the black screen issue. Close all applications and restart your computer.
- Adjust display settings: Open the display settings on your Ubuntu system and check if the second monitor is detected. If not, try clicking the “Detect Displays” button to force Ubuntu to search for the monitor.
- Update graphics drivers: Outdated or incompatible graphics drivers can cause display issues. Update your NVIDIA graphics drivers to the latest version by following the manufacturer’s instructions.
Resolving Issues After Computer Sleeps
Another common problem faced by users is the inability to detect the second monitor after the computer wakes up from sleep mode. To resolve this issue, follow these steps:
- Open the Power settings: Go to the system settings in Ubuntu and click on “Power”.
- Adjust power settings: Check the power settings for sleep mode and make sure it is set to a reasonable time before the system goes to sleep.
- Disable screen lock: Sometimes, screen lock settings can interfere with the detection of the second monitor. Disable the screen lock or adjust the settings to make sure it does not affect the display configuration.
- Restart X server: If the issue persists, you can try restarting the X server by pressing Ctrl+Alt+Backspace. This will restart the display manager and may resolve the problem.
Addressing Driver Conflicts: Nouveau Vs Nvidia
Driver conflicts can also cause issues with detecting the second monitor in Ubuntu. One common conflict is between the Nouveau driver (open-source) and the Nvidia driver (proprietary). Here’s how you can address this conflict:
- Disable Nouveau driver: Open a terminal and run the following command to disable the Nouveau driver:
sudo nano /etc/modprobe.d/blacklist.conf. Add the lineblacklist nouveauto the file and save it. - Install Nvidia driver: Install the Nvidia driver by following the manufacturer’s instructions. You can download the latest driver from the Nvidia website or use the Ubuntu Software Center.
- Reboot your system: After installing the Nvidia driver, reboot your system to apply the changes.
By following these steps, you can resolve common Ubuntu detection problems and enjoy seamless dual-monitor setup on your Ubuntu system. Remember to keep your system and drivers up to date for the best performance.
Advanced Troubleshooting Techniques
When it comes to troubleshooting second monitor detection issues on Ubuntu with Nvidia graphics cards, it is important to have some advanced techniques up your sleeve. In this section, we will explore three techniques that can help you overcome this frustrating problem.
Utilizing Xorg.conf For Custom Display Settings
One way to bypass the second monitor detection issue is by utilizing the Xorg.conf file to specify custom display settings. This configuration file allows you to manually define the display configuration for your system. Here’s how you can do it:
- Open the terminal and type the following command to edit the Xorg.conf file:
sudo nano /etc/X11/xorg.conf - If the file doesn’t exist, create a new one by using the command:
sudo touch /etc/X11/xorg.conf - In the Xorg.conf file, add the necessary configuration for your second monitor. You can use the
Identifier,Monitor,Screen, andDevicesections to define the display. Consult the Nvidia documentation or community forums for specific syntax details. - Save the changes and exit the editor.
- Restart your system for the changes to take effect.
This method allows you to have fine-grained control over your display settings and can often solve detection issues.
Kernel And X Server Version Compatibility Checks
Another potential cause of second monitor detection problems is compatibility issues between the kernel and X server versions. The kernel is the core of the operating system, while the X server is responsible for managing graphical output. Here’s how you can check their compatibility:
- Open the terminal and type the following command to check your kernel version:
uname -a - Note down the kernel version.
- Type the following command to check your X server version:
X -version - Compare the kernel and X server versions to ensure they are compatible. Look for any known compatibility issues between the two versions in the Nvidia documentation or community forums.
- If there is a mismatch, consider updating either the kernel or X server to a compatible version.
Performing these compatibility checks can help resolve any conflicts between the kernel and X server, ensuring smooth second monitor detection.
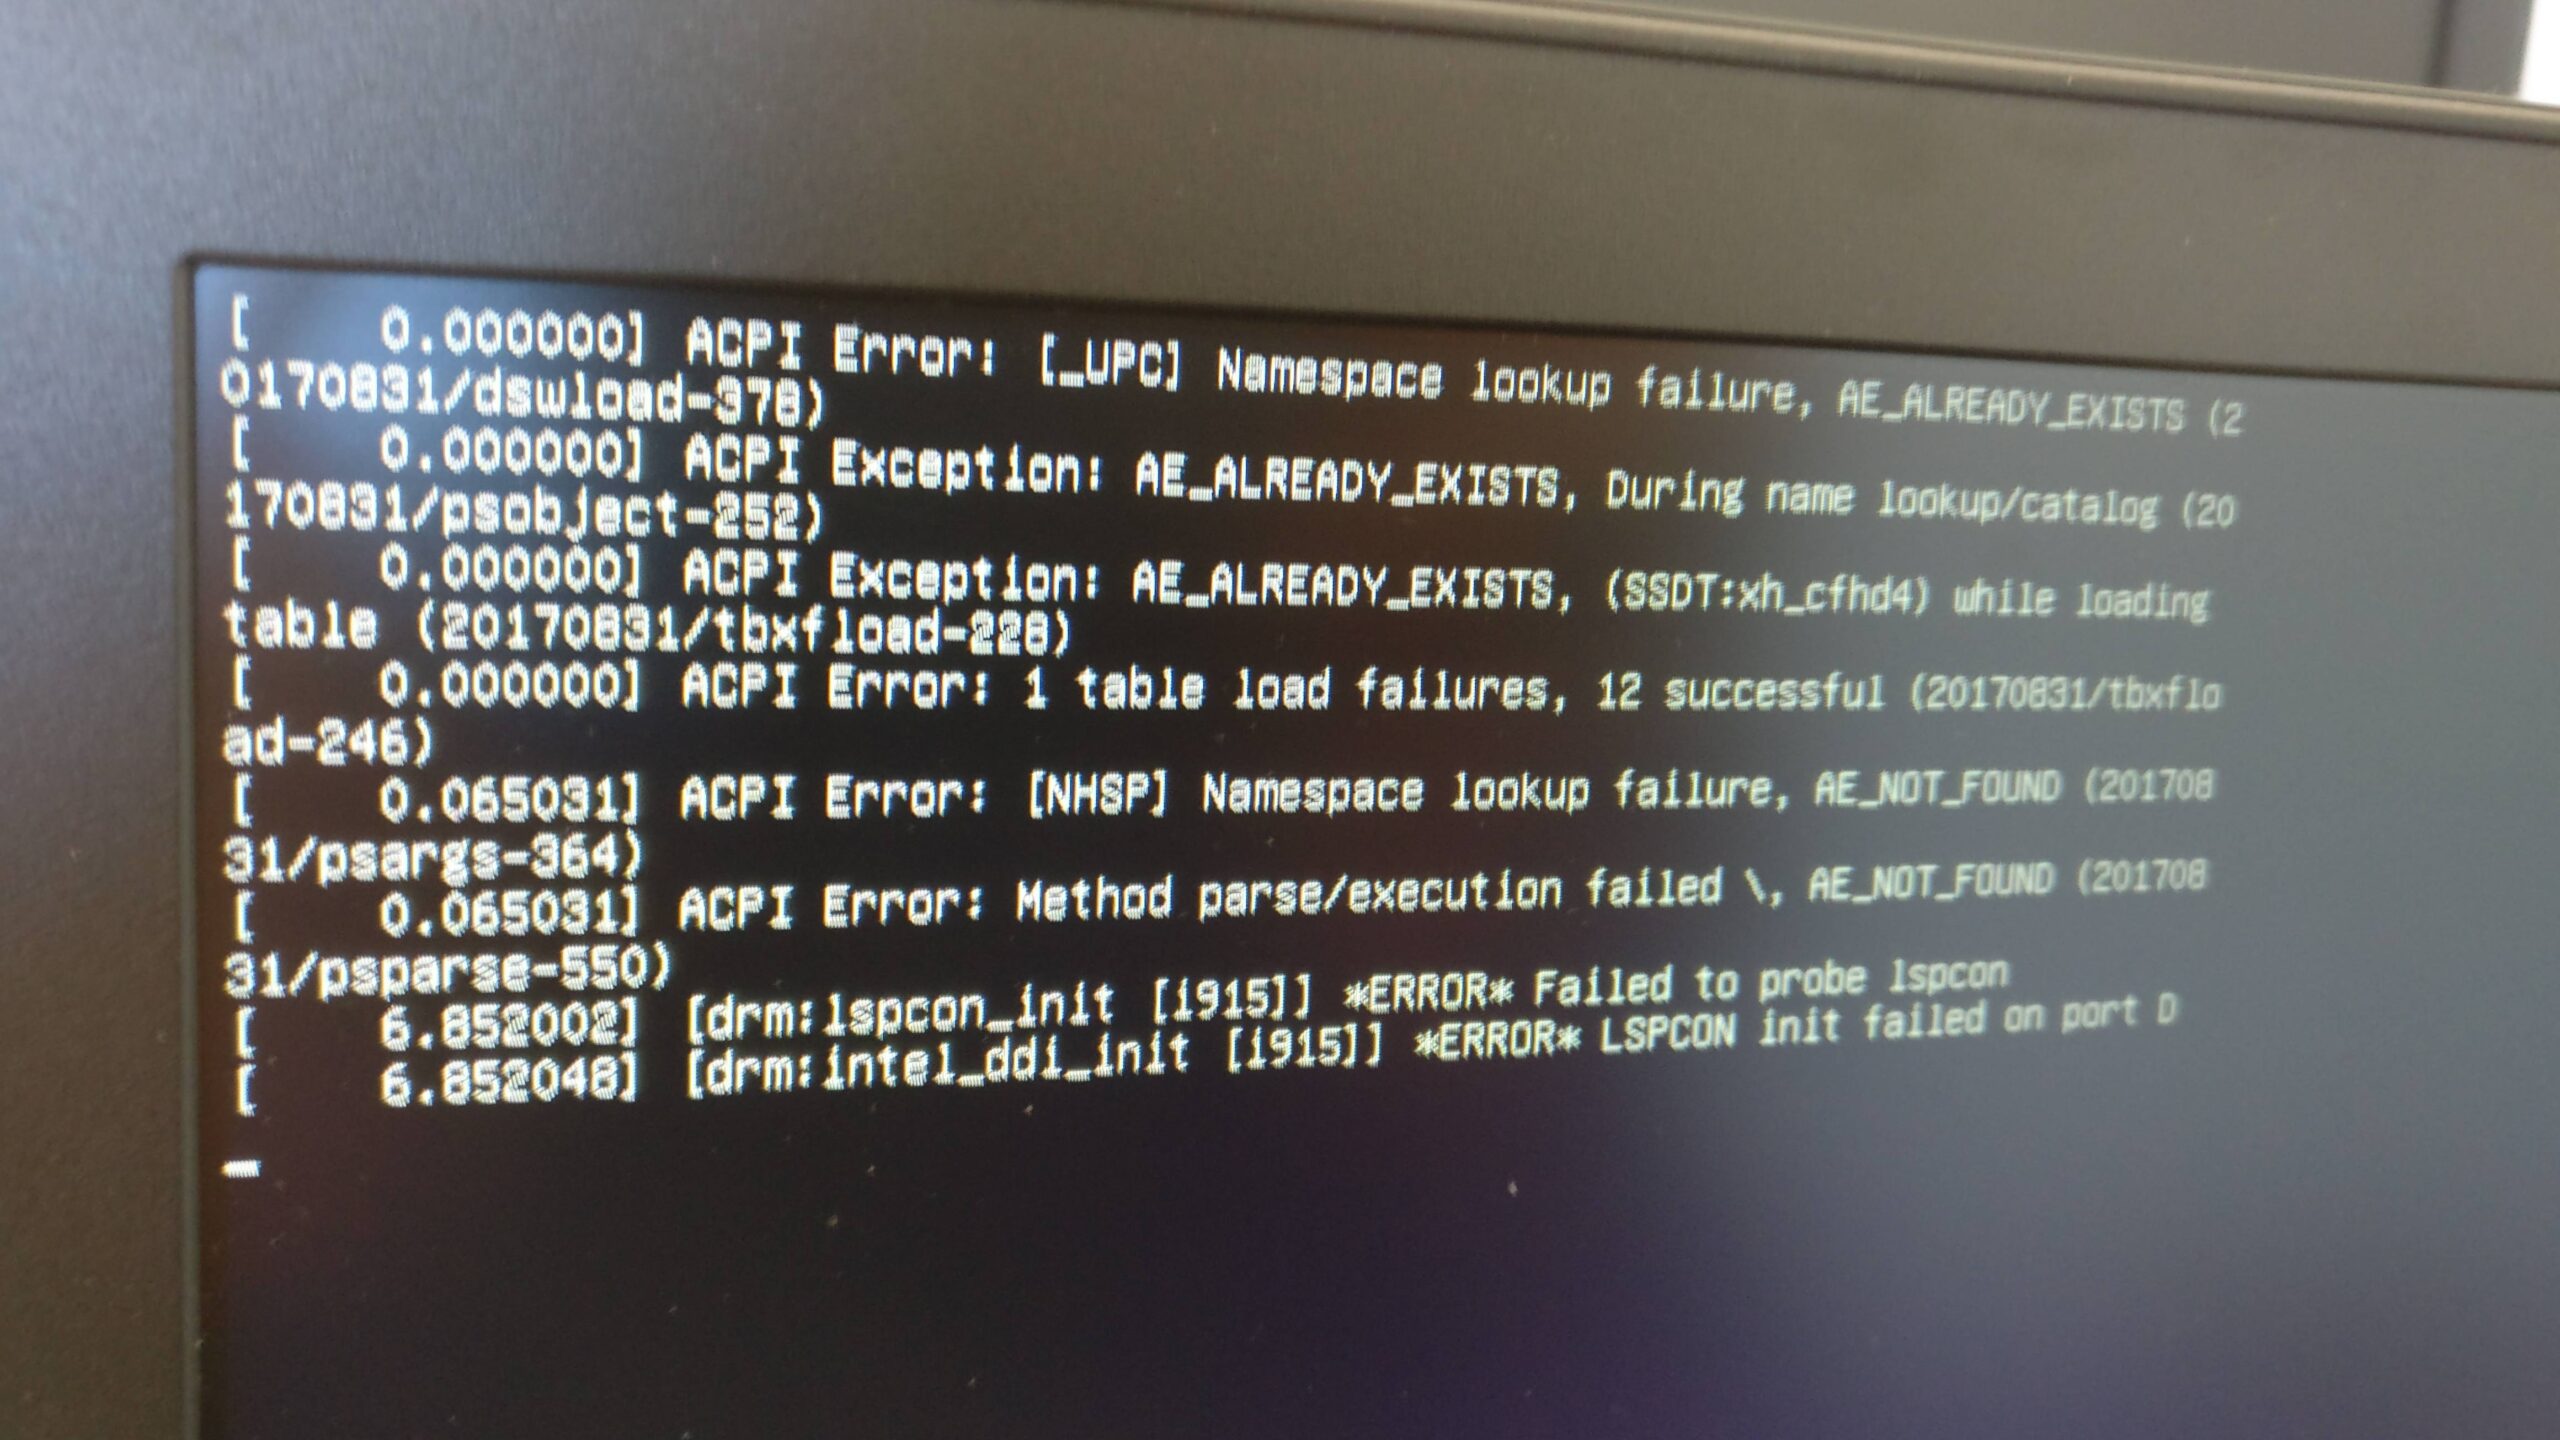
Debugging With System Logs For Display Issues
System logs provide valuable insights into the cause of display issues. By analyzing these logs, you can identify any error messages or warnings that may shed light on the second monitor detection problem. Here’s how you can do it:
- Open the terminal and type the following command to view the system logs:
sudo journalctl -b -p err - Look for any error messages related to the display or Nvidia drivers.
- Research these error messages online or seek help from the Ubuntu community forums to understand their possible causes and solutions.
- Based on the information gathered, take appropriate action to resolve the issue.
Utilizing system logs for debugging can provide valuable clues and aid in troubleshooting second monitor detection issues effectively.
When Ubuntu Doesn’t Recognize An External Monitor
If your Nvidia second monitor is not being detected in Ubuntu, it could be due to hardware failure, such as a faulty cable or monitor. To troubleshoot, open the display settings and click “Detect Displays” to prompt Ubuntu to search for the monitor.
Additionally, make sure your system is configured to recognize multiple monitors in the NVIDIA settings.
Tweaking Display Configurations With Xrandr
If your Ubuntu system is not recognizing an external monitor, one solution is to tweak the display configurations using xrandr. This powerful command-line tool allows you to control and manipulate your display settings, including adding and configuring external monitors.
To use xrandr, open a terminal window and enter the following command:
xrandrThis will display a list of connected displays and their resolutions. If your second monitor is not detected, you can try forcing its detection by entering the command:
xrandr --addmode [your-monitor-name] [desired-resolution]Replace [your-monitor-name] with the name of your second monitor, and [desired-resolution] with the resolution you want to set.
After adding the mode, you can enable the second monitor by entering the command:
xrandr --output [your-monitor-name] --mode [desired-resolution] --right-of [primary-monitor-name]Replace [your-monitor-name] and [desired-resolution] with the appropriate values, and [primary-monitor-name] with the name of your primary monitor.
Dealing With Usb-c And Displayport Monitor Detection
If you are using a USB-C or DisplayPort connection for your external monitor and Ubuntu is not detecting it, there are a few possible solutions to try.
First, make sure that the cable is properly connected and functioning. Try using a different cable or port on your computer to see if that resolves the issue.
You can also try updating your graphics drivers. Nvidia users can use the “Additional Drivers” tool in Ubuntu to install the latest proprietary graphics drivers. This may help with monitor detection and compatibility.
If your monitor still isn’t detected, you can also try using a different display manager. Ubuntu uses the GNOME display manager by default, but you can install and use other display managers like LightDM or SDDM. Sometimes, different display managers can handle monitor detection differently, so it’s worth giving this a try.
Strategies For Resolving Persistent Detection Failures
If you are experiencing persistent issues with Ubuntu not detecting your second monitor, here are a few strategies you can try:
- Check your monitor’s settings: Sometimes, the monitor itself may have settings that need to be adjusted for it to be recognized by Ubuntu. Consult the user manual or the manufacturer’s website to ensure that the monitor is configured correctly.
- Restart the display service: You can try restarting the display service in Ubuntu to refresh the monitor detection. Open a terminal and enter the command “sudo systemctl restart display-manager.service” to do this.
- Reset the BIOS settings: In some cases, incorrect BIOS settings can interfere with monitor detection. Restart your computer and access the BIOS settings. Look for any options related to display or graphics and restore them to their default values.
- Update Ubuntu: Keeping your Ubuntu system up to date with the latest updates and patches is crucial for ensuring compatibility and resolving any known issues. Use the “Software Updater” tool in Ubuntu to check for and install updates.
- Seek community support: If none of the above strategies work, it may be helpful to seek support from the Ubuntu community. Visit forums, chat rooms, or online communities to ask for assistance from experienced Ubuntu users who may have encountered similar issues and found solutions.
Frequently Asked Questions On Nvidia Second Monitor Not Detected Ubuntu
Why Ubuntu Does Not Detect Second Monitor?
Ubuntu may not detect a second monitor due to hardware failure, such as a faulty cable or monitor. To fix this, open display settings and click “Detect Displays” to force Ubuntu to search for the monitor. If using NVIDIA graphics card, follow instructions to set up multiple displays.
How Do I Fix Nvidia Not Detecting My Second Monitor?
To fix Nvidia not detecting your second monitor on Ubuntu, follow these steps: 1. Open the display settings on your Ubuntu system. 2. Check if the second monitor is detected. If not, click “Detect Displays” to force Ubuntu to search for it.
3. Ensure the cable connecting the second monitor is working properly. 4. Consider checking if the second monitor is faulty. 5. If using the “xserver-xorg-video-nouveau” driver, note that it may not work after your computer sleeps. In case of hardware failure or persistent issues, seek professional assistance.
How Do I Get Ubuntu To Recognize My External Monitor?
To get Ubuntu to recognize your external monitor, follow these steps: 1. Connect the monitor to your computer. 2. Open the Activities overview and start typing “Displays”. 3. Click on “Displays” to open the panel. 4. If the monitor is not detected, click on the “Detect Displays” button to force Ubuntu to search for it.
5. Adjust the settings as needed. If the issue persists, it could be a hardware problem with the cable or the monitor itself.
Why Is My 2nd Monitor Not Being Detected?
The most common reason your 2nd monitor is not being detected on Ubuntu is due to hardware failure. It could be a faulty cable or monitor. To troubleshoot, check your display settings and click “Detect Displays” to force Ubuntu to search for the monitor.
You can also try connecting the monitor to a different port or updating your NVIDIA graphics card driver.
Conclusion
If you are experiencing the issue of Nvidia not detecting a second monitor on Ubuntu, there are a few troubleshooting steps you can take. Firstly, check the hardware by ensuring that the cable and monitor are not faulty. Secondly, open the display settings on your Ubuntu system and click the “Detect Displays” button to force Ubuntu to search for the monitor.
If these steps do not resolve the issue, you may need to seek further assistance or explore alternative display drivers.