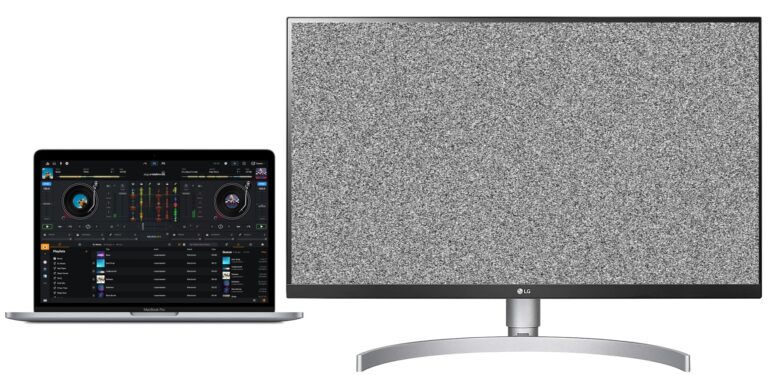
New PC Build Not Displaying on Monitor: Troubleshooting Tips & Fixes
If your new PC build is not displaying on the monitor, start by testing the monitor with another device or testing another monitor with the computer to eliminate the monitor as the source of the problem. Additionally, ensure that both the motherboard power cable and the CPU power cable are properly plugged in, and check that the RAM is seated correctly.
Troubleshooting the issue may require further investigation and steps, but these initial checks can help identify common causes of no display on a new PC build.
Confirming Power And Connections
When building a new PC, one of the most frustrating issues you may encounter is a lack of display on the monitor. Before diving into more complex troubleshooting steps, it’s important to confirm that the power and connections are properly set up. This will help eliminate any simple issues that might be causing the problem. Here are a few crucial steps to take:
Verify All Cables Are Securely Connected
Start by checking all the cables connected to your PC and monitor. Ensure that they are securely plugged in and not loose. Sometimes, a loose cable can lead to no display output. Check both ends of the cables to make sure they are properly connected.
Check Power Supply To Monitor And Pc
Next, confirm that both your monitor and PC have a stable power supply. Check if the monitor is powered on and connected to a functioning power outlet. Additionally, make sure your PC is receiving power by verifying that the motherboard power cable and CPU power cable are properly plugged in. These power connections are essential for your PC to function correctly.
Ensure Proper Input Source Is Selected On Monitor
In some cases, the issue might be as simple as selecting the correct input source on your monitor. If you have multiple input options (such as HDMI, DisplayPort, or DVI), ensure that the right input source is selected on your monitor. Using the wrong input source can result in a blank screen even if everything else is connected correctly.
By following these steps to confirm power and connections, you can eliminate any simple issues that may be causing the lack of display on your new PC build. If the problem still persists after checking these basic connections, then further troubleshooting might be required.

Credit: m.youtube.com
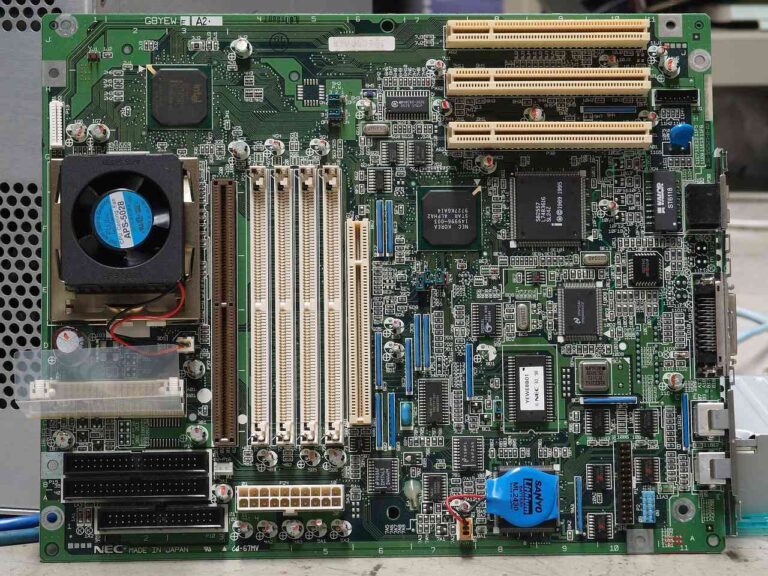
Inspecting The Graphics Card
When it comes to troubleshooting a new PC build that is not displaying on the monitor, one of the critical components to inspect is the graphics card. The graphics card is responsible for rendering images and videos, and if it is not functioning correctly, it can lead to a blank or black screen. In this section, we will explore two essential steps to inspect the graphics card and resolve any potential issues.
Bre-seat The Graphics Card/b
The first step is to re-seat the graphics card. Over time, the graphics card may become slightly loose due to vibrations or movement during transportation. Re-seating the graphics card ensures that it is properly connected to the motherboard and receives the necessary power and data signals.
To re-seat the graphics card, follow these steps:
- Turn off the computer and unplug it from the power source.
- Open the computer case to access the internal components.
- Locate the graphics card, which is usually inserted into a PCI Express slot on the motherboard.
- Gently remove the graphics card by pressing down on the release latch or unscrewing any securing screws.
- Carefully inspect the gold contacts on the graphics card for any dust or debris. If present, use a soft, lint-free cloth to clean them.
- Align the graphics card with the PCI Express slot and firmly push it into place until it clicks into position.
- Secure the graphics card with any screws or clips that were removed during the process.
- Close the computer case and reconnect the power cable.
- Turn on the computer and check if the display issue has been resolved.
Btest With Another Graphics Card If Available/b
If re-seating the graphics card does not solve the display problem, the next step is to test with another graphics card if available. Sometimes, the graphics card itself may be faulty and require replacement.
To test with another graphics card, follow these steps:
- Turn off the computer and unplug it from the power source.
- Open the computer case to access the internal components.
- Remove the current graphics card by following the steps outlined in the previous section.
- If you have another graphics card available, insert it into the PCI Express slot on the motherboard.
- Secure the new graphics card with any screws or clips if necessary.
- Close the computer case and reconnect the power cable.
- Turn on the computer and check if the display issue has been resolved.
If the new graphics card displays properly, it indicates that the original graphics card was indeed faulty. In this case, you may need to contact the manufacturer for a replacement or consider purchasing a new graphics card.
In conclusion, inspecting the graphics card is an essential step in troubleshooting a new PC build that is not displaying on the monitor. By re-seating the graphics card and testing with another graphics card if available, you can identify and resolve any graphics card-related issues.
Memory And Motherboard Troubleshooting
If you’re experiencing a problem with your new PC build not displaying on the monitor, there are a few troubleshooting steps you can try. First, test the monitor with another device or try a different monitor with your computer to eliminate the monitor as the source of the problem.
Additionally, make sure that both the motherboard power cable and the CPU power cable are properly plugged in, and check that the RAM is seated properly.
Confirm Ram Is Seated Correctly
One possible reason for your new PC build not displaying on the monitor could be an issue with the RAM. Incorrectly seated RAM modules can prevent your computer from POSTing (Power-On Self-Test) and displaying anything on the screen. To troubleshoot this issue, follow these steps:- Shut down your computer and unplug the power cord.
- Open up your computer case and locate the RAM slots on the motherboard.
- Check if the RAM modules are properly inserted into the slots. They should be aligned correctly and fully seated.
- If you suspect a faulty RAM module, try removing it and reseating it again. Make sure it clicks into place securely.
Test With Minimal Hardware Configuration
Another troubleshooting step to consider when your new PC build is not displaying on the monitor is to test with a minimal hardware configuration. This process helps identify any compatibility issues or faulty components that may be causing the problem. Here’s how you can do it:- Disconnect all unnecessary peripherals and expansion cards, such as extra hard drives, optical drives, and sound cards.
- Remove all but one RAM module, leaving it in the primary RAM slot.
- Disconnect any unnecessary cables except for the power supply and monitor cables.
- Power on your computer and see if it POSTs and displays on the monitor.
- If it does, gradually add back the disconnected components one by one, testing and observing if the issue reoccurs.
- If you encounter the problem after reconnecting a specific component, that component may be the culprit and should be further investigated or replaced.
Analyzing Post And Beep Codes
If your new PC build is not displaying on the monitor, there are a few troubleshooting steps you can take. First, test the monitor with another device or test another monitor with your computer to ensure the monitor is not the issue.
Additionally, make sure the motherboard power cable, CPU power cable, and RAM are all properly connected.
Listen For Beep Codes At Startup
When you power on your new PC build and it doesn’t display anything on the monitor, it’s time to analyze the POST (Power-On Self-Test) and beep codes. Beep codes are a series of sounds emitted by the motherboard during the startup process. These codes can provide important clues about the specific hardware issue that is causing the lack of display. So, take a moment to listen for any beep codes when you turn on your computer. Each beep code sequence corresponds to a specific error or warning.Use Motherboard Manual To Decode Messages
To decode the beep codes and understand what they mean, you’ll need to refer to the motherboard manual. The motherboard manual contains valuable information about the various beep code patterns and their corresponding meanings. It will guide you on how to interpret the beeps and help you identify the specific component or hardware causing the issue. So, make sure to have your motherboard manual handy when troubleshooting your new PC build. In conclusion, when your new PC build is not displaying anything on the monitor, it’s important to listen for beep codes at startup and consult your motherboard manual to decode these messages. This will enable you to pinpoint the hardware issue and take the necessary steps to resolve it. By understanding and analyzing the POST and beep codes, you can troubleshoot your new PC build effectively and get your system up and running in no time. Note: Remember to refer to your specific motherboard manual for accurate information regarding the beep codes and their meanings.New Pc Build Not Displaying Fix
Are you facing the frustrating issue of your new PC build not displaying on your monitor? Don’t worry, we’ve got you covered with some effective fixes to get your display up and running. In this blog post, we will discuss two troubleshooting methods to resolve the “New PC Build Not Displaying” issue. Read on to find out how to fix this problem and get your monitor working.
H3clear Cmos To Reset Bios Settings/h3
If you’ve successfully built your PC but still can’t see anything on your monitor, one possible solution is to clear the CMOS to reset the BIOS settings. This can help resolve any configuration issues that might be causing the display problem. Here’s how you can do it:
- Turn off your computer and unplug the power cord.
- Locate the CMOS battery on your motherboard. It’s a round, silver-colored battery.
- Remove the CMOS battery carefully using a small flathead screwdriver or your fingernail.
- Wait for about 5 minutes to ensure that the CMOS settings are completely reset.
- Place the CMOS battery back into its socket and ensure it is properly seated.
- Plug in the power cord and turn on your computer.
- Check if the display issue is resolved. If not, move on to the next troubleshooting method.
H3use Integrated Graphics To Isolate Issues/h3
If the CMOS reset didn’t fix the problem, it’s time to isolate the issue by using integrated graphics. This method will help determine if the problem lies with the graphics card or other hardware components. Follow these steps:
- Turn off your computer and unplug the power cord.
- Remove the graphics card from the PCIe slot on your motherboard.
- Locate the HDMI or DisplayPort output on your motherboard. This is usually located near the USB ports.
- Connect your monitor to the integrated graphics output using the appropriate cable (HDMI or DisplayPort).
- Plug in the power cord and turn on your computer.
- Check if you can see the display now. If yes, it indicates a problem with your graphics card. Consider troubleshooting or replacing it.
- If you still can’t see the display, it could be an issue with other hardware components. You may need to consult a professional or refer to your motherboard manual for further troubleshooting steps.
By following these two methods, you can effectively troubleshoot and fix the “New PC Build Not Displaying” issue. Remember to always double-check your connections and consult your hardware manual for specific instructions. Hopefully, this guide has helped you resolve the display problem and get your new PC up and running smoothly.
When To Consult A Technician
Building a new PC can be an exciting experience, but it can also come with its fair share of challenges. One frustrating issue that many DIY builders encounter is a new PC not displaying anything on the monitor. If you’ve already tried troubleshooting steps like testing the monitor with another device or checking cable connections, and you’re still facing the same problem, it may be time to consult a technician.
If Problems Persist After All Tests
If you’ve exhaustively tried all the recommended troubleshooting steps and your new PC is still not displaying anything on the monitor, it’s a good indication that there might be an underlying hardware issue. In this case, seeking the assistance of a qualified technician can be beneficial. They have the expertise to diagnose and identify the root cause of the problem, whether it’s a faulty component or compatibility issue.
Potential Warranty Or Hardware Replacement Considerations
When your newly built PC fails to display on the monitor, it’s crucial to consider potential warranty or hardware replacement options. A technician can evaluate your hardware components and determine if any of them need to be replaced or if you’re eligible for warranty coverage. Getting professional advice can save you time, money, and unnecessary frustration.
Remember, building a PC requires technical knowledge and troubleshooting skills. While it’s satisfying to take on the challenge yourself, sometimes it’s best to leave it to the experts. Consulting a technician can provide you with the necessary guidance and expertise to resolve the issue and get your new PC up and running smoothly.
Frequently Asked Questions For New Pc Build Not Displaying On Monitor
Why Wont My New Pc Show On My Monitor?
If your new PC is not showing on your monitor, here are some troubleshooting steps to consider: 1. Check your monitor by testing it with another device or using another monitor with your computer. 2. Make sure both your motherboard power cable and CPU power cable are properly plugged in.
3. Ensure that your RAM is seated properly. 4. Verify that your monitor is running on the correct output mode. 5. Consider trying a different cable type (e. g. , HDMI instead of DisplayPort) or connecting your monitor to the graphics card instead of the HDMI port on the motherboard.
Why Is My Monitor Not Seeing My Pc?
If your monitor is not detecting your PC, there could be a few reasons. First, test your monitor with another device or try another monitor with your computer to rule out any monitor issues. Make sure the motherboard power cable and CPU power cable are properly plugged in, and check that the RAM is seated correctly.
If the issue persists, it may be a loose or damaged cable.
Why Does My Monitor Say No Signal On New Pc?
If your monitor says “no signal” on a new PC, there are a few possible causes. First, check that both your motherboard power cable and CPU power cable are plugged in properly. Ensure your RAM is seated correctly. You may also want to test your monitor with another device or test another monitor with your computer to eliminate the monitor as the source of the problem.
Can Ram Cause No Display?
Yes, faulty RAM can cause a no display issue on a computer. Ensure RAM is properly seated and functioning correctly. Test the monitor with another device to eliminate it as the source of the problem. Check cable connections and try different cable types if necessary.
Conclusion
In troubleshooting a new PC build not displaying on the monitor, it is crucial to start by testing the monitor with another device or trying another monitor with the computer. This will help identify if the issue lies with the monitor or the computer.
Additionally, ensure that the motherboard power cable, CPU power cable, and RAM are properly connected. Checking the cable connections and using a different cable type, such as HDMI instead of DisplayPort, can also help resolve the problem. By following these steps, you can troubleshoot and fix the issue of a new PC build not displaying on the monitor.