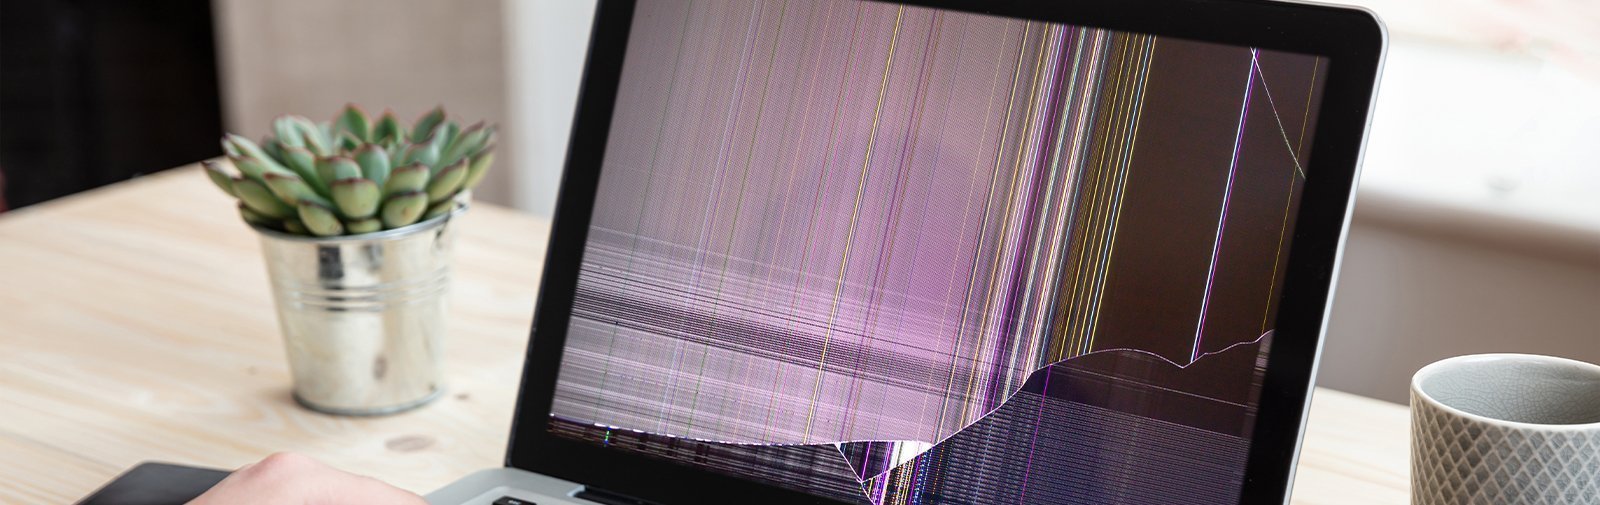
Monitor Not Working With Laptop: Troubleshooting Tips
To troubleshoot the issue of a monitor not working with a laptop, start by turning off both the computer and the monitor. Then, unplug the video cable connecting the two.
Check for any damage or bent pins on the video port and cable. If everything appears to be undamaged, reconnect the monitor to the computer. If the problem persists, try changing the cable connecting the external monitor. In some cases, a faulty cable could be the culprit.
Introduction (122 words): Having a monitor that isn’t working with your laptop can be frustrating and hinder productivity. Whether you’re trying to connect an external monitor or facing issues with your laptop’s screen not displaying on an external monitor, it’s essential to resolve the problem promptly. There can be several reasons behind this issue, including damaged video cables, bent pins, or faulty drivers. By following a few troubleshooting steps, you can often determine the cause and resolve the problem. We will explore various methods to troubleshoot and fix the issue of a monitor not working with your laptop. These solutions are designed to help you get your monitor functioning properly again and ensure a seamless connection between your laptop and the external display.
Troubleshooting Basics
When your monitor is not working with your laptop, it can be frustrating and hinder your productivity. However, before you panic and start looking for expensive solutions, there are a few troubleshooting basics you can try. By following these simple steps, you may be able to resolve the issue and get your monitor working again.
Ensure All Cables Are Securely Connected
One common reason why a monitor may not work with a laptop is due to loosely connected cables. To fix this issue, follow these steps:
- Turn off both the laptop and the monitor.
- Unplug the video cable that connects the monitor to the laptop.
- Inspect the video port on both the laptop and the monitor, ensuring there is no physical damage or bent pins.
- If there is no damage, securely reconnect the monitor to the laptop.
Verify The Power Supply To Both Laptop And Monitor
Another possible reason for a monitor not working with a laptop is a power supply issue. To troubleshoot this problem:
- Confirm that both the laptop and the monitor are connected to a working power source.
- Make sure the monitor is powered on.
- Turn off the laptop and then turn it back on to refresh the connection.
Confirm That The Correct Input Source Is Selected
It’s possible that your monitor is not working because the correct input source is not selected. Here’s what you can do:
On your monitor, use the menu buttons to navigate to the input source settings.
Ensure that the input source corresponds with the video port you have connected your laptop to. For example, if you have connected your laptop to the HDMI port on the monitor, ensure that HDMI is selected as the input source.
Check For Physical Damage To Cables And Ports
Physical damage to cables and ports can also cause your monitor not to work with your laptop. Check for the following:
- Inspect the video cable for any visible damage or fraying.
- Examine the video ports on both the laptop and the monitor for any physical damage.
If you find any damage, consider replacing the cable or seeking professional help.
By following these troubleshooting basics, you may be able to resolve the issue and get your monitor working with your laptop again. However, if the problem persists, it may be necessary to consult a professional or seek further technical support.

Credit: www.hp.com
Diagnosing Connectivity Issues
If you’re experiencing connectivity issues between your monitor and laptop, it can be frustrating and impact productivity. However, diagnosing the problem doesn’t have to be complicated. By following a few simple steps, you can identify and resolve the issue quickly. Below are some troubleshooting methods to help you get your monitor working with your laptop again.
Test With An Alternative Cable
One common cause of monitor connectivity issues is a faulty cable. To determine if the cable is the problem, try using an alternative cable to connect your laptop to the monitor. This will help you determine if the issue lies with the original cable or with the laptop itself.
Use A Different Port On The Laptop If Available
If testing with a different cable doesn’t solve the issue, try connecting the monitor to a different port on your laptop. Some laptops have multiple video ports, such as HDMI, DisplayPort, or VGA. By using a different port, you can determine if the problem is specific to a particular port on your laptop.
Connect The Monitor To Another Laptop Or Device For Testing
If the previous steps didn’t resolve the issue, connecting the monitor to another laptop or device can help determine if the problem lies with the monitor itself. By testing the monitor on a different device, you can determine if the issue is exclusive to your laptop or if it’s a problem with the monitor.
In conclusion, when troubleshooting monitor connectivity issues with your laptop, it’s important to test with an alternative cable, use a different port on the laptop if available, and connect the monitor to another laptop or device for testing. These steps can help you diagnose the problem and get your monitor working again. Remember to double-check the video cable, ports, and monitor settings, as these can also contribute to connectivity issues. By following these troubleshooting methods, you can quickly identify and resolve any connectivity problems between your monitor and laptop.
Setting And Driver Configuration
When your monitor refuses to work with your laptop, it can be frustrating and hinder your productivity. Often, these issues can be resolved through proper Setting and Driver Configuration. By adjusting display settings in the operating system, updating or reinstalling video drivers, and reviewing the monitor’s onboard menu settings, you can troubleshoot and resolve the problem.
Adjust Display Settings In The Operating System
If your laptop is not working with an external monitor, the first step is to check the display settings in the operating system. Here’s how:
- Turn on your laptop and ensure it is properly connected to the external monitor.
- Click on the Start menu and navigate to Settings.
- Select System and then Display.
- Under the Multiple displays section, click on the Detect button to allow your laptop to recognize the external monitor.
- If the monitor is still not recognized, try restarting both the laptop and the monitor.
Update Or Reinstall Video Drivers
Outdated or corrupt video drivers can cause compatibility issues between your laptop and the monitor. To update or reinstall the video drivers, follow the steps below:
- Visit the website of your laptop manufacturer or the graphics card manufacturer.
- Search for the latest video drivers compatible with your laptop model.
- Download and install the updated drivers, following the on-screen instructions.
- If the issue persists, consider reinstalling the video drivers. To do this, open the Device Manager on your laptop.
- Locate the Display Adapters section, right-click on the video driver, and select Uninstall.
- Restart your laptop and let the system automatically install the default video driver.
Review Monitor’s Onboard Menu Settings
Sometimes, the issue may lie in the settings of your monitor itself. To ensure the monitor is properly configured, follow these steps:
- Access the onboard menu settings of your monitor using the buttons on the monitor itself.
- Check for any settings related to input source or display mode and make sure they are set correctly.
- Verify that the monitor is set to the correct input source, such as HDMI or VGA, depending on the cable you are using.
- Also, check the brightness, contrast, and resolution settings of the monitor to ensure they are properly adjusted.
By following these steps to adjust display settings, update or reinstall video drivers, and review monitor’s onboard menu settings, you can resolve issues of a monitor not working with your laptop. Remember to restart your devices and check for any physical cable damage if the problem persists. By troubleshooting these settings and configurations, you can enjoy a seamless dual-monitor experience on your laptop.
Monitor Not Working With Laptop: Analysis
If you’re experiencing issues with your monitor not working with your laptop, it is important to analyze the situation to determine the root cause. In this section, we will discuss the potential hardware and software-related factors that could be causing the problem. By understanding these factors, you can effectively troubleshoot and resolve the issue.
Determine If The Issue Is Hardware Or Software Related
Firstly, it is crucial to assess whether the problem lies in the hardware or software components. To do this, ensure that both the computer and monitor are turned off. Unplug the video cable that connects the monitor to the computer. Inspect the video port on both the computer and the monitor, as well as the video cable, for any signs of damage such as bent pins or physical wear and tear.
If the video cable and ports appear to be in good condition, reconnect the monitor to the computer and turn them both on. If the monitor still fails to display correctly, it is likely that the issue is not related to the hardware components and you should proceed to the software-related analysis.
Check For Overheating Components
Overheating components can often cause display issues between laptops and monitors. To determine if this is the case, check for any signs of overheating, such as excessive heat or strange noises, coming from either the laptop or the monitor. Overheating can lead to malfunctions in the internal components, which may result in display problems.
If you suspect overheating, make sure the laptop is positioned in a well-ventilated area and clean any dust or debris that may be obstructing the airflow. Consider using a cooling pad or an external fan to further regulate the temperature. By keeping the components cool, you can potentially resolve the monitor not working issue.
Inspect For Signs Of Internal Laptop Monitor Conflicts
In some cases, conflicts within the laptop’s internal monitor settings can interfere with the external monitor’s functionality. To address this possibility, check for any signs of conflicts between the internal and external monitors.
Start by confirming if the laptop screen is displaying correctly. If the laptop’s own display is not functioning properly or is experiencing issues, it could signify conflicts within the laptop’s monitor settings. Make sure to troubleshoot and resolve any problems with the laptop’s internal display before proceeding.
Additionally, verify that the external monitor is properly connected and recognized by the laptop. Check the display settings on the laptop to ensure that the external monitor is selected as the primary display or extended display if desired.
By inspecting for signs of internal conflicts and adjusting the display settings accordingly, you can potentially resolve the issue of the monitor not working with the laptop.
Advanced Troubleshooting Techniques
If your monitor is not working with your laptop, try troubleshooting steps such as checking the video cable for damage, reconnecting the monitor, or changing the cable connecting the external monitor. Make sure the monitor is connected to a power source and powered on.
Sometimes, a faulty Windows display driver can also cause connection issues, so ensure your drivers are up to date.
According to SEO experts, when your monitor is not working with your laptop, it can be frustrating and hinder your productivity. However, before you give up and start looking for a new monitor, there are advanced troubleshooting techniques that you can try. These techniques can help you identify and resolve the issue with your monitor and laptop connection. In this section, we will explore three effective troubleshooting techniques: performing a power cycle on all devices, using built-in hardware diagnostic tools if available, and considering a factory reset on the monitor.Perform A Power Cycle On All Devices
To begin troubleshooting the connection between your monitor and laptop, you can perform a power cycle on all devices involved. Here’s a step-by-step guide to help you:- Turn off your laptop and monitor.
- Unplug the video cable that connects the monitor to the computer.
- Check the video port on both the computer and the monitor, as well as the video cable, for any signs of damage or bent pins.
- If there is no visible damage, reconnect the monitor to the computer by securely plugging in the video cable.
- Turn on the monitor first and then the laptop.
Use Built-in Hardware Diagnostics Tools If Available
Some laptops and monitors come with built-in hardware diagnostic tools that can help identify and troubleshoot issues. These tools are designed to test the hardware components, including the display and graphics card. Here’s how you can use these tools if they are available:- Refer to the user manual or manufacturer’s website to find out if your laptop or monitor has built-in hardware diagnostic tools.
- If available, navigate to the settings or control panel of your laptop or monitor to access the diagnostic tools.
- Follow the on-screen instructions to run the hardware diagnostics.
- The tool will perform various tests to check the functionality of the display and graphics card.
- Based on the results, the tool may provide recommendations or further troubleshooting steps.
Consider A Factory Reset On The Monitor
If the above steps didn’t resolve the issue, you can try a factory reset on your monitor. This can help restore the monitor to its default settings and eliminate any configuration or software-related problems. Note that performing a factory reset will erase any personalized settings or configurations you have made on the monitor. Here’s how to perform a factory reset:- Refer to your monitor’s user manual or manufacturer’s website to find the specific instructions for performing a factory reset.
- Typically, you will need to access the monitor’s settings or menu options to locate the reset option.
- Select the factory reset option and follow the on-screen instructions to confirm the reset.
- Once the reset is complete, reconnect the monitor to your laptop and check if the issue has been resolved.
Frequently Asked Questions For Monitor Not Working With Laptop
How Do I Get My Laptop To Recognize My Monitors?
To get your laptop to recognize your monitors, follow these steps: 1. Turn off your computer and monitor. 2. Check the video cable for any damage or bent pins. 3. If there is no damage, reconnect the monitor to the computer.
4. Try changing the cable connecting the external monitor. 5. If the new cable works, the previous cable was faulty. Remember to ensure the monitor is connected to a power source and powered on. You can also try refreshing your computer or checking for updated drivers.
Why Is My Laptop Not Displaying On External Monitor?
If your laptop is not displaying on an external monitor, there are a few possible solutions. First, check the cable connecting your laptop to the monitor and ensure it is secure. You can also try changing the cable to see if that resolves the issue.
Additionally, make sure the input resource on the external monitor is set correctly. If none of these solutions work, there may be an issue with the HDMI port on your laptop or a faulty display driver.
Why Won’t My Laptop Detect My Monitor Via Hdmi?
If your laptop is not detecting your monitor via HDMI, there may be a few reasons for this issue. First, check the video cable and the ports on both the laptop and monitor for any damage. If there is no damage, try reconnecting the monitor to the laptop.
You can also try using a different HDMI cable to see if the previous one was faulty.
Why Is My Laptop Saying No Signal To My Monitor?
The laptop may say no signal to the monitor due to a faulty video cable or damaged ports. Try unplugging and reconnecting the cable or try using a different cable. Make sure the monitor is powered on and the computer is refreshed by turning it off and on.
Additionally, check for any driver updates.
Conclusion
In troubleshooting a monitor not working with a laptop, there are a few steps you can take to resolve the issue. First, check the video cable and port for any damage or bent pins. If everything appears fine, try reconnecting the monitor to the computer.
If that doesn’t work, you can also try changing the cable connecting the monitor or updating your display drivers. Remember to check the power source and ensure the monitor is powered on. By following these steps, you can hopefully resolve the issue and get your monitor working properly with your laptop.