Monitor Not Turning off After Inactivity Windows 11: Troubleshooting Guide
To fix the issue of your monitor not turning off after inactivity in Windows 11, you can try adjusting the power settings. Go to the Windows Control Panel, select Hardware and Sound, then choose Power Options.
From there, select “Choose when to turn off the display” and adjust the settings accordingly. Additionally, you can also try checking the settings in the Windows Settings app under System > Power, and click on Screen and Sleep. By making these adjustments, you should be able to resolve the problem of your monitor not turning off.
Preliminary Checks Before Troubleshooting
Before jumping into troubleshooting why your monitor is not turning off after inactivity on Windows 11, there are a few preliminary checks you can perform. These checks will help ensure that you cover the basics and eliminate any simple issues that could be causing the problem.
Ensure Monitor Cables Are Secure
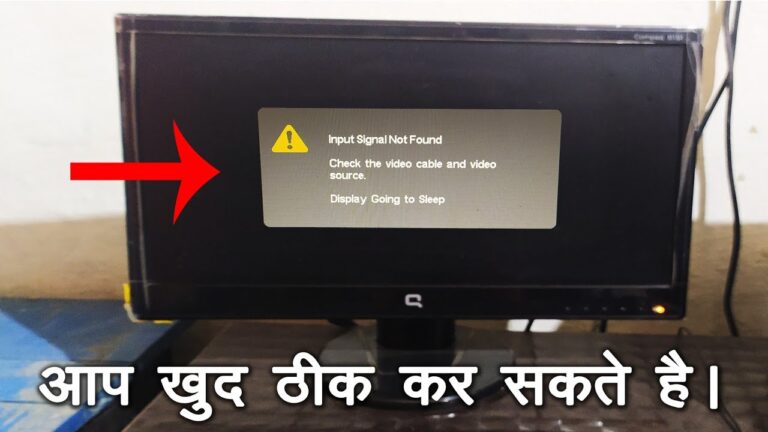
The first thing you should check is whether the monitor cables are securely connected to both your computer and the monitor itself. Loose or damaged cables can prevent the monitor from receiving the necessary signals to go into sleep mode. Here’s what you need to do:
- Turn off your computer and unplug the power cord.
- Inspect the cables connecting your monitor to your computer.
- Make sure the cables are firmly connected at both ends.
- If you notice any damage or fraying on the cables, consider replacing them.
Verify Power Settings Are Applicable
The next step is to ensure that the power settings on your Windows 11 system are properly configured and applicable to the monitor. Here’s how you can check:
- Click on the Start button and select “Settings” from the menu.
- In the Settings window, click on the “System” category.
- On the left-hand side, click on “Power & sleep”.
- Under the “Screen” section, make sure the “Turn off my display after” setting is set to your desired time.
- If the setting is already correct, try selecting a different time and then revert it back to the desired time.
- Click on the “Sleep” section and ensure that the “When plugged in, turn off after” setting is also configured correctly.
Confirm Windows 11 Updates Are Current
Outdated operating system versions can sometimes lead to issues with power management and monitor behavior. To ensure that this is not the cause of your problem, check for and install any pending Windows 11 updates. Here’s how:
- Click on the Start button and select “Settings” from the menu.
- In the Settings window, click on the “Windows Update” category.
- Click on the “Check for updates” button and allow Windows 11 to search for any available updates.
- If updates are found, click on the “Install” button to download and install them.
- Restart your computer once the updates are installed.
By performing these preliminary checks, you can ensure that the basic settings and connections are in place before delving into more advanced troubleshooting steps. If the issue persists after these checks, it may be necessary to explore other potential causes and solutions for your monitor not turning off after inactivity on Windows 11.
Credit: www.cnet.com
Understanding Power Settings And Screens
Are you experiencing a frustrating issue where your monitor refuses to turn off after a period of inactivity on Windows 11? Don’t worry, you’re not alone. Many users have encountered this problem, and it can be quite annoying.
In this article, we will explore the power settings and screen timeout options on Windows 11 to help you understand why your monitor may not be turning off as expected. So let’s dive into the world of power settings and screens!
H3explore Power & Sleep Settings/h3
One of the first places to investigate when dealing with a monitor that won’t turn off is the Power & Sleep settings. These settings control how your computer manages power usage and determines when to put the display to sleep.
- Open the Windows Control Panel.
- Select Hardware and Sound.
- Select Power Options.
- On the left, choose “Choose when to turn off the display” or similar option.
Once you’re in this settings menu, you can configure the time duration after which the display should turn off when idle. Make sure to set a reasonable time that suits your usage patterns.
H3delve Into Screen Timeout Options/h3
In addition to the Power & Sleep settings, Windows 11 offers specific screen timeout options that you can explore. These settings control how long the screen stays active before it turns off. It’s possible that the screen timeout options are overriding the Power & Sleep settings, leading to the issue of the monitor not turning off.
- Right-click the Start button or press Win + X.
- Alternatively, open the Windows Settings app and go to System > Power.
- Click on the “Screen and Sleep” option.
Here, you can configure the screen timeout duration for both battery-powered and plugged-in scenarios. It’s important to differentiate between these settings to ensure that the desired behavior is achieved.
H3differentiating Between Battery And Plugged-in Settings/h3
When troubleshooting the monitor not turning off issue, it’s crucial to differentiate between the power settings for battery usage and when the device is plugged in.
Windows 11 allows you to define separate power settings for different scenarios. By accessing the Power & Sleep settings and screen timeout options for both battery and plugged-in settings, you can ensure that the appropriate configurations are in place for your specific needs.
Take the time to adjust these settings accordingly and observe if your monitor starts turning off after the set time duration. It’s advisable to test both battery and plugged-in scenarios to cover all possible use cases.
In conclusion, understanding the power settings and screens on Windows 11 is vital to resolving the issue of a monitor not turning off after inactivity. By exploring the Power & Sleep settings, delving into the screen timeout options, and differentiating between battery and plugged-in settings, you can ensure that your monitor behaves as expected.
Unresponsive Monitor After Idle: Causes
Experiencing an unresponsive monitor after inactivity on Windows 11 can be quite frustrating. It not only affects your productivity but can also lead to unnecessary energy consumption. Let’s investigate some of the potential causes for this issue and explore possible solutions.
H3investigate Windows 11 Display Drivers/h3
One possible cause for your monitor not turning off after inactivity could be related to display drivers. Outdated or incompatible display drivers can disrupt normal power-saving functions and cause the monitor to remain unresponsive. To investigate and fix this issue:
- Open the Device Manager by right-clicking on the Start button.
- Navigate to the “Display adapters” category and expand it.
- Right-click on your display driver and select “Update driver.”
- If an update is available, follow the on-screen instructions to install it.
- After updating the driver, restart your computer and check if the issue persists.
H3issues With Background Applications/h3
Background applications can sometimes interfere with power-saving features, causing the monitor to stay unresponsive. To address this issue:
- Press Ctrl + Shift + Esc to open the Task Manager.
- Click on the “Processes” or “Background processes” tab.
- Identify any resource-intensive applications that might be running unnecessarily.
- Right-click on these applications and select “End task” to close them.
- Alternatively, you can uninstall unnecessary applications through the Control Panel.
- Once you’ve closed or uninstalled the problematic applications, monitor if the issue persists.
H3interference From Power-saving Features/h3
Power-saving features within Windows 11 itself might interfere with the monitor’s normal functioning. To ensure these features are not causing the unresponsiveness:
- Click on the Start button and open the Settings app.
- Navigate to the “System” category.
- Click on “Power & sleep” in the left menu.
- Check the power and sleep settings to ensure they are configured correctly.
- Adjust the time durations for “Screen” and “Sleep” as desired.
- Save the changes and see if the issue is resolved.
By investigating the Windows 11 display drivers, addressing issues with background applications, and ensuring proper configuration of power-saving features, you can troubleshoot and resolve the problem of an unresponsive monitor after inactivity on Windows 11.
Step-by-step Monitor Troubleshooting
Are you frustrated because your monitor doesn’t turn off after a period of inactivity on Windows 11? Don’t worry, we’ve got you covered! In this step-by-step guide, we will walk you through three troubleshooting methods that can help resolve this issue. Let’s get started!
Adjusting Power & Sleep Settings Walkthrough
If your monitor is not turning off after inactivity, adjusting the Power & Sleep settings might do the trick. Follow these steps to customize these settings:
- Open the Windows Control Panel.
- Select Hardware and Sound.
- Select Power Options.
- On the left, select Choose when to turn off the display or Sleep settings.
- Adjust the timeout duration to your desired value.
- Click Apply and then OK to save the changes.
Display Driver Update And Rollback Process
Outdated or incompatible display drivers can sometimes cause the monitor not to turn off. Follow these steps to update or rollback your display drivers:
- Right-click the Start button or press Win + X.
- Select Device Manager from the menu.
- Expand the Display adapters category.
- Right-click on your display adapter and select Update driver.
- Choose the option to search automatically for updated driver software.
- If an update is found, follow the on-screen instructions to install it.
- If the issue persists, repeat steps 1-3 and then right-click on your display adapter again.
- Select Properties and navigate to the Driver tab.
- Click on the Roll Back Driver button and confirm the rollback.
Disabling Interfering Applications And Features
Some applications or features on your Windows 11 system can interfere with the monitor turning off. To disable them, follow these steps:
- Open the Windows Settings app.
- Navigate to System and click on Power & Sleep in the left sidebar.
- Click on Additional power settings at the bottom of the page.
- Click on Change plan settings next to your selected power plan.
- Click on Change advanced power settings.
- Expand the Display section and locate the Allow display to turn off after option.
- Ensure that this option is set to the desired value.
- Click Apply and then OK to save the changes.
Windows 11 Troubleshooting Guide Deep Dive
Welcome to the Windows 11 Troubleshooting Guide Deep Dive! In this section, we will tackle a common issue faced by Windows 11 users, which is the monitor not turning off after inactivity. This can be quite frustrating, but fear not – we have some solutions for you to try out.
Utilizing Windows Troubleshooter For Power Issues
If you’re experiencing problems with your monitor not turning off after a period of inactivity, Windows Troubleshooter can be a useful tool to diagnose and fix the issue. Follow these steps:
- Open the Windows Control Panel.
- Select “Hardware and Sound”.
- Select “Power Options”.
- On the left, select “Choose when to turn off the display”.
Once you have accessed the “Choose when to turn off the display” settings, you can adjust the time settings to your preference. It’s recommended to set a lower time limit, such as 1-2 minutes, to see if the issue gets resolved. If the monitor still does not turn off, you can proceed to the next troubleshooting step.
Registry Tweaks For Advanced Users
If the Windows Troubleshooter did not resolve the issue, you can try making registry tweaks. Note that making changes to the registry can be risky and should only be done by advanced users who are comfortable with these procedures. Here’s how to proceed:
- Open the Registry Editor by pressing Windows Key + R, then typing “regedit” and pressing Enter.
- Navigate to the following path: HKEY_LOCAL_MACHINE\SYSTEM\CurrentControlSet\Control\Power\PowerSettings\238C9FA8-0AAD-41ED-83F4-97BE242C8F20\7bc4a2f9-d8fc-4469-b07b-33eb785aaca0
- Double-click on “Attributes”.
- Change the value data from 1 to 2.
- Click OK and close the Registry Editor.
After making these changes, restart your computer and see if the monitor now turns off properly after inactivity. If the issue persists, it may be time to seek professional tech support assistance.
When To Consider Professional Tech Support Assistance
If you have followed the troubleshooting steps mentioned above and the monitor still refuses to turn off after inactivity, it’s recommended to consider professional tech support assistance. Issues with power settings can sometimes indicate underlying hardware or software problems that require specialized knowledge to diagnose and fix.
Professional tech support can help you pinpoint the root cause of the issue and provide tailored solutions based on your specific hardware and software configuration. They have the expertise to handle complex issues that may be beyond the scope of general troubleshooting guides.
Remember, resolving technical issues can be challenging, but with the right support, you can get your monitor functioning as intended and enjoy a seamless Windows 11 experience.
Frequently Asked Questions On Monitor Not Turning Off After Inactivity Windows 11
How Do I Make My Monitor Turn Off Automatically Windows 11?
To make your monitor turn off automatically in Windows 11, follow these steps: 1. Open Windows Control Panel. 2. Select Hardware and Sound. 3. Choose Power Options. 4. On the left, select Choose when to turn off the display. 5. Adjust the settings according to your preference.
Why Is Windows 11 Not Putting Monitors To Sleep?
Windows 11 may not put monitors to sleep due to a configuration issue. To resolve this, open Windows Control Panel, select Hardware and Sound, then Power Options. Choose when to turn off the display and adjust the settings accordingly.
How Do I Stop My Screen From Timing Out Windows 11?
To stop your screen from timing out in Windows 11, follow these steps: 1. Open the Windows Control Panel. 2. Select Hardware and Sound. 3. Choose Power Options. 4. On the left-hand side, select Choose when to turn off the display.
5. Adjust the settings to your desired time. By adjusting the power settings, you can prevent your screen from timing out on Windows 11.
Why Is My Pc Monitor Not Turning Off?
Your PC monitor may not be turning off due to certain settings or software issues. To fix this, you can try going into your Windows Control Panel, selecting “Power Options,” and choosing when to turn off the display. Alternatively, you can right-click the Start button or open the Windows Settings app, go to “System,” and then “Power,” and adjust the screen and sleep settings.
Conclusion
If you’re experiencing the frustrating issue of your monitor not turning off after inactivity on Windows 11, don’t worry, there are solutions available. First, check your power options in the control panel and ensure that the “Choose when to turn off the display” setting is properly configured.
If that doesn’t work, you can also try adjusting the screen and sleep settings in the Windows Settings app. By following these steps, you should be able to resolve the issue and enjoy better power management on your computer.