Monitor Not Detecting Signal from Laptop: Troubleshooting Guide for a No Signal Error
If your monitor is not detecting a signal from your laptop, try reconnecting or replacing the HDMI cable. This issue could occur if the graphics card is loose or damaged.
When your monitor is not detecting a signal from your laptop, it can be frustrating and hinder your productivity. This problem can occur due to various reasons, such as a loose HDMI cable or a damaged graphics card. We will discuss some possible solutions to fix the “no signal” issue and get your monitor working properly again.
Whether you need to reconnect the HDMI cable or replace it altogether, we’ll provide you with the necessary steps to resolve this problem quickly and easily. So, let’s get started and get your monitor back up and running in no time.
Assess Cable And Port Conditions
When your monitor is not detecting a signal from your laptop, one of the first things you should do is assess the cable and port conditions. This will help you identify any potential issues that may be causing the problem. Here are some steps you can take:
Inspect Hdmi, Vga, Or Dvi Cables For Damage
The first step is to visually inspect the cables you are using to connect your laptop and monitor. Look for any signs of damage such as frayed wires, bent pins, or loose connectors. If you notice any issues, it is recommended to replace the cable with a new one. Even small damages can affect the signal transmission and cause connectivity problems.
Examine Ports On Both Monitor And Laptop For Obstruction
Next, check the ports on both your monitor and laptop for any obstructions. Dust, dirt, or debris in the ports can prevent a proper connection and result in a no signal issue. Use a can of compressed air to clean out the ports and ensure there are no obstructions. It’s also important to check for bent or damaged pins in the ports, as this can also lead to connectivity problems.
Swap Cables To Test For Cable Failure
If you have multiple cables available, try swapping them to see if the issue lies with the cable itself. For example, if you are using an HDMI cable and experiencing a no signal problem, try replacing it with a different HDMI cable to see if that resolves the issue. This will help determine if the problem is due to a faulty or damaged cable.
By following these steps and assessing the cable and port conditions, you can troubleshoot and potentially resolve the monitor not detecting signal issue. It’s important to ensure a secure and undamaged connection between your laptop and monitor to ensure a proper signal transmission.
Confirm Proper Input Source Selection
One common issue that many laptop users encounter is when their monitor fails to detect a signal from their laptop. This can be frustrating, especially if you need to use your monitor for work or entertainment purposes. However, before you start panicking or considering a replacement, it’s important to confirm the proper input source selection. By reviewing your monitor settings for the correct input source and knowing how to toggle between different sources, you can easily resolve this issue in no time.
Review Monitor Settings For Correct Input Source
When encountering a “no signal” error on your monitor, the first step is to ensure that the correct input source is selected. Sometimes, the monitor may be set to a different input mode, which prevents it from receiving signals from your laptop. To confirm the input source setting, follow these simple steps:
- Press the menu button on your monitor.
- Navigate to the input source option using the arrow keys.
- Select the appropriate input source, such as HDMI or VGA.
- Save and exit the menu.
By reviewing and adjusting your monitor settings, you can ensure that it is set to the correct input source for your laptop.
Illustrate How To Toggle Between Different Sources
In some cases, you may need to switch between different input sources on your monitor. This is particularly useful if you have multiple devices connected to your monitor, such as a laptop and a gaming console. To toggle between different sources, follow these steps:
- Press the source button on your monitor.
- Use the arrow keys or the source selection button to navigate through the available input sources.
- Select the desired input source for your laptop.
By toggling between different sources, you can ensure that your monitor is receiving the signal from your laptop correctly.
Suggest Scenarios Where Manual Selection Is Necessary
While most modern monitors are capable of automatically detecting the input source, there may be scenarios where manual selection is necessary. Here are a few examples:
- Switching between a laptop and a desktop computer.
- Connecting multiple laptops to the same monitor.
- Using different types of cables, such as HDMI and VGA.
In these situations, manual input source selection ensures that the correct device is connected and that the monitor receives the signal accordingly.
By confirming proper input source selection, reviewing monitor settings, and knowing how to toggle between different sources, you can easily troubleshoot and resolve the issue of your monitor not detecting a signal from your laptop. Remember to check the cables, ports, and connections as well to ensure a stable and secure connection between your laptop and monitor. With these simple steps, you’ll be back up and running in no time!
Utilize Laptop Function Keys
If your monitor is not detecting a signal from your laptop, there are a few steps you can follow to resolve the issue. First, try reconnecting or replacing the HDMI cable. If that doesn’t work, you can check the video card, unplug and replug the HDMI cable, or try connecting to an external monitor.
It’s also recommended to check the graphics card for any loose or damaged connections.
Utilize Laptop Function Keys Identify function keys that toggle display output One possible reason for a monitor not detecting a signal from a laptop is that the display output may be toggled off. Many laptops have function keys that can control the display output settings. By using these function keys, you can enable or disable the external display output. Here are some common function keys that you can try: – Fn + F4: This combination is often used to switch between different display modes. Pressing this key combination may cycle through options such as “Laptop display only,” “External display only,” or “Duplicate display.” – Fn + F5: This combination is commonly used to toggle between different external display options. Pressing this key combination may cycle through options such as “External display only,” “Duplicate display,” or “Extended display.” – Fn + F8 or Fn + F9: Depending on the laptop model, pressing these function keys may activate the external display output. Guide through enabling external display on laptops To enable the external display output on your laptop, follow these steps: 1. Press the appropriate function key combination that corresponds to the desired display mode. For example, if you want to use only the external monitor, press Fn + F4 or Fn + F5 until the desired option is selected. 2. Wait for a few seconds to allow the laptop to detect the external display. Sometimes, it may take a moment for the computer to recognize the new display. 3. If the monitor does not detect a signal after trying different function keys, check the cable connection between your laptop and the external monitor. Ensure that the HDMI or VGA cable is properly plugged into both the laptop and the monitor. 4. If you are using an HDMI connection, consider replacing the HDMI cable with a new one to rule out any potential cable issues. Outline common keyboard shortcuts for different laptops Here are some common keyboard shortcuts for enabling the external display output on different laptop models: – HP laptops: Press Fn + F4 or Fn + F9 to toggle display output options. – Dell laptops: Press Fn + F1 or Fn + F8 to cycle through display output options. – Lenovo laptops: Press Fn + F10 or Fn + F11 to switch display output settings. – Asus laptops: Press Fn + F8 or Fn + F9 to enable or disable the external display. Remember to consult your laptop’s user manual for specific instructions related to your model. By utilizing the laptop function keys, you can easily toggle display output settings and resolve any issues with a monitor not detecting a signal from a laptop.Adjust Graphics Card Settings
If your monitor is not detecting a signal from your laptop, try adjusting your graphics card settings. Check and secure cable connections, update or reinstall graphics drivers, or consider switching the primary monitor.
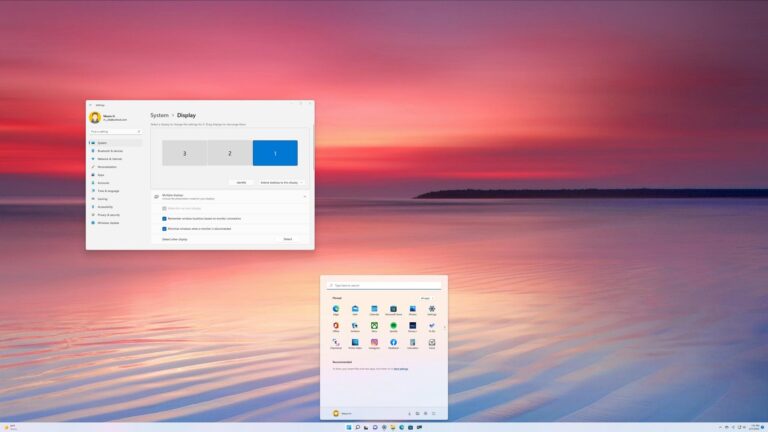
Navigate To Graphics Card Control Panel
Adjusting the graphics card settings can often solve the issue of a monitor not detecting a signal from your laptop. To access the graphics card control panel, follow these steps:
- Right-click on your desktop and select “Graphics Options” or “Graphics Properties”. This will open the control panel for your graphics card.
- In the control panel, navigate to the “Display” or “Display Settings” tab.
- Look for an option that allows you to detect or identify displays. Click on this option to ensure that the external display is recognized by your graphics card.
- If the external display is not recognized, look for an option to manually add a display or adjust the display settings.
- Save your settings and exit the graphics card control panel.
Provide Steps To Ensure External Display Is Recognized
If your external display is not being recognized by your laptop, try the following steps:
- Ensure that the cables connecting your laptop and the external display are securely plugged in. Unplug and re-plug them to ensure a proper connection.
- If you are using an HDMI cable, try using a different HDMI port on both your laptop and the external display.
- If your laptop has multiple display outputs, such as HDMI and VGA, try connecting the external display to a different output.
- Restart your laptop and the external display. Sometimes a simple restart can resolve the issue of a monitor not detecting a signal.
Tips For Updating Or Reinstalling Graphics Drivers
If adjusting the graphics card settings and ensuring the external display is recognized does not solve the issue, updating or reinstalling the graphics drivers may help. Here are a few tips:
- Open the Device Manager on your laptop by right-clicking on the “Start” button and selecting “Device Manager”.
- In the Device Manager, expand the “Display adapters” category to see the graphics card listed.
- Right-click on the graphics card and select “Update driver” to check for the latest driver updates online. Follow the on-screen instructions to install any available updates.
- If updating the drivers does not solve the issue, you can also try uninstalling the graphics drivers and then reinstalling them. Right-click on the graphics card in the Device Manager and select “Uninstall device”. After the drivers are uninstalled, restart your laptop and Windows will automatically reinstall the drivers.
- If you prefer to manually install the graphics drivers, you can visit the website of the graphics card manufacturer and download the latest drivers from there. Make sure to select the correct drivers for your specific graphics card model and operating system.
By following these steps to adjust graphics card settings, ensure the external display is recognized, and update or reinstall graphics drivers, you should be able to resolve the issue of a monitor not detecting a signal from your laptop.
Tackle Bios And Firmware Factors
If your monitor is not detecting a signal from your laptop, there are a few possible solutions to consider. First, try reconnecting or replacing the HDMI cable. If that doesn’t work, check the video card and make sure the connection is secure.
You can also try updating or reinstalling graphics drivers.
Explain The Role Of Bios Settings In Display Output
BIOS (Basic Input/Output System) settings play a crucial role in the display output of your laptop. BIOS is responsible for initializing and controlling various hardware components, including the graphics card. It contains configuration settings that determine how your laptop interacts with external devices such as monitors. Incorrect BIOS settings can lead to a “no signal” error on your monitor.
Instruct On Checking And Updating Bios/firmware
To resolve the issue of your monitor not detecting the signal from your laptop, follow these steps to check and update your BIOS/firmware:
- Restart your laptop and enter the BIOS settings by pressing the designated key (such as F2 or Del) during startup.
- Locate the section related to display settings or graphics configuration.
- Ensure that the display output is set correctly, such as HDMI or VGA, depending on your monitor’s connection.
- If necessary, update your BIOS/firmware to the latest version provided by your laptop manufacturer. Visit their official website and search for the appropriate BIOS/firmware update for your laptop model.
- Download the update file and carefully follow the manufacturer’s instructions to install it. Make sure to back up your data before performing any firmware updates.
- After updating the BIOS/firmware, save the changes and exit the BIOS settings.
- Restart your laptop and check if the monitor detects the signal properly.
Discuss Potential Impacts Of Recent Updates Or Resets
Recent updates or resets can sometimes cause compatibility issues between your laptop and the monitor. These impacts can result in a “no signal” error. Here are some potential impacts to consider:
- Driver Incompatibility: Updates or resets may have replaced or corrupted the graphics driver, leading to a loss of display output.
- Configuration Changes: Updates or resets can reset or change BIOS settings, resulting in incorrect display output settings.
- Firmware Bugs: Recent updates or resets might introduce bugs or compatibility issues within the BIOS or firmware, affecting the display output.
- Check the device manager and ensure that the graphics driver is up to date. If not, download the latest driver from the manufacturer’s website and install it.
- Recheck the BIOS settings and revert any changes if necessary, ensuring the display output is correctly configured.
- If you suspect firmware issues, contact your laptop manufacturer for assistance or consider a professional repair service to diagnose and resolve the problem.
Explore Hardware Component Checks
Explore hardware component checks to troubleshoot the issue of a monitor not detecting a signal from a laptop. Reconnect or replace the HDMI cable, check the video card, and ensure secure cable connections for potential solutions. Visit online forums or try different display configurations to resolve the “no signal” problem.
Guide On Reseating Or Replacing The Graphics Card
If you’re experiencing the frustrating issue of your monitor not detecting a signal from your laptop, one of the key components to check is the graphics card. A loose or damaged graphics card can often be the culprit behind a “no signal” problem. To address this, you can try reseating or replacing the graphics card. Here is a step-by-step guide on how to reseat or replace the graphics card: 1. Power off your laptop and unplug it from the power source. 2. Locate the graphics card slot on your laptop. This is usually located on the side or back of the laptop. 3. Unscrew any screws securing the graphics card in place. 4. Gently remove the graphics card from the slot by pulling it straight out. Be careful not to apply too much force or damage any surrounding components. 5. Inspect the graphics card for any visible signs of damage, such as bent pins or burnt marks. If the card appears to be damaged, you may need to replace it. 6. If the graphics card looks fine, carefully reinsert it into the slot, ensuring that it is properly aligned. 7. Secure the graphics card in place by tightening the screws. 8. Plug in your laptop and power it on to check if the monitor now detects a signal. If reseating the graphics card doesn’t solve the problem, it may be necessary to replace it. Consult the user manual or contact the manufacturer for instructions on how to replace the graphics card with a new one.Outline Steps For Testing With An Alternate Monitor
If you’re still encountering the “no signal” issue after checking the graphics card, it may be helpful to test your laptop with an alternate monitor. This will help determine if the problem lies with the laptop or the original monitor. Here are the steps to follow: 1. Obtain an alternate monitor that you know is in working condition. 2. Power off your laptop and disconnect it from the power source. 3. Locate the video output port on your laptop. This can be VGA, HDMI, DisplayPort, or DVI, depending on your laptop model. 4. Connect the alternate monitor to the video output port using the appropriate cable. 5. Power on the alternate monitor and ensure it is set to the correct input source. 6. Plug in your laptop and power it on. 7. If the alternate monitor detects a signal and displays the laptop’s output, then the original monitor may be the issue. Consider troubleshooting or replacing the original monitor. 8. If the alternate monitor still does not detect a signal, then the problem could lie with your laptop or the graphics card. Consider seeking professional hardware diagnostics to further diagnose and resolve the issue. By following these steps, you can effectively troubleshoot the “no signal” problem between your laptop and the monitor. Whether it’s reseating or replacing the graphics card or testing with an alternate monitor, these hardware component checks can help you identify and resolve the issue.Frequently Asked Questions On Monitor Not Detecting Signal From Laptop
Why Does My Monitor Say No Signal When Connected To My Laptop?
Your monitor says no signal when connected to your laptop because the monitor is not receiving a signal from your laptop. To fix this issue, check and secure cable connections, test with a different monitor, reseat the graphics card, and update or reinstall graphics drivers.
Ensure the monitor and graphics card are compatible and properly configured.
Why Is My Graphics Card Not Sending Signal To My Monitor?
If your graphics card is not sending a signal to your monitor, there are a few steps you can take to fix the issue. First, check and secure all cable connections, including the video and power cables. If that doesn’t work, try testing with a different monitor or display.
You can also re-seat the graphics card and inspect it for any damage. Updating or reinstalling graphics drivers via Device Manager or Safe Mode may solve the problem.
Why Is My External Monitor Detected But No Display?
If your external monitor is detected but not displaying anything, it may be due to loose or damaged connections. Try unplugging and replugging the HDMI or VGA cable. If that doesn’t work, check the graphics card and update/reinstall the drivers.
Consider switching the primary monitor or adjusting display settings. Ensure the monitor is recognized in system settings.
Why Is My Vga Monitor Detected But No Signal?
If your VGA monitor is detected but there is no signal, it could be due to incompatible VGA output and input specifications. It can also be caused by misconfigured display settings. Check your VGA connections, ensure proper configuration, and try adjusting resolution and refresh rate settings.
Updating graphics drivers can also help resolve the issue. If the problem persists, consider seeking professional assistance.
Conclusion
To troubleshoot the issue of your monitor not detecting a signal from your laptop, there are a few potential solutions you can try. Firstly, check the connection between your laptop and the monitor. Reconnect or replace the HDMI cable if necessary.
If that doesn’t work, ensure the graphics card is properly connected and not loose or damaged. Updating or reinstalling graphics drivers might also resolve the issue. Additionally, you can test with a different monitor or adjust display settings to see if that resolves the problem.
By following these steps, you should be able to fix the “No Signal” issue and get your monitor working again.