Intel Nuc Does Not Boot Without Monitor: Troubleshooting Guide
Intel NUC does not boot without a connected monitor, although it functions properly if the display is disconnected after it starts. However, there is a simple fix for this issue, such as enabling the CSM (Compatibility Support Module) and switching only the monitor item to legacy in the CSM options in the BIOS.
This problem is commonly seen with headless NUCs (NUCs without a monitor), but using HDMI plugs can help resolve the booting problem in some cases. Visit forums and communities like Reddit and TrueNAS for more troubleshooting solutions and tips.
Intel Nuc Boot Issues Explained
Boot issues with Intel NUC can be frustrating, and one particular problem that users often encounter is when the NUC does not boot without a connected monitor. In this article, we will explore the common scenarios that lead to boot problems, the role of the display in the booting process, and possible errors that occur when a monitor is not connected.
Common Scenarios Leading To Boot Problems
There are several common scenarios that can cause boot problems with an Intel NUC. These include:
- The NUC failing to boot when no monitor is connected
- The NUC displaying a black screen with no signal via HDMI
- The NUC not booting from an USB flash drive or SSD
Role Of The Display In Booting Mechanisms
The display plays a crucial role in the booting mechanisms of an Intel NUC. When a monitor is connected, it provides the necessary feedback and communication for the NUC to initialize and boot up properly. Without a connected monitor, the NUC may encounter errors and fail to start.
| Scenario | Result |
|---|---|
| No monitor connected | NUC fails to boot |
| Black screen with no signal | NUC fails to boot |
| No boot from USB flash drive or SSD | NUC fails to boot |
Possible Errors Without Connected Monitors
When a monitor is not connected to the Intel NUC, several errors can occur, preventing it from booting:
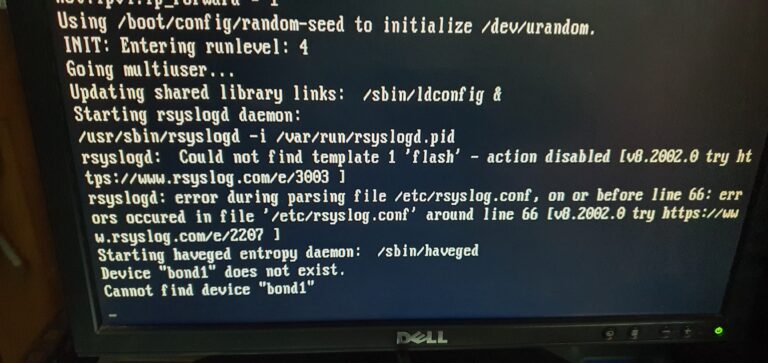
- The NUC may display a black screen with no signal via HDMI.
- The NUC may not detect USB flash drives or SSDs as bootable devices.
- BIOS settings may need to be adjusted to enable legacy support for the monitor item.
- In some cases, a “headless” NUC, which is used without a monitor, may experience booting issues that require specific solutions.
It is worth noting that for those using a regular PC system board, booting without a monitor may not be possible. However, Intel NUCs have been designed to handle headless setups, but certain models may have this specific problem.
In conclusion, the Intel NUC not booting without a connected monitor can be frustrating, but understanding the common scenarios, the role of the display in booting mechanisms, and possible errors that occur without connected monitors can help troubleshoot the issue effectively.
Intel Nuc Boot Quirks
The Intel NUC has a quirk where it does not boot without a connected monitor. While it works perfectly once booted and the display can be disconnected, it requires a monitor to start up. This issue can be resolved by enabling the CSM option and switching the monitor item to legacy in the BIOS settings.
Intel Nuc’s Reliance On Display Signals
One common boot quirk experienced by Intel NUC users is the device’s reliance on display signals. Unlike traditional desktop computers that can boot without a connected monitor, the Intel NUC requires a monitor to be connected for it to start up properly. This quirk stems from the design and specifications of the NUC, which expects to receive display signals upon booting.
This behavior can pose a challenge for users who want to configure their Intel NUC as a headless system, without a dedicated monitor connected. While some NUC models can boot without a monitor attached, others may encounter issues and refuse to start up.
Differentiating Between Hardware And Software Issues
When facing boot issues with an Intel NUC, it is crucial to differentiate between hardware and software problems. By narrowing down the root cause, users can troubleshoot and resolve the issue more effectively. Here’s a breakdown of how to distinguish between the two:
| Hardware Issues: | Software Issues: |
|---|---|
|
|
By determining whether the boot issue arises from hardware or software, users can then focus their troubleshooting efforts accordingly. For hardware issues, checking and replacing cables or contacting Intel support should be considered. On the other hand, addressing software-related problems may involve adjusting BIOS settings, reinstalling the operating system, or ensuring the boot files are intact.
Overall, understanding and dealing with Intel NUC’s boot quirks, such as its reliance on display signals, can save users valuable time and effort when configuring or troubleshooting their devices.
Troubleshooting Guide: No Monitor, No Boot
If your Intel Nuc does not boot without a monitor connected, you can try enabling the CSM (Compatibility Support Module) and switching only the monitor item to legacy in the CSM options. This simple fix has worked for many users experiencing this issue.
Are you experiencing trouble booting up your Intel Nuc without a monitor? Don’t worry, we’ve got you covered with this step-by-step troubleshooting guide. Follow these simple steps to diagnose and resolve the issue:
Step-by-step Approach For Diagnosis
- Ensure that the Intel Nuc is properly connected to a power source.
- Check all cable connections, including the HDMI or DisplayPort cable, to ensure they are securely plugged in.
- If you are using an HDMI cable, try using a different HDMI port on the Nuc or try using a different cable altogether.
- If none of the above steps work, proceed to the next troubleshooting step.
Ensuring All Connections Are Secure
It is essential to check that all connections are secure to eliminate any issues related to loose cables or connections. Follow these steps:
- Check the HDMI or DisplayPort cable that connects the Intel Nuc to the monitor. Ensure that it is securely plugged in on both ends.
- Inspect the power cable connection to the Nuc and the power outlet. Make sure they are firmly connected.
- If you are using any adapters or converters, ensure that they are also securely connected between the Nuc and the monitor.
- Verify that the monitor itself is properly connected to a power source and turned on.
Verifying Power Supply Functionality
To troubleshoot any potential issues with the power supply, follow these steps:
- Ensure that the power supply unit is functioning correctly by testing it with another device or using a multimeter.
- If the power supply is not working properly, consider replacing it with a compatible one.
- Check if there are any power-related settings in the BIOS or UEFI that could be causing the issue. Consult the Intel Nuc’s user manual or support documentation for guidance.
By following these troubleshooting steps, you should be able to diagnose and resolve the issue of your Intel Nuc not booting without a monitor. If the problem persists, it is recommended to seek further assistance from Intel’s support team or consult with a professional technician.
Bios Adjustments For Monitor-less Booting
One common issue faced by Intel NUC users is the inability to boot the system without a connected monitor. This can be problematic, especially for users who need to run headless operations or remote server setups. Luckily, there are BIOS adjustments that can be made to enable monitor-less booting on Intel NUC. In this section, we will guide you through the process of accessing and navigating the BIOS settings, configuring the system for headless operation, and finally saving the changes and testing for successful boot.
Accessing And Navigating Bios Settings
In order to make the necessary adjustments for monitor-less booting, you will need to access the BIOS settings on your Intel NUC. Follow these steps to get started:
- Power on your Intel NUC and press the Del key repeatedly to enter the BIOS setup.
- Once you’re in the BIOS setup, you can navigate through the various menus using the arrow keys on your keyboard. Use the Enter key to select a menu or make changes.
Configuring To Enable Headless Operation
After accessing the BIOS settings, it’s time to configure your Intel NUC to enable headless operation. Here’s what you need to do:
- Navigate to the Boot menu in the BIOS setup.
- Within the Boot menu, look for options related to monitor settings or display configurations.
- Toggle the relevant setting to enable headless operation. This setting may be named differently depending on your BIOS version, but it generally allows the system to boot without a connected monitor.
- Save the changes and exit the BIOS setup.
Saving Changes And Testing For Successful Boot
Now that you’ve made the necessary adjustments in the BIOS settings, it’s time to save the changes and test if your Intel NUC can successfully boot without a monitor. Follow these steps:
- Make sure to save the changes you’ve made in the BIOS setup. Most BIOS versions have a dedicated key such as F10 to save and exit.
- Once the changes are saved, power off your Intel NUC and disconnect the monitor.
- Power on your Intel NUC and observe if it boots successfully without any display.
- If the system boots without any issues, congratulations! You have successfully enabled monitor-less booting on your Intel NUC.
- If the system does not boot or encounters any errors, you may need to revisit the BIOS settings and double-check the configurations.
By following these steps, you can overcome the obstacle of Intel NUC not booting without a monitor. This allows for more flexible setups, remote operations, and headless configurations. Enjoy the convenience of monitor-less booting on your Intel NUC!
Alternative Solutions And Workarounds
If you own an Intel Nuc and have experienced the frustration of it not booting without a monitor connected, don’t worry, you’re not alone. This issue has been reported by many users, and fortunately, there are alternative solutions and workarounds available to resolve this problem.
Temporary Monitor Connection For Initial Boot
One workaround is to temporarily connect a monitor during the initial boot process. This allows the Nuc to properly initialize and start the boot sequence. Once the boot process is complete, you can disconnect the monitor, and the Nuc should continue to function normally. While this solution might not be the most convenient, it can get you up and running without the need for a dedicated monitor.
Utilizing Hdmi Dummy Plugs
An alternative solution is to utilize HDMI dummy plugs. These small devices mimic the presence of a monitor by providing a continuous signal to the Nuc’s HDMI port. By using a dummy plug, the Nuc can detect the presence of a display and successfully boot, even without a physical monitor connected. These dummy plugs are relatively inexpensive and can be easily purchased online.
Remote Management Alternatives For Headless Setups
If you prefer a completely headless setup without the hassle of temporarily connecting a monitor or using dummy plugs, remote management alternatives are available. These options allow you to access and control your Nuc remotely, without the need for a physical monitor.
- One option is to use Intel Active Management Technology (AMT) if your Nuc model supports it. AMT provides out-of-band management capabilities, allowing you to access and control your Nuc remotely, even when it is powered off or unresponsive. This can be especially useful for server applications or remote installations.
- Another option is to utilize a remote desktop software solution such as VNC or TeamViewer. By installing the software on your Nuc and a separate computer or mobile device, you can establish a remote connection and control your Nuc as if you were sitting in front of it. This allows you to perform necessary configurations and troubleshooting without the need for a physical monitor.
By exploring these alternative solutions and workarounds, you can overcome the issue of the Intel Nuc not booting without a monitor connected. Whether you choose to temporarily connect a monitor, use HDMI dummy plugs, or opt for remote management alternatives, you can ensure that your Nuc functions smoothly in a headless setup.
Credit: www.intel.com
Updating Your Intel Nuc For Better Stability
Importance Of Keeping Bios And Drivers Updated
Keeping your Intel NUC’s BIOS and drivers updated is crucial for ensuring better stability and performance. The BIOS, or Basic Input/Output System, is responsible for initializing and configuring hardware components when you start your NUC. Updating the BIOS can provide bug fixes, security patches, and improvements to the overall functionality of your system.
Similarly, regularly updating the drivers for your NUC’s components, such as graphics, sound, and network drivers, can help resolve compatibility issues, address known bugs, and improve performance. By keeping both the BIOS and drivers up to date, you can optimize your Intel NUC’s performance while minimizing potential issues.
How To Safely Update Intel Nuc Firmware
Updating the firmware of your Intel NUC is a straightforward process that can be done safely by following a few simple steps:
- Start by identifying your specific NUC model and noting down the current BIOS version installed on your system.
- Visit the Intel Support website and navigate to the Drivers & Software section.
- Enter your NUC model number or use the website’s detection tool to automatically identify your system.
- Once you’ve selected your NUC model, you’ll find a list of available driver and firmware updates.
- Locate the BIOS update and download the latest version.
- Read the instructions provided by Intel carefully before proceeding.
- Before updating the BIOS, it’s recommended to close all running applications and temporarily disable any antivirus or security software.
- Run the downloaded BIOS update file and follow the on-screen instructions to complete the installation process.
- After the update is successfully installed, restart your Intel NUC to apply the changes.
- Verify that the BIOS version has been updated by checking the system information or BIOS settings.
Where To Find And How To Install Updates
To find the necessary updates for your Intel NUC and install them, follow these steps:
- Go to the Intel Support website and click on the Download Center tab.
- In the search bar, enter your NUC model number or use the website’s detection tool to automatically identify your system.
- Click on the “Drivers” tab to view the available driver and firmware updates.
- Choose the appropriate updates based on your specific NUC model and requirements.
- Click on the download button for each update to save the files to your computer.
- After the downloads are complete, locate the files and run the installers.
- Follow the installation instructions provided by each update to complete the process.
- Once all the updates are successfully installed, restart your Intel NUC for the changes to take effect.
By regularly updating both the BIOS and drivers of your Intel NUC and following the safe installation procedures, you can ensure better stability, improved performance, and compatibility with the latest software and hardware.
Advanced Intel Nuc Boot Troubleshooting
When it comes to troubleshooting boot issues with your Intel NUC, there are a few advanced steps you can take. In this section, we will explore three troubleshooting methods: resetting the CMOS to default settings, booting from alternate media like USB or network, and seeking professional assistance or contacting support when necessary.
Resetting The Cmos To Default Settings
If your Intel NUC is not booting without a monitor, one possible solution is to reset the CMOS to its default settings. This can help resolve any configuration conflicts or glitches that may be causing the issue.
- Shut down your Intel NUC by holding down the power button for a few seconds.
- Unplug the power cord from the back of the NUC.
- Locate the CMOS battery on the motherboard. It is a small, round battery.
- Remove the CMOS battery carefully, using a small screwdriver or your fingers.
- Wait for at least 5 minutes to ensure the CMOS is completely reset.
- Reinsert the CMOS battery back into its slot.
- Reconnect the power cord.
- Turn on your Intel NUC and check if the boot issue has been resolved.
Booting From Alternate Media Like Usb Or Network
If resetting the CMOS does not solve the boot issue, you can try booting your Intel NUC from alternate media, such as a USB drive or network.
To boot from alternate media, follow these steps:
- Connect a bootable USB drive or configure a network boot option for your Intel NUC.
- Access the BIOS settings by pressing the F2 key during startup.
- Navigate to the Boot tab in the BIOS menu.
- Set the USB drive or network boot option as the first boot device.
- Save the changes and exit the BIOS.
- Restart your Intel NUC and check if it boots successfully without a monitor.
When To Seek Professional Assistance Or Contact Support
If you have tried resetting the CMOS and booting from alternate media without success, it may be time to seek professional assistance or contact Intel support for further guidance.
Professional assistance can be sought from a computer technician or an Intel authorized service center. They can diagnose the issue and provide a solution tailored to your specific Intel NUC model.
If your Intel NUC is still under warranty, contacting Intel support is recommended. They can help troubleshoot the issue remotely or advise on the next steps to take.
Remember to provide them with detailed information about your NUC model, the troubleshooting steps you have already attempted, and any error messages or symptoms you have observed.
By following these steps and seeking the appropriate assistance when needed, you can effectively troubleshoot boot issues with your Intel NUC.
Frequently Asked Questions Of Intel Nuc Does Not Boot Without Monitor
Why Does My Nuc Fail To Boot?
Your Intel NUC may fail to boot if a monitor is not connected. It works fine once booted and the display can be disconnected. Enabling CSM in the BIOS and switching only the monitor item to legacy may solve the issue.
Some NUC models may require a HDMI “plug” to resolve this problem.
How Do I Get To The Boot Menu On Intel Nuc?
To access the boot menu on an Intel NUC, follow these steps: 1. Connect a monitor to your Intel NUC. 2. Power on the NUC and press the F10 key repeatedly during startup. 3. This will open the boot menu, allowing you to choose the desired boot device.
4. Use the arrow keys to navigate to the desired option and press Enter to select it. 5. Your Intel NUC will now boot from the chosen device.
How Do I Clear My Intel Nuc Cmos?
To clear the CMOS on your Intel NUC, follow these steps: 1. Power off the NUC and unplug it from the power source. 2. Locate the CMOS jumper on the motherboard. 3. Use a small tool to move the jumper from pins 1-2 to pins 2-3.
4. Wait for a few seconds, then move the jumper back to its original position (pins 1-2). 5. Plug the NUC back in and power it on. Your CMOS will now be cleared.
How To Boot From Usb Stick Intel Nuc?
To boot from a USB stick on an Intel NUC, follow these steps: 1. Connect the USB stick to the NUC. 2. Restart the NUC and press the F10 key repeatedly to enter the BIOS setup. 3. In the BIOS setup, go to the Boot Menu and select the USB stick as the first boot device.
4. Save the changes and exit the BIOS setup. 5. The NUC will now boot from the USB stick.
Conclusion
The Intel NUC may experience issues when booting without a monitor connected. While it functions perfectly once the display is disconnected after booting, it requires the display to be connected initially. This can be a problem for those who want to use the NUC as a headless device.
One solution suggested by users is to enable the CSM and switch only the monitor item to legacy in the CSM options. It is important to note that this workaround may not work for all NUC models, so it is recommended to seek further assistance if needed.