How to Fix Monitor Not Displaying
To fix a monitor not displaying, start with basic hardware troubleshooting: check monitor connections, ensure it’s powered on, and try a different input port or cable. If the issue persists, it could be due to damaged cables, incorrect display configuration, faulty GPU or RAM, or a damaged PSU.
Troubleshoot by checking connections, refreshing the connection by turning the computer off and on, choosing the correct input port, and checking the signal cable connection to the graphics card. If the problem persists, additional troubleshooting may be required.
Symptoms Of Monitor Malfunction
If your monitor is not displaying anything, there are a few troubleshooting steps you can take. Firstly, check the connections between the monitor and the computer to ensure they are secure. If that doesn’t work, try restarting the computer and the monitor.
If the issue persists, consider checking for any software or driver updates that may be needed.
Blank Or Black Screen
If your monitor is displaying a blank or black screen, it could indicate a potential malfunction. This issue could be caused by various factors such as loose connections, incorrect display settings, or hardware problems. To troubleshoot this problem, follow these steps: 1. Check the connections: Ensure that the cables connecting the monitor to the computer are securely plugged in. Try disconnecting and reconnecting them to make sure they are properly seated. 2. Adjust display settings: Make sure that the display settings on your computer are correctly configured. You can access these settings by right-clicking on the desktop and selecting “Display settings” (For Windows users) or by going to “System Preferences” and selecting “Displays” (For Mac users). Check the resolution and refresh rate settings to ensure they are compatible with your monitor. 3. Test with a different device: Connect your monitor to a different computer or device to see if the issue is specific to your current setup. If the monitor works fine with another device, the problem may lie with your computer’s graphics card or drivers. 4. Update drivers: Ensure that your computer’s graphics card drivers are up to date. You can visit the manufacturer’s website or use third-party software to update the drivers automatically. 5. Check monitor settings: Some monitors have built-in settings that can affect the display. Use the menus on your monitor to reset the settings to factory defaults or adjust any settings that may be causing the issue. If none of these steps solve the problem and the monitor still displays a blank or black screen, it may indicate a hardware issue. In such cases, contacting the manufacturer or seeking professional assistance would be recommended.No Signal Message
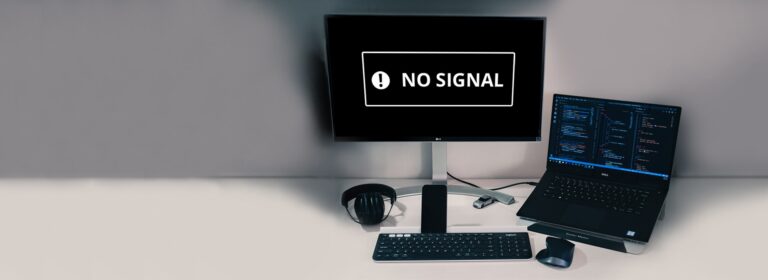
Another common symptom of monitor malfunction is receiving a “No signal” message on the screen. This message indicates that the monitor is not receiving a signal from the computer or device it is connected to. Here’s how you can tackle this issue: 1. Check cable connections: Ensure that the cable connecting your monitor to the computer is securely plugged in on both ends. Sometimes, loose or faulty cables can cause this problem. Try disconnecting and reconnecting the cable to see if that resolves the issue. 2. Test with a different cable: If you suspect the cable to be the problem, try using a different cable to connect your monitor to the computer. This will help determine if the issue is with the cable itself. 3. Verify input source: Most monitors have multiple input source options such as HDMI, DisplayPort, or VGA. Make sure that the input source selected on your monitor matches the cable you are using. Use the monitor’s built-in controls to switch between input sources if needed. 4. Restart the computer: Sometimes, a simple restart can fix issues related to the signal between the computer and the monitor. Turn off the computer completely, wait for a few seconds, and then turn it back on. 5. Test with another device: Connect the monitor to a different device such as a laptop or gaming console to check if the “No signal” message persists. This will help determine if the issue is specific to your computer or if it is a problem with the monitor itself. If these steps do not resolve the issue, it is possible that there is a problem with the hardware, such as the graphics card or the monitor itself. In this case, seeking professional help would be advisable.Flickering Or Distorted Display
A flickering or distorted display can be quite frustrating and can greatly affect your productivity. If you are experiencing this issue with your monitor, follow these troubleshooting steps: 1. Check cable connections: Ensure that all cables connecting the monitor to the computer are securely plugged in on both ends. Loose or faulty cables can cause flickering or distorted display. Try disconnecting and reconnecting the cables to ensure a proper connection. 2. Update graphics card drivers: Outdated or incompatible graphics card drivers can cause display issues. Visit the manufacturer’s website or use third-party software to update the drivers to the latest version. 3. Adjust refresh rate and resolution: Incorrect refresh rate and resolution settings can lead to display problems. Right-click on the desktop and select “Display settings” (For Windows users) or go to “System Preferences” and select “Displays” (For Mac users). Check the refresh rate and resolution settings and adjust them accordingly. 4. Test with another device: Connect the monitor to a different computer or device to see if the flickering or distorted display persists. If the issue is present on multiple devices, it indicates a problem with the monitor itself. 5. Reset monitor settings: Some monitors have options to reset the display settings to factory defaults. Use the monitor’s built-in menus to perform a reset and see if that resolves the issue. If none of these steps fix the problem and the flickering or distorted display continues, it may be a hardware issue. Contact the manufacturer or seek professional assistance to get the monitor repaired or replaced.Checking Hardware Connections
When your monitor is not displaying, it can be frustrating and leave you wondering what the issue might be. One of the first steps you should take is to check the hardware connections. Sometimes, a loose or faulty cable can be the culprit behind the no display problem. In this section, we will guide you through the steps to ensure all your hardware connections are secure and working properly.
Ensure All Cables Are Securely Connected
Loose or damaged cables can cause your monitor to not display anything. To make sure all your cables are securely connected, follow these steps:
- Check the power cable: Ensure that the power cable is firmly plugged into both the monitor and the power outlet.
- Inspect the video cable: If you are using a VGA, DVI, or HDMI cable, make sure it is securely connected to both the monitor and the computer’s graphics card. If the cable appears damaged or frayed, consider replacing it.
- Verify the signal cable: If you are using a separate video signal cable, such as DisplayPort or Thunderbolt, check that it is properly connected at both ends.
- Try a different cable: If possible, try using a different video cable to rule out any issues with the current one.
By ensuring all your cables are securely connected, you can eliminate any potential issues caused by loose or damaged connections.
Verify Power Source And Monitor Power
A lack of power supply can also cause your monitor to not display anything. To verify the power source and monitor power, follow these steps:
- Check the power source: Ensure that the power outlet you are using is functional by plugging another device into it.
- Inspect the monitor’s power button: Make sure the monitor’s power button is turned on and lit up. If it’s not, press the power button to turn it on.
- Confirm the power adapter: Check that the power adapter is securely connected to the monitor and that the LED indicator light on the adapter is on.
- Try a different power outlet or adapter: If possible, try using a different power outlet or power adapter to eliminate any issues with the current one.
By verifying the power source and monitor power, you can ensure that your monitor is receiving the necessary power supply.
How To Fix Monitor Not Displaying: Basic Checks
If your monitor is not displaying anything, start with basic troubleshooting steps. Check the hardware, cables, and connections. Ensure the monitor is powered on and the correct input port is selected. Refresh the connection by turning off and on the computer.
If the issue persists, there may be problems with the display drivers or GPU.
Test With Alternate Cables
If you are experiencing a monitor not displaying any content, one of the first things you should check is the cables connecting your monitor to your computer. Faulty or loose cables can often be the culprit behind a missing display. To troubleshoot this issue, follow these steps:
- Ensure that all the cables connecting your monitor to your computer are securely plugged in at both ends. Check the VGA, DVI, HDMI, or DisplayPort cable, depending on your monitor’s connection.
- If you suspect that the cable may be faulty, try using an alternate cable to connect your monitor. Borrow one from another device or purchase a new cable to test.
- If you are using an adapter for your cable connection, also try swapping it out with a different adapter to rule out any issues with the adapter itself.
Connect To A Different Power Outlet
Another potential cause for a monitor not displaying anything is a power-related issue. To check if this is the problem and resolve it, follow these steps:
- Make sure that both the monitor and the computer are receiving power.
- If your monitor has a power indicator light, ensure that it is on. If not, check the power cable connection and try connecting the monitor to a different power outlet.
- Try plugging your computer and monitor into a different power outlet to see if the issue is with the power source. Sometimes, a faulty power outlet can prevent the monitor from displaying anything.
Use Another Monitor To Isolate Issue
If neither the cables nor the power supply seem to be causing the problem, it’s possible that the issue lies with the monitor itself. To determine whether the monitor is the culprit, follow these steps:
- Connect a different monitor to your computer and see if it displays properly. If the alternate monitor works fine, then the problem is likely with your original monitor.
- If the alternate monitor also does not display anything, the issue could be with your computer’s graphics card or other internal components. In this case, you might need to seek professional assistance.
By performing these basic checks, you can troubleshoot and fix common issues related to a monitor not displaying. If none of these solutions resolve the problem, it’s recommended to reach out to a professional technician for further assistance.

Credit: www.pcmag.com
Adjusting Display Settings
When troubleshooting a monitor not displaying properly, one of the crucial steps you can take is adjusting the display settings. By accessing and navigating the display settings, you can customize various aspects of your screen to ensure optimal visibility and performance.
Accessing And Navigating The Display Settings
Before diving into the specific settings, you first need to know how to access and navigate the display settings on your computer. The process may vary slightly depending on your operating system, but here are the general steps:
- Right-click on an empty area of your desktop.
- A context menu should appear. Select “Display settings” or a similar option.
- This will open the display settings window, where you can make the necessary adjustments.
Resolution, Refresh Rate, And Monitor Detection
Within the display settings window, you will find several options that directly affect the appearance and functionality of your monitor. Some of the most important settings to pay attention to include:
- Resolution: This setting determines the number of pixels on the screen. Adjusting the resolution can significantly impact the clarity and sharpness of images and text. If your monitor is not displaying correctly, try changing the resolution to see if it resolves the issue.
- Refresh Rate: The refresh rate represents how many times the screen image refreshes per second. Higher refresh rates result in smoother visuals, especially during fast-paced activities like gaming or video playback. Make sure the refresh rate is set to the highest value supported by your monitor.
- Monitor Detection: If your computer is not detecting the monitor, it could be due to incorrect monitor detection settings. Within the display settings, you can choose to extend, duplicate, or display only on one monitor. Make sure the correct monitor is selected as the primary display.
By adjusting these display settings and ensuring they are optimized for your monitor, you can often troubleshoot issues related to a monitor not displaying correctly. Keep in mind that specific options and terminology may vary depending on your computer and operating system.
Updating Or Reinstalling Drivers
One common solution to fix a monitor not displaying is to update or reinstall the drivers for your video card. Outdated or faulty drivers can often cause display issues on your monitor. In this section, we will discuss the process of updating or reinstalling video card drivers.
Identifying Correct Driver Versions
Before updating or reinstalling your video card drivers, it is important to identify the correct driver versions for your specific video card model. Using incorrect drivers can lead to further display problems or compatibility issues. Follow these steps to identify the correct driver versions:
- Identify your video card model. This information can usually be found in your computer’s Device Manager or by referring to the documentation that came with your video card. Make a note of the make and model of your video card.
- Visit the manufacturer’s website. Go to the official website of the video card manufacturer to find the correct drivers for your specific model. Most manufacturer websites have a support or drivers section where you can search for the latest drivers by entering your video card model.
- Download the drivers. Once you have identified the correct drivers for your video card, download them from the manufacturer’s website. Ensure that you are downloading the drivers that are compatible with your operating system.
Process For Updating/reinstalling Video Card Drivers
Now that you have identified the correct driver versions for your video card, follow these steps to update or reinstall the drivers:
- Uninstall the existing drivers. Open the Device Manager on your computer and locate the Display Adapters section. Right-click on your video card and select “Uninstall” to remove the existing drivers.
- Restart your computer. After uninstalling the drivers, restart your computer to complete the removal process.
- Install the new drivers. Locate the downloaded driver files and run the installer. Follow the on-screen instructions to install the new drivers for your video card.
- Restart your computer again. Once the installation is complete, restart your computer to apply the changes.
- Test your monitor. After the computer restarts, check if your monitor is now displaying correctly. If the issue persists, try repeating the process with different driver versions or seek further assistance from the manufacturer’s support.
By updating or reinstalling the drivers for your video card, you can often resolve issues related to your monitor not displaying. Remember, it is essential to identify the correct driver versions for your video card and follow the proper process to update or reinstall them.
Using Built-in Diagnostics
If you’re experiencing issues with your monitor not displaying, one of the most effective troubleshooting methods is to use the built-in diagnostics available on your computer. These diagnostics can help identify and resolve potential hardware or software problems related to your monitor’s display.
On-board Monitor Diagnostics
Many monitors come with built-in diagnostic tools that can assist in troubleshooting display issues. To access these diagnostics, follow these steps:
- First, turn off your computer and monitor.
- Check the monitor’s user manual or manufacturer’s website for instructions on accessing the diagnostics menu. This is usually done by pressing a specific key combination on your keyboard or using buttons on the monitor itself.
- Once you’re in the diagnostics menu, run the appropriate tests for your specific issue. These tests may include checking for dead pixels, verifying color accuracy, or testing for connectivity problems.
- Follow the on-screen instructions provided by the diagnostics software. This may include adjusting settings, running calibration routines, or performing other troubleshooting steps.
- After completing the diagnostics, restart your computer and check if the display issue has been resolved.
Motherboard/cpu/gpu Stress Tests
In some cases, the issue may be related to hardware components such as the motherboard, CPU, or GPU. Running stress tests on these components can help identify potential issues that may be affecting the monitor’s display. Here’s how you can perform these stress tests:
- Download and install a reliable stress testing software such as Prime95 or FurMark.
- Run the stress test program and select the appropriate stress testing options for your system’s components.
- Allow the stress test to run for a significant period of time to ensure that any potential issues are detected.
- Monitor the temperature and performance statistics during the stress test to identify any abnormalities.
- If any issues are detected, consult the documentation or contact the manufacturer of your motherboard, CPU, or GPU for further assistance.
By utilizing the on-board monitor diagnostics and performing stress tests on your hardware components, you can effectively troubleshoot and resolve most monitor display issues. If the problem persists, it’s recommended to consult a professional technician for further assistance.
How To Fix Monitor Not Displaying: Hardware Solutions
If your monitor is not displaying, start by troubleshooting the hardware. Check the cables, graphics card, and power supply. If these are not the issues, try a different monitor or display cord.
Testing With A Different Video Card
If you’re experiencing a monitor not displaying any image or a black screen, it could be due to a faulty video card. To troubleshoot this issue, follow these steps:
- Turn off your computer and unplug it from the power source.
- Open the computer case and locate the video card.
- Remove the video card from its slot and carefully insert a different video card into the slot.
- Connect the monitor to the new video card and power on the computer.
If the monitor displays the image with the new video card, it indicates a problem with the previous video card. Consider replacing the faulty video card to resolve the issue.
Swapping Out Ram Sticks
Faulty or incompatible RAM sticks can also cause issues with the monitor not displaying anything. Here’s how you can check and fix this problem:
- Power off your computer and unplug it.
- Open the computer case and locate the RAM sticks.
- Remove the RAM sticks one by one and reseat them firmly into their slots.
- Power on the computer and check if the monitor displays the image.
If the monitor starts displaying, it indicates that one of the RAM sticks was either loose or faulty. Replace the faulty RAM stick or contact a technician for further assistance.
Checking For Motherboard Issues
In some cases, motherboard issues can also result in a monitor not displaying anything. To diagnose and fix this problem, follow these steps:
- Turn off the computer and unplug it.
- Open the computer case and locate the motherboard.
- Check for any visible signs of damage like burnt capacitors or loose connections.
- Remove the motherboard from the case and inspect it carefully.
- If there are any visible issues, consider contacting a professional technician to repair or replace the motherboard.
By following these hardware troubleshooting steps, you can identify and fix common issues that cause a monitor not to display anything. If the problem persists, it’s recommended to consult a professional technician for further assistance.
Bios/uefi Settings Check
If you’re experiencing issues with your computer monitor not displaying anything, it’s time to perform a BIOS/UEFI settings check. The BIOS (Basic Input/Output System) or UEFI (Unified Extensible Firmware Interface) settings control various hardware configurations on your computer, including the display settings. By navigating the BIOS/UEFI and checking the display configurations, you can troubleshoot and resolve any issues preventing your monitor from displaying properly.
Navigating Bios/uefi For Display Configurations
When it comes to troubleshooting display issues, understanding how to navigate the BIOS/UEFI settings is essential. Follow these steps to access the settings:
- Restart your computer and press the designated key to enter the BIOS/UEFI. The key to access the settings may vary depending on your computer manufacturer. Common keys include F2, Del, or Esc.
- Once inside the BIOS/UEFI, look for the “Display” or “Video” section. The exact location may differ depending on your BIOS/UEFI version.
- In the “Display” or “Video” section, you will find options related to screen resolution, refresh rate, and multi-monitor support.
- Make sure the display settings are configured correctly for your monitor. If you are unsure about the optimal settings, you can reset them to default, which we will discuss in the next section.
Resetting To Default Settings
If your monitor is still not displaying after checking the BIOS/UEFI settings, resetting to default settings can help resolve any configuration-related issues. Follow these steps to reset the settings:
- Within the BIOS/UEFI settings, locate the option to reset to default settings. This option is usually labeled as “Reset to Default,” “Load Optimal Defaults,” or something similar.
- Select the option and confirm the reset. Keep in mind that resetting to default settings may change other configurations in the BIOS/UEFI as well.
- Save the changes and exit the BIOS/UEFI. Your computer will restart, and the default settings will be applied.
After resetting the BIOS/UEFI settings, check if your monitor is now displaying properly. If the issue persists, further troubleshooting may be required, such as checking cables, testing with a different monitor, or seeking professional assistance. Remember to document your previous BIOS/UEFI settings before making any changes, as this will help you revert back if necessary.
Systematic Component Verification
To fix monitor not displaying issues, start with basic hardware troubleshooting. Check if the monitor, video, and motherboard are working properly, ensure the power supply is not faulty, and try resetting the UEFI/BIOS or using a different port on the graphics card.
If these steps don’t work, try using a new monitor or a different display cord. If the problem persists, it may be due to faulty cables, incorrect display configuration, or other hardware issues.
Method For Checking Peripheral Component Integrity
When troubleshooting a monitor that is not displaying properly, it’s important to systematically verify the integrity of the peripheral components. This involves checking each component individually to identify any potential issues. Here’s a step-by-step method for checking peripheral component integrity:- Check the monitor cables: Start by inspecting the cables that connect the monitor to the computer. Make sure they are securely connected and not damaged.
- Test the monitor on another device: Connect the monitor to another device, such as a laptop or another computer, to see if it displays properly. This will help determine if the issue lies with the monitor or the computer.
- Inspect the graphics card: If the monitor displays properly on another device, the issue may be with the computer’s graphics card. Check if the graphics card is properly seated in the motherboard and inspect it for any visible damage.
- Ensure proper power supply: Check the power supply unit (PSU) to ensure it is functioning correctly. Ensure that all power connections are secure and there are no loose cables. If possible, test the PSU with another monitor to see if it provides adequate power.
- Verify RAM and GPU: Faulty RAM or a malfunctioning graphics processing unit (GPU) can also result in monitor display issues. Remove and reseat the RAM sticks and the GPU to ensure they are properly connected.
Troubleshooting Steps For Power Supply Units
One common cause of a monitor not displaying is a faulty or insufficient power supply. To troubleshoot power supply units (PSUs), follow these steps:- Check power connections: Ensure that the power cord is securely connected to both the PSU and the wall outlet. Wiggle the cord slightly to check for any loose connections.
- Test the wall outlet: Plug another electronic device into the same wall outlet to verify if it is providing power. If the device powers on, the wall outlet is working fine.
- Use a different power cable: If possible, try using a different power cable to connect the PSU to the wall outlet. Sometimes, a faulty cable can prevent the PSU from supplying adequate power.
- Remove and reconnect cables: Disconnect and then reconnect all cables connected to the PSU. This includes both the main power cable and any additional peripheral power cables.
- Test with a different PSU: If all else fails, try using a different PSU to power the computer. This will help determine if the issue is with the original PSU or another component of the system.
Frequently Asked Questions On How To Fix Monitor Not Displaying
Why Is My Monitor On But Not Displaying?
The main reasons your monitor may be on but not displaying are damaged or loose cables, incorrect display configuration, faulty GPU or RAM, incorrect BIOS settings, faulty peripheral devices, or a damaged power supply. Try checking and adjusting these components to fix the issue.
Why Is My External Monitor Not Displaying?
There are several reasons why your external monitor may not be displaying: 1. Damaged or loosely connected cables. 2. Incorrect display configuration. 3. Faulty or problematic GPU or RAM. 4. Incorrect BIOS configuration. 5. Faulty peripheral devices or damaged PSU (Power Supply Unit).
Ensure all cables are properly connected, check display settings, and troubleshoot hardware components if necessary.
Why Isn’t My Monitor Being Detected?
If your monitor is not being detected, try these troubleshooting steps: 1. Check if the monitor is powered on. 2. Restart the computer to refresh the connection. 3. Make sure the correct input port is selected in the monitor’s controls.
4. Verify the signal cable connection between the display and the graphics card. If the issue persists, consider seeking professional repair assistance.
How Do I Get My Monitor To Work Again?
To get your monitor working again, follow these steps: 1. Check all cables and connections. 2. Restart your computer to refresh the connection. 3. Make sure the monitor is powered on. 4. Choose the correct input port on the monitor’s controls.
5. If these steps don’t work, try troubleshooting or contacting technical support.
Conclusion
Troubleshooting a monitor that is not displaying can be a frustrating experience, but there are several steps you can take to resolve the issue. Start by checking the basic hardware connections and power supply. If those are not the problem, try resetting the UEFI/BIOS or using a different port on the graphics card.
If all else fails, consider testing with a new monitor or display cord. Remember to also check for loose or faulty cables and ensure correct display configuration. By following these steps, you can hopefully get your monitor back to working properly and enjoy a seamless viewing experience.