Is Your Monitor Working? How to Check and Troubleshoot
To check if your monitor is working or not, simply turn it on and verify that the power light is illuminated. This indicates that the monitor is powered on and functioning properly.
Additionally, you can also check the cable connections, adjust the brightness and contrast settings, and connect a different working monitor to troubleshoot any display issues. It’s important to ensure that the power cord is securely connected and that the monitor is properly configured in your computer’s settings.
By following these steps, you can determine whether your monitor is working or if further troubleshooting is needed.
‘is Your Monitor Working?’ Basic Checks
To check if your monitor is working or not, start by turning it on and checking if the power light is illuminated. Ensure that the power and cable connections are secure, and adjust the brightness and contrast settings. You can also try connecting a different working monitor to troubleshoot the issue.
If there is no display visible on the screen and it’s completely black or blank, it is likely that your monitor is turned off or not functioning properly. Double-check the power cord and cable connections, and consider testing the monitor on another computer to determine if it is working or not.
Remember to consult the user manual or seek professional assistance if needed.
Confirm Power Light Indication
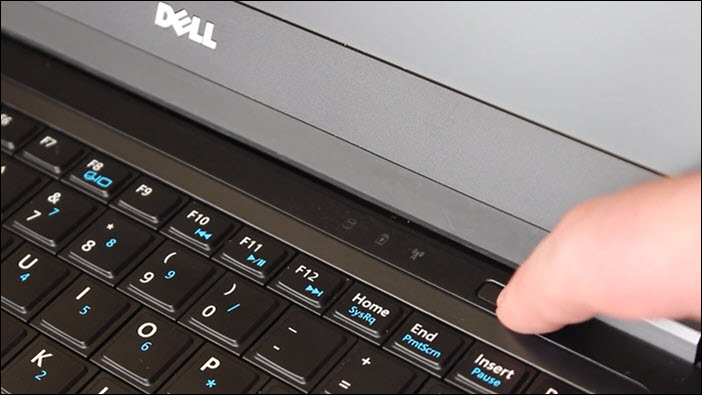
To determine if your monitor is working or not, the first step is to check the power light indication. Make sure your monitor is turned on by checking if the power light is lit. The power light is usually located on the front or side of the monitor and can be blue, green, or orange, depending on the brand and model. If the power light is off or not lit, ensure that the monitor is properly plugged into a power source and try turning it on again.
Assess Cable Connections Integrity
Another basic check to perform is assessing the integrity of the cable connections. Start by inspecting the cable that connects your monitor to the computer. Check if it is securely plugged into both the monitor and the computer, ensuring a snug fit. If the cable is loose or disconnected, reconnect it firmly and check if the monitor starts displaying.
If the issue persists, try using a different cable to rule out cable damage as the cause of the problem. Sometimes, cables can become frayed or damaged, resulting in a poor connection or no display at all. By using a different cable, you can determine if the issue lies with the cable itself.
Evaluate Brightness And Contrast Settings
Adjusting the brightness and contrast settings of your monitor can also help determine if it is working properly. On the monitor’s control panel, locate the buttons or menu options that allow you to adjust these settings. Increase the brightness and contrast settings to their maximum levels and observe if the display becomes more visible.
If the display remains dark or has no improvement, it may indicate a problem with the monitor itself. However, if the display becomes visible after adjusting the brightness and contrast settings, the issue could be related to incorrect settings rather than a malfunctioning monitor.
Performing these basic checks can help you troubleshoot and determine whether your monitor is working or not. Remember to ensure the power light is indicated, inspect cable connections for integrity, and evaluate brightness and contrast settings. By following these steps, you can effectively diagnose and resolve common monitor issues.
Visual Inspection Techniques
When it comes to troubleshooting monitor issues, one of the first steps you should take is a visual inspection. This allows you to identify any physical damages or signs of overheating that may be affecting the functionality of your monitor. In this section, we will discuss two essential visual inspection techniques to determine whether your monitor is working or not.
Inspect For Physical Damages
Physical damages can significantly impact the performance of your monitor. Therefore, it is crucial to thoroughly inspect the device for any signs of physical harm. Here’s what you need to do:
- Examine the monitor’s exterior for any cracks, scratches, or dents.
- Check the bezel and screen for any signs of damage, such as discoloration or dead pixels.
- Inspect the ports and connectors for any bent or broken pins.
If you notice any physical damages, it is recommended to seek professional assistance for repair or replacement.
Look For Signs Of Overheating
Overheating can cause various issues with your monitor, including flickering, distorted images, or complete malfunction. Therefore, it is essential to check for signs of overheating. Here are some steps to follow:
- Ensure that the monitor has proper ventilation and is not placed in a closed or confined space.
- Check if the cooling fan on the back or sides of the monitor is functioning correctly. Make sure it is not blocked or obstructed by any objects.
- Feel the back of the monitor for excessive heat. If it feels unusually hot, it may indicate an overheating problem.
If you suspect your monitor is overheating, it is recommended to turn it off and allow it to cool down before further use. Additionally, you may want to consult a technician for a more in-depth diagnosis and potential solutions.
By following these visual inspection techniques, you can quickly determine if your monitor is working or not. Remember to address any physical damages or signs of overheating promptly to ensure the optimal performance of your monitor.
Using Software To Check Monitor Status
When it comes to checking if your monitor is working or not, using software can be a helpful and efficient method. By utilizing the operating system display settings, employing third-party diagnostic tools, and considering graphics card management software, you can easily assess the status of your monitor.
Utilize Operating System Display Settings
To begin with, you can start by utilizing the display settings provided by your operating system. These settings allow you to configure various aspects of your monitor, such as resolution, brightness, and color calibration. By adjusting these settings, you can ensure that your monitor is displaying visuals correctly.
Employ Third-party Diagnostic Tools
If you want to dive deeper into checking the working status of your monitor, you can employ third-party diagnostic tools. These tools are specifically designed to provide comprehensive information about your monitor’s performance. They can analyze parameters like refresh rate, response time, and pixel quality, giving you a detailed overview of any potential issues.
Consider Graphics Card Management Software
Furthermore, considering graphics card management software can also be beneficial when checking your monitor’s status. These software applications allow you to monitor the performance of your graphics card and make adjustments accordingly. By analyzing GPU temperature, fan speed, and power consumption, you can ensure that your graphics card is functioning optimally, which in turn affects the display quality on your monitor.
By utilizing operating system display settings, employing third-party diagnostic tools, and considering graphics card management software, you can effectively check the working status of your monitor. These software-based methods provide you with valuable insights and control over your monitor’s performance, ensuring that you can enjoy a seamless and visually appealing experience.
Credit: www.dell.com
Check And Troubleshoot With Alternative Equipment
When you encounter issues with your monitor and suspect it may not be working properly, it’s important to perform thorough troubleshooting to identify the root cause. One effective strategy is to check and troubleshoot with alternative equipment. By connecting to another working monitor, using different cables and input sources, and switching between integrated and dedicated graphics, you can narrow down the issue and find a possible solution.
Connect To Another Working Monitor
If your monitor isn’t displaying any image or appears to be malfunctioning, a simple way to test its functionality is by connecting it to another working monitor. By doing so, you can determine whether the problem lies with your monitor or if it’s related to other components of your system.
Use Different Cables And Input Sources
To eliminate the possibility of faulty cables or input sources causing the issue, try using different cables and input sources. Swap out the cables connecting your monitor to the computer, ensuring they are securely plugged in. Additionally, switch to different input sources, such as HDMI, VGA, or DisplayPort, to see if the problem persists. This will help identify any cable or input-related problems that may be affecting your monitor’s functionality.
Switch Between Integrated And Dedicated Graphics
If you have a computer with both integrated and dedicated graphics options, it’s worth checking if the issue lies with the graphics settings. Start by switching between integrated and dedicated graphics, if applicable, to see if the problem is resolved. Some systems may require you to change the graphics settings in the BIOS or through dedicated software. By doing so, you can determine if the issue is related to the specific graphics hardware in use.
By following these troubleshooting steps, you can effectively check and troubleshoot your monitor issues using alternative equipment. Remember to test your monitor with another working monitor, use different cables and input sources, and switch between integrated and dedicated graphics. This will help you identify the root cause of the problem and find a suitable solution.
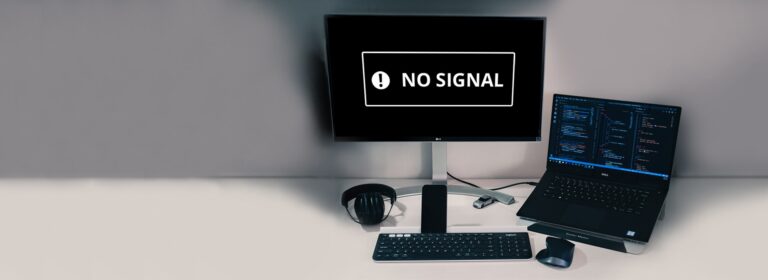
Fixing No Display Or Black Screen
Encountering a black screen or no display on your monitor can be frustrating, but fear not, as there are several troubleshooting steps you can take to resolve this issue. In this article, we will guide you through some methodical tests and adjustments to help you get your monitor up and running again.
Methodically Test Power Supply And Cables
If your monitor isn’t displaying anything, the first thing you need to check is the power supply and cables. Follow these steps:
- Ensure the power cable is securely connected to both the monitor and the power outlet.
- Check if the power light on the monitor is turned on. Look for a blue, green, or orange light on the front or the back of the monitor.
- If the power light is off, try connecting the monitor to a different power outlet.
- Inspect the cable connecting the monitor to the computer. Make sure it is properly plugged in and not damaged. If necessary, replace the cable with a known working one.
- Connect the monitor to a different computer or laptop to see if it works. This will help determine if the issue lies with the monitor or the computer.
Adjust Monitor’s Display Settings
In some cases, the issue may be related to the monitor’s display settings. Follow these steps to adjust the settings:
- Turn on the monitor and access the menu settings. The method to access the menu may vary depending on the monitor model, so refer to the user manual.
- Locate the brightness and contrast settings and set them to the maximum level.
- If the monitor has a color calibration option, make sure it is set to default or factory settings.
- Save the changes and exit the menu settings.
Reset And Update Monitor Drivers
If the above steps didn’t resolve the issue, try resetting and updating the monitor drivers. Follow these steps:
- Press the Windows key + X on your keyboard and select Device Manager from the menu.
- Expand the Display adapters category and right-click on the monitor driver.
- Select Uninstall device and follow the on-screen instructions to uninstall the driver.
- Once the driver is uninstalled, restart your computer.
- After the restart, the driver should automatically reinstall. If not, visit the manufacturer’s website and download the latest driver for your specific monitor model.
- Install the downloaded driver and restart your computer once again.
By following these methodical steps, you can effectively troubleshoot and fix the black screen or no display issue on your monitor. Remember to test the power supply and cables, adjust the display settings, and reset/update the monitor drivers. If the issue persists, it may be necessary to seek professional assistance or consider replacing the monitor.
Rectifying Distorted Or Incorrect Displays
To check if your monitor is working, make sure it is powered on by checking the power light. Also, ensure that all power and cable connections are secure. If the screen is completely black or blank, it may be a sign that the monitor is turned off or not working.
Try connecting it to another computer to test if it is functioning properly.
Correct Resolution And Refresh Rate Misconfigurations
One common cause of distorted or incorrect displays on a monitor is incorrect resolution and refresh rate settings. This can result in fuzzy or stretched images, as well as flickering screens. To rectify this issue, follow these steps:
- Right-click on the desktop and select “Display settings”.
- Under the “Display” tab, check the resolution and adjust it to the recommended setting for your monitor.
- Click on the “Advanced display settings” link and ensure that the refresh rate is set to the recommended value.
- If necessary, experiment with different resolutions and refresh rates until you find the optimal settings for your monitor.
Calibrate Color And Screen Position Settings
In addition to resolution and refresh rate, incorrect color and screen position settings can also cause distorted displays. Follow these steps to calibrate these settings:
- Access the monitor’s on-screen display (OSD) menu by using the buttons located on the monitor itself.
- Navigate to the color settings and adjust the brightness, contrast, and color temperature to your preference.
- Next, navigate to the screen position settings and ensure that the image is centered and properly aligned.
- Save your changes and exit the OSD menu.
Troubleshoot Potential Graphics Card Problems
If the above steps do not resolve the distorted or incorrect display, it is possible that there may be an issue with the graphics card. To troubleshoot this problem, follow these steps:
- Update the graphics card driver to the latest version. You can do this by visiting the manufacturer’s website and downloading the driver.
- Open the device manager on your computer and expand the “Display adapters” category.
- Right-click on the graphics card and select “Update driver”. Choose the option to search for the driver automatically.
- If the driver update does not work, try uninstalling and reinstalling the graphics card driver completely.
- If none of these steps resolve the issue, it may be necessary to replace the graphics card.
Frequently Asked Questions For How To Check Monitor Is Working Or Not
How Do You Test If A Monitor Is Working?
To test if a monitor is working, turn it on and check if the power light is on. Confirm cable connections and adjust brightness and contrast settings. You can also try connecting a different working monitor to your computer. If the screen is black or blank, the monitor may be turned off or faulty.
How Do You Tell If Your Monitor Is Broken?
To check if your monitor is broken, follow these steps: 1. Turn on the monitor and check if the power light is on. 2. Verify that the monitor is connected properly to the power source and the computer. 3. Adjust the brightness and contrast settings on the monitor.
4. Connect a different working monitor to your computer to test if the issue is with the monitor itself. If these steps don’t help, your monitor may need to be repaired or replaced.
Why Is My Computer Monitor Not Displaying?
The primary reason for a computer monitor not displaying is likely damaged or loosely connected cables. Other possible causes include incorrect display configuration, faulty GPU or RAM, incorrect BIOS settings, faulty peripheral devices, or a damaged PSU. Check all connections and configurations to resolve the issue.
How Can I Check My Monitor?
To check if your monitor is working, follow these steps: 1. Turn on the monitor and check the power light. 2. Verify the monitor’s power cable is connected securely. 3. Check for a blue, green, or orange light indicating power. 4.
Connect the monitor to another computer to test if it works. 5. Double-check that the cable is plugged in firmly at both ends.
Conclusion
To conclude, checking if a monitor is working or not can be easily done by following a few simple steps. Firstly, ensure that the power light is turned on. Next, check the power and cable connections, and adjust the brightness and contrast settings.
If the issue persists, try connecting a different working monitor. Furthermore, if the screen appears completely black or blank, it indicates that the monitor may be turned off. Checking the power cord and making sure it’s firmly plugged in can also help resolve any display issues.
Lastly, testing the monitor on another computer can help determine if it’s functioning properly. By following these tips, you can troubleshoot and resolve monitor-related problems.